Bitlocker is basically a drive encryption tool that allows you to protect your drive against any system or firmware unauthorized access. Normally, you need a computer system with TPM to execute Bitlocker drive encryption. If you try to open it without a TPM, your computer system will tell you that the administrator needs to set a system policy option. In this article, we will discuss how to allow Bitlocker without a compatible TPM in Windows 10.
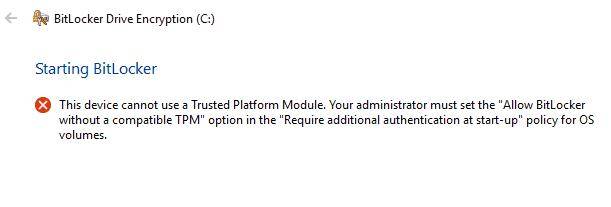
Part 1: What Is TPM (Trusted Platform Module)
Before heading towards the methods, let's find out what TPM exactly is. TPM, or Trusted Platform Module, is a microchip on your computer's motherboard that generates and stores the Bitlocker encryption keys. When you log on to your Windows during start-up, it automatically unlocks the encrypted drive. If someone tries to tamper with your PC or remove the drive, it will not decrypt without the TPM key. Likewise, the TPM key will not work if it is moved to another computer as well.
Some computers come with an in-built TPM microchip, while others need it to be added later. However, if your computer does not support one, you will need to enable Bitlocker without a compatible TPM. Although it is less secure, it is still better than nothing.
Part 2: How to Enable Bitlocker Without TPM
Ideally, it is recommended that you should install a TPM chip in your computer system and use Bitlocker. However, if you are unable to do so, don’t worry. There is a way that you can try to enable Bitlocker without a compatible TPM. To do this, you will need to reconfigure the default settings in Bitlocker. In this way, you can store the encryption keys on a separate removable device that needs to be inserted every time you boot your computer. You can do this in three easy steps:
- Step 1: Configure Settings in Group Policy to Enable Bitlocker Without TPM.
- Step 2: Apply the Group Policy Changes to Take Effect.
- Step 3: Set Up Bitlocker on Computer.
Note: Make sure to update your BIOS to the latest version before doing this. Your Bitlocker may take time to complete the encryption process. The time duration will depend on the size of the drive and the amount of data.
Step 1: Configure Settings in Group Policy to Enable Bitlocker Without TPM
In the first step, we will configure the group policy setting to enable Bitlocker without a compatible TPM. To do this, you have to:
1. Click on the Windows icon on the bottom-left corner of your computer screen. This will open the Start menu.
2. In the search bar, type gpedit.msc and press Enter.
3. Select Group Policy Object Editor from the search results to open it.
4. From the left pane, locate Computer Configuration. Under that, double-click on Administrative Templates to expand it. The subfolders under Administrative Templates will appear.
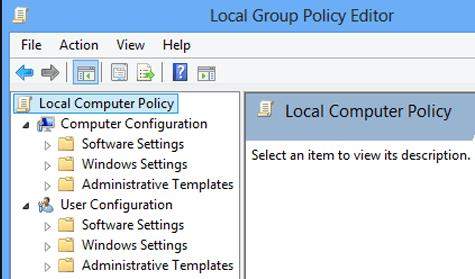
5. Now, double-click on Windows Components.
6. From there, select Bitlocker Drive Encryption.
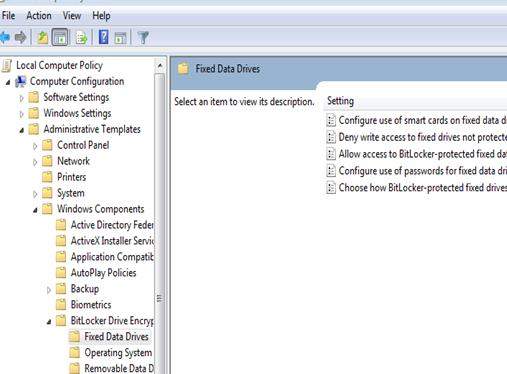
7. Now, click on Operating System Drives. A list of settings will appear on your right pane.
8. From there, double-click on Require additional authentication at start-up. A window box will appear.
9. Since the default settings of the "Require additional authentication at start-up" are not configured, thus we need to enable them. To do this, simply click on Enable. The rest of the options will be enabled automatically. Now, simply press OK and close the Group Policy Object Editor.
Step 2. Apply the Group Policy Changes to Take Effect
After that, we need to apply the group policy changes through the gpupdate.exe /force command. To do this, you have to:
1. Type CMD in the search box from the Start button, right click on Command Prompt and choose Run as administrator.
2. Type gpupdate.exe /force into the search bar and press Enter. The process might take a few minutes. Once it is complete, the group policy changes will be applied.

Step 3. Set Up Bitlocker on Computer
Lastly, you need to enable the Bitlocker Drive Encryption with a removable storage drive or a USB Flash drive. To do this, you have to:
1. Press the Windows key from your keyboard to open the Start menu. Type Control Panel in the search bar and hit Enter.
2. From here, select System and Security and click on Bitlocker Drive Encryption.
3. To enable Bitlocker for a drive, click Turn on Bitlocker.
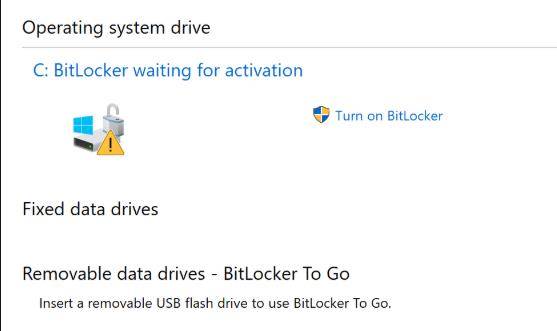
4. The start-up preference page for Bitlocker start-up will appear. Follow the on-screen instruction to prepare your drive for Bitlocker.
5. After that, it will ask you how you want to unlock your drive during start-up. You can either choose Enter a Password or Insert a USB Flash Drive. If you choose the former, you will need to enter a password every time you start your computer. However, with the latter, you'll need to insert the USB drive every time your PC boots in order to access your files.
6. Select Enter a Password And set a start-up password.
7. After that, Bitlocker will ask you to make a recovery key. Select Save to USB Flash Drive.
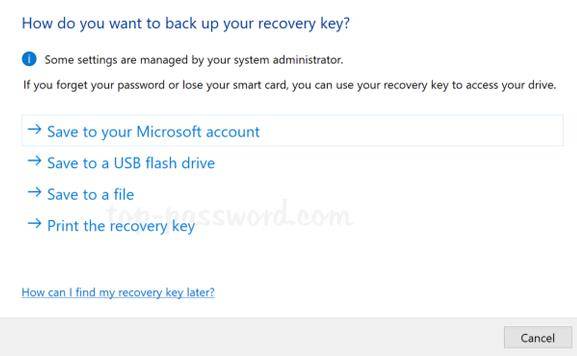
8. Now, follow the on-screen instructions to enable the Bitlocker Driver Encryption.
Summary
Typically, Bitlocker requires a computer system with a compatible Trusted Platform Module (TPM). However, in some cases, you may need to allow Bitlocker without a compatible TPM. That is why this article provides you with a step-by-step on how to allow/enable Bitlocker without a compatible TPM in your Windows 10. In case you forget your Windows password, you can easily recover your Windows password through PassFab 4WinKey. And with that, I bid you all a Farewell and a Good Luck!
