The question of how to convert CSV to Excel is pretty commonly asked by several users. In this article, you will know about the easy and quick ways to convert a CSV file into an Excel file. You will learn how to do this in a single workbook of Excel. Additionally, this article will also detail the ways to tackle the common problems that arise while doing this.
One such common problem is when the CSV file is not displaying correctly within the Excel sheet’s columns. The problem of transferring data from a CSV file to an Excel file can be pretty annoying. Often there are people who attempt to carry out such an operation and end up with a lot of problems and errors. By following the ways mentioned in this article you can avoid such issues while converting a CSV file to Excel.
Part 1: Is it Possible to Convert CSV to Excel?
There are many situations wherein you may want to convert CSV to Excel. For instance the user may want to password protect a particular important file. In that case, they will have to convert the file to Excel as the password protection feature is not supported by CSV files. Also, there may be cases when you need to use some Excel functions, VBA coding and make summaries which is only possible in Excel and not in CSV. When the data set is large, reading it on Excel is much more simpler than reading it on CSV. Due to this and many other reasons a user may wish to convert CSV to Excel. This conversion can be made in several ways. A few such ways are described below.
Part 2. How to Convert CSV to Excel
The most easy ways and quick ways in which you can convert CSV to Excel are detailed below.
Solution 1: Convert CSV to Excel via “From Text”
This is one of the easiest ways to convert CSV to Excel. If you want to make the conversion via Data, follow the steps given below.
- Step 1: Download the CSV file that you want to convert to Excel and save it in the preferred location.
- Step 2: Launch Excel and select a blank workbook
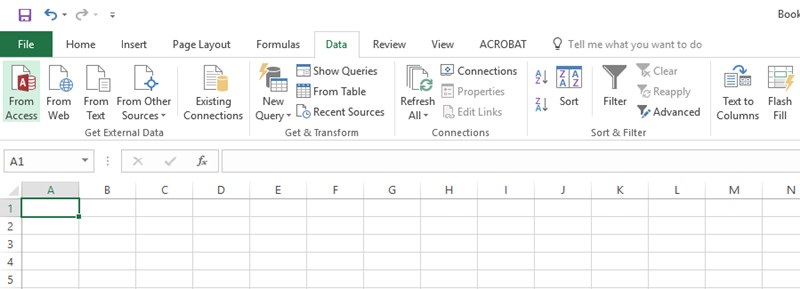
Step 3: From the options available at the top, click on “Data” and then on “From Text”.

- Step 4: Select the CSV file that you want to convert and click on “Import”.
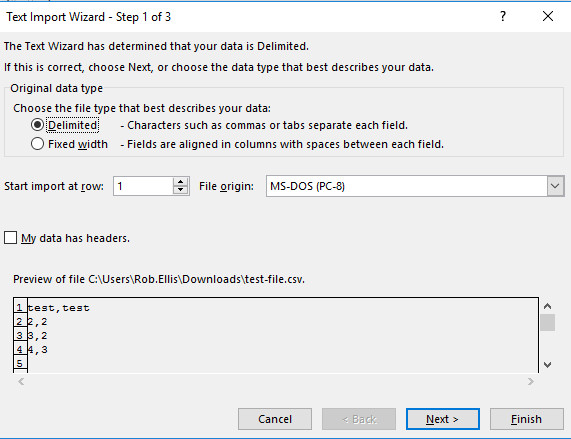
Step 5: Once the Text Import Wizard pops up, select the “Delimited” option and then click on “Next”.

Step 6: From the section of “Delimiters”, tick the box in front of “Comma” and then click on “Next”.

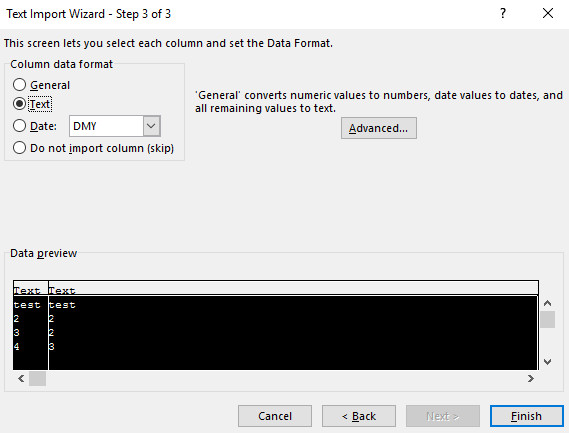
Step 7: Highlight all the columns, select “Text” and then click on “Finish”.

- Step 8: When asked, “Where do you want to put the data?”, click on a cell in the Excel worksheet and click on “OK”.
This is one way to perform Excel import CSV.
Solution 2: Excel Import CSV via “Get & Transform Data”
You can also try out this method to import the CSV file to the Excel sheet. Follow the steps below to do this.
- Step 1: Launch Excel, from the options available at the top, click on “Data”.
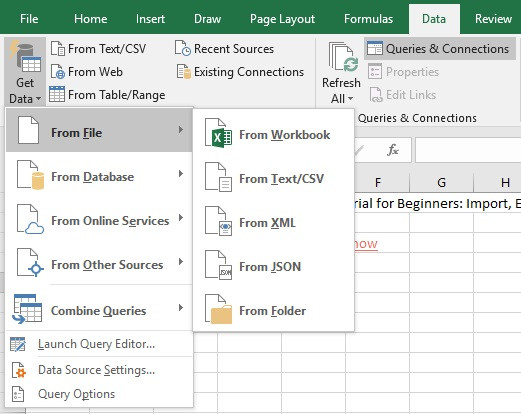
Step 2: Click on “Get & Transform Data” and then on “From Text/CSV”.

- Step 3: Select “Transform Data” to load the data in the CSV file to Power Query. You can edit this prior to bringing it into the Excel sheet.
This way you can open your CSV file in Excel.
Solution 3: Open CSV in Excel via File
If the above method does not seem to work, you can try to open the CSV file in Excel via the “File” option. You can do this by following the steps given below.
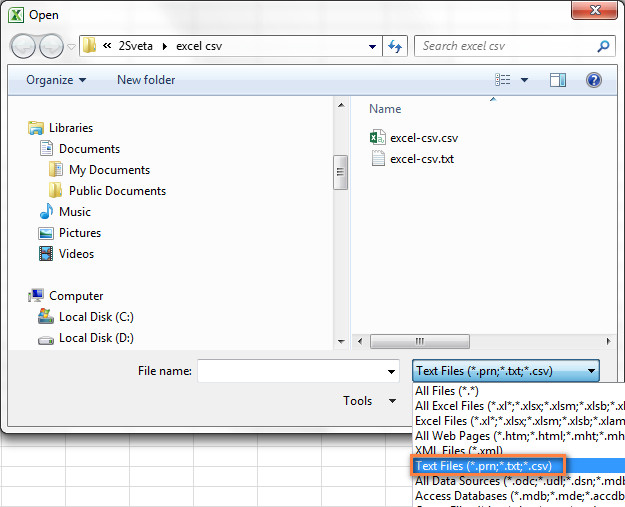
- Step 1: From the “File” option in Excel sheet, click on “Open”.
Step 2: From the drop down menu at the bottom, select “Text Files (*.prn;*.txt;*.csv)”.

- Step 3: Select the CSV file that you wish to open and it will appear on the Excel worksheet.
This is another simple method to convert CSV file to Excel.
Solution 4: Convert CSV to Excel Online
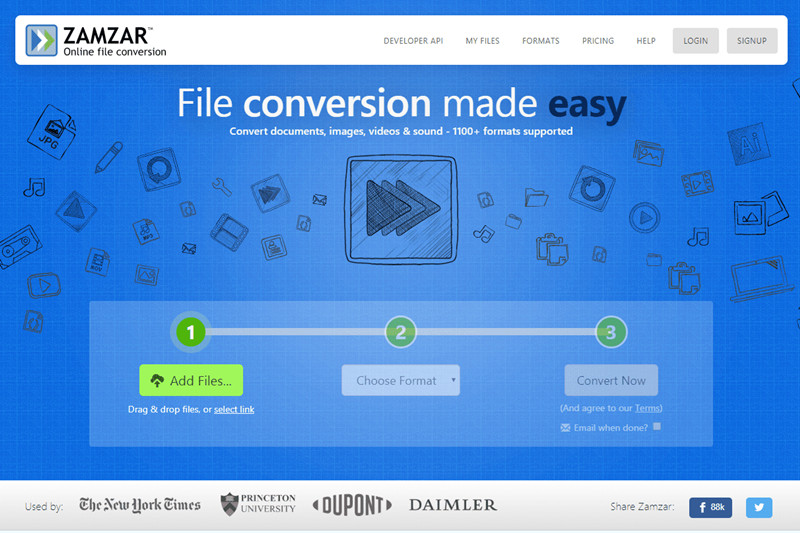
You can also use some online services to make the conversion of a CSV to Excel online. There are a few websites like the ones mentioned below which offer such a service.
https://www.zamzar.com/convert/csv-to-xls/
https://convertio.co/csv-xlsx/

In such websites, all you need to do is upload the document in “.csv” format and then once the software or tool on the website converts the file to Excel format, you can download the file.
Part 3. How to Convert Excel to CSV
90% people prefer CSV over Excel because many programs and applications support CSV file. Few people give first priority to CSV because its format diagnoses the problems with data immediately. As we all knows very well that CSV file is a plain text and 70% users understand it without any learning curve. Few people mostly ask us a question that is it possible to convert Excel to CSV? So a big YES to all those, now it becomes easier to convert files to CSV. Just go through the below Article and start converting your files.
- Solution 1: Save Excel as CSV via “Save as” in Excel
- Solution 2: Excel Export to CSV UTF-8 or UTF-16
- Solution 3: Convert Excel to CSV File via Google Sheets
- Solution 4: Convert Excel to CSV via Open Office
- Solution 5: Convert Excel to CSV Online
Solution 1: Save Excel as CSV via “Save as” in Excel
Now Excel export to CSV is no more difficult, this solution is really good to follow. Best part about converting Excel to CSV is that when uploading contacts it completely reduces the chance of import errors.
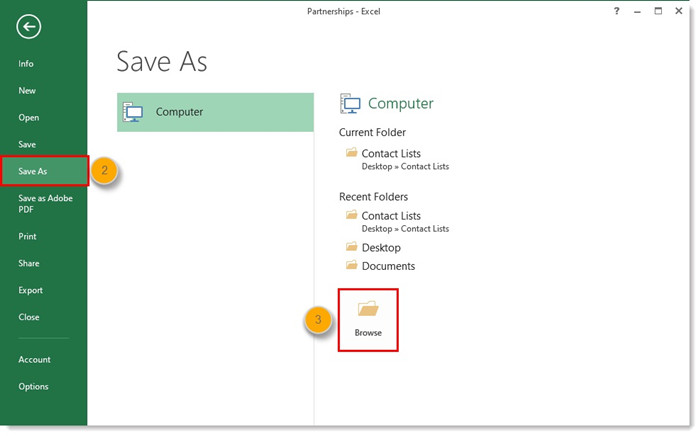
Step 1: First you need to Open Excel and then click File.

Step 2: Now you need to click Save as and then click Browse to save your output file.

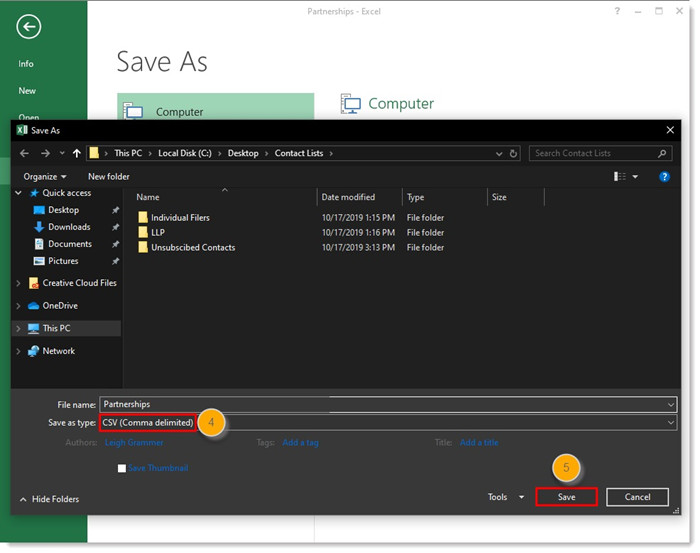
- Step 3: Now simply choose CSV from Save as type.
Step 4: At the end click Save, finally file is converted.

The drawback of using above method is that if your file contains special symbols like foreign characters then above solution won’t work so continue to below solution if you want to convert Excel to CSV online.
Solution 2: Excel Export to CSV UTF-8 or UTF-16
This solution is best if your file is very complicated like if your Excel file contains small quotes or dashes then these characters will not be mangled at all and you will not loses the content originality.
Excel Export to CSV via UTF-8
- Step 1: Open the Excel sheet and navigate to File and then Save as.
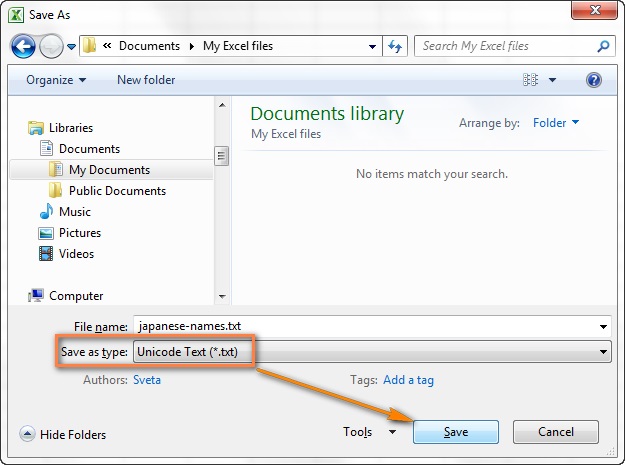
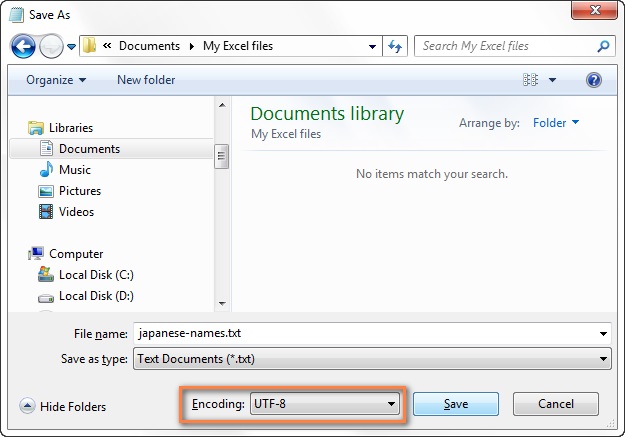
Step 2: Now you have to assign a name to your file and select Unicode Text (*.txt) and hit Save.

- Step 3: Now open the Unicode .txt file in Notepad.
- Step 4: Now you have to click File and then Save as enter a File name and then navigate to Encoding to UTF-8.
Step 5: Hit Save button.

- Step 6: This is almost the end, simply go to Windows Explorer and change the file extension to .txt to .csv.
Excel Export to CSV via UTF-16
Exporting Excel to CSV is easier and quick because while saving a file as Unicode (.txt), Excel automatically employs the UTF-16.
- Step 1: Choose File.
- Step 2: Now choose Save as in Excel.
- Step 3: Now you have to select the file format Unicode Text (*.txt).
- Step 4: After that you have to change the file extension to .CSV in Windows Explorer. Finally it’s done.
Solution 3: Convert Excel to CSV File via Google Sheets
It is the most popular solution to convert Excel to CSV online because it is time savvy and web based online solution.
- Step 1: First you need to go to Google Drive Screen.
- Step 2: Now click New and then File Upload.
Step 3: After file uploading Open it.

- Step 4: After file opening, you have to click File.
- Step 5: Now go to Download as and choose Comma Separated Values (.csv). Finally the file will be downloaded as .csv format.
Solution 4: Convert Excel to CSV via Open Office
Benefit of this software is that if you do not have access to Excel then Open Office can play an important role in Excel file conversion to CSV.
- Step 1: First you have to open Open Office.
- Step 2: Now open the Excel file here.
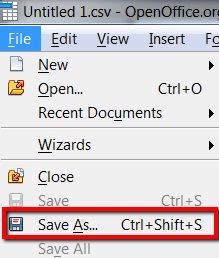
Step 3: Now hit File and choose Save as.

- Step 4: Now assign a name to your file and Save your type as CSV and then hit Save.
Solution 5: Convert Excel to CSV Online
This online converter is one of the best converters so far.
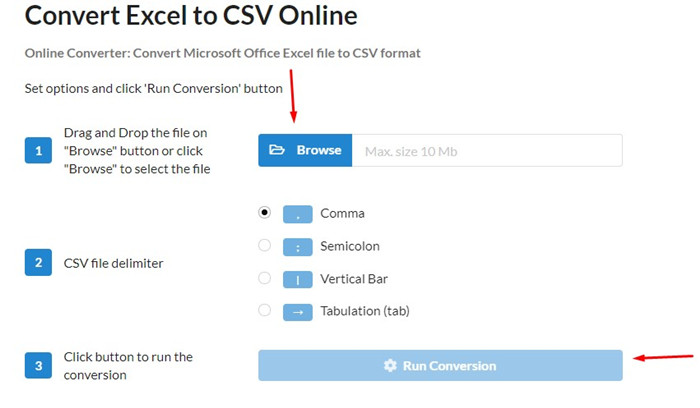
- Step 1: Simply upload the file from Browse button.
- Step 2: Now you have to select CSV file delimiter according to your file requirement.
Step 3: At the end simply click the Run Conversion button.

Extra Tips: How to Unlock Lost Excel Workbook Password
While carrying out the above conversion, if you lock the Excel workbook and forget the password, it can be pretty annoying for you. In such a case, you can make use of PassFab for Excel tool and unlock the lost excel workbook password easily. This is an excellent tool that has been specifically developed for dealing with the common issues faced by the users while using Excel. Here is how you can unlock a lost Excel workbook password with the help of this tool.
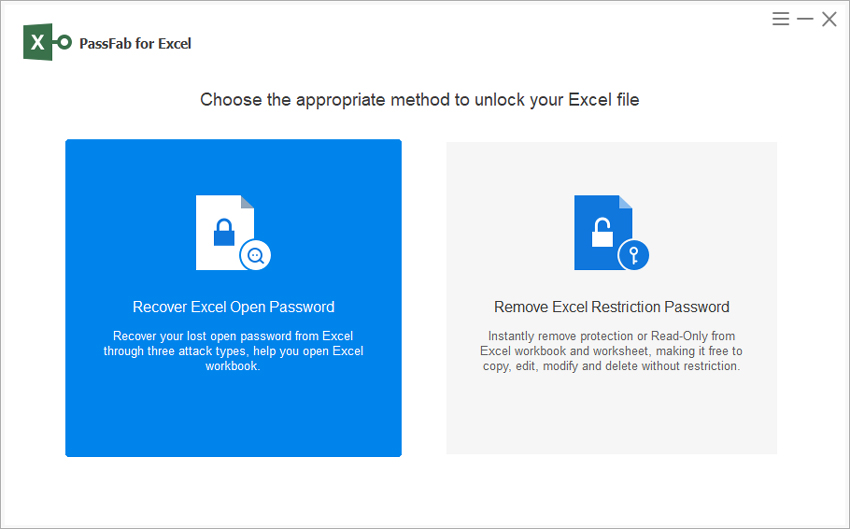
Step 1: Once you download this tool on your system, launch it and click on “Recover Excel Open Password” from the main interface.
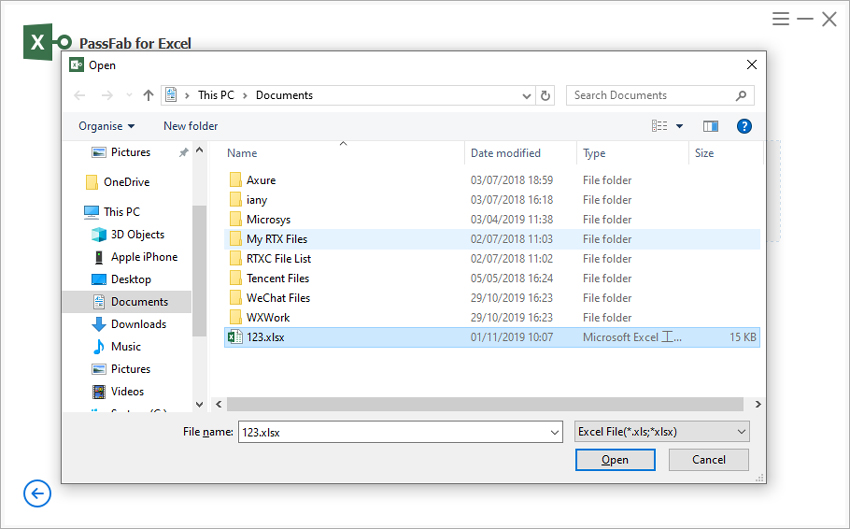
Step 2: Click on “+” icon and select the Excel file that you wish to unlock.
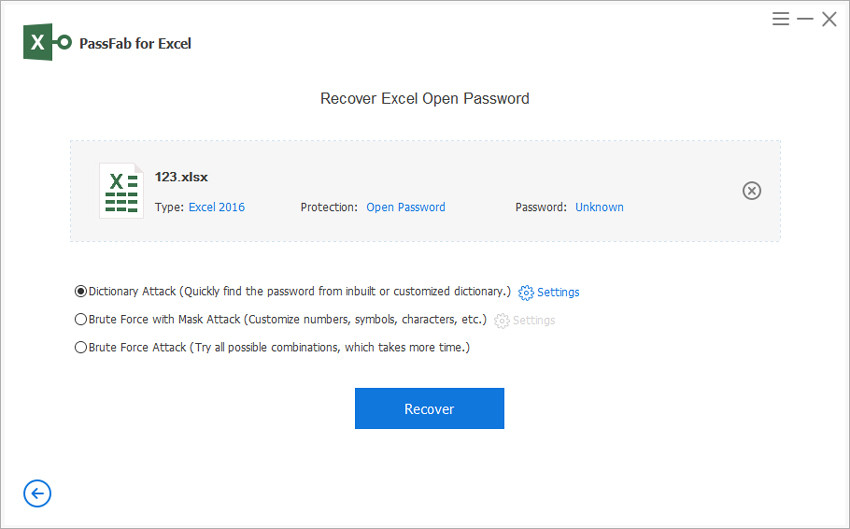
Step 3: You can pick “Dictionary Attack” if you know what passwords which you have previously used for the Excel worksheet, select “Brute Force with Mask Attack” if you know a few clues about what the password might be or click on “Brute Force Attack” if you have absolutely no idea what the password of the Excel sheet is.
Step 4: Once you make the preferred selection to find the password, click on “Recover”.
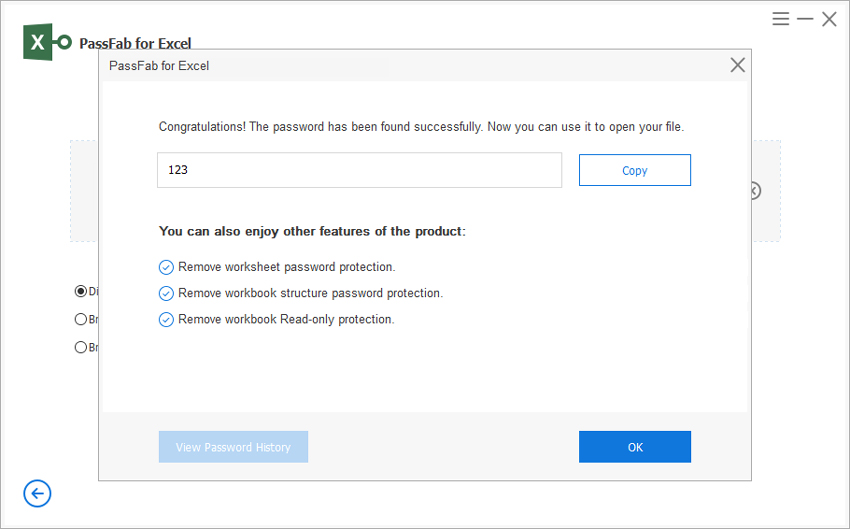
Step 5: Once the process is completed, you can click on the “Copy” option to copy the recovered password of the Excel sheet.
This way you no longer have to fret when you lose or forget the password of your Excel worksheet by mistake. By the way, here is a video tutorial about how to use it step by step:
Summary
You may want to convert the CSV file to Excel file due to many reasons. The most simplest and quickest ways to convert a CSV file to Excel are described in detail in this article. By using these methods you can easily convert a CSV file to Excel. After doing so, if in case you lose or forget the password for the Excel file, you can make use of PassFab for Excel, the best Excel password remover and recovery tool to unlock the lost or forgotten password.
