Irrespective of the kind of computer you use (Mac or Windows), Excel files are the part and parcel of your life. As they keep everything organized from your grocery list to crucial data at work, locking the Excel workbook becomes essential. People across the globe use Excel, starting from personal use to Govt. institutes, business houses, corporate offices and so on. When you lock the Excel worksheet you are assured that the information is not misused by anyone. Your data or information is well protected from leakage or mishandling.
Through this article we are going to explain how to lock Excel workbook and unlock if they are pre-locked.
Guide on How to Lock Excel Workbook
Well! From the above section, you understood that how vital it is to lock Excel workbooks. In this section we will explain how to password protect your Excel workbook in Excel 2007 and Excel 2016 version. Keep reading.
Excel 2016
Password protecting Excel 2016 is pretty easy. Here is the step-by-step guide to understand how to lock Excel workbook with password.
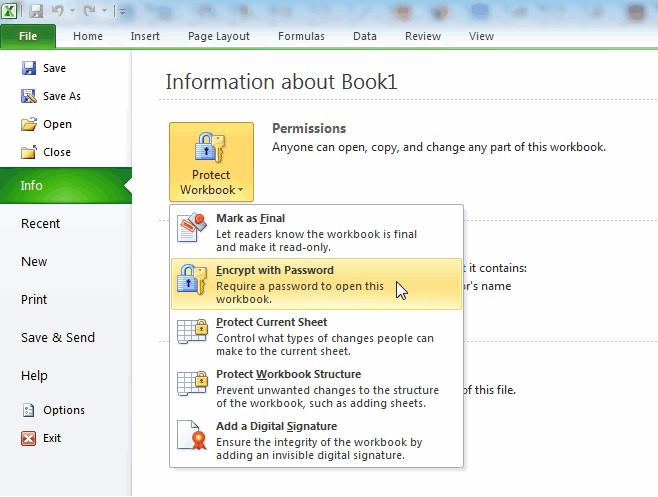
1. First of all, you need to open the Excel document that you have decided to password protect. Now, hit ‘File’ > click ‘Info’ > tap the ‘Protect Workbook’ tab here.
2. Now, you need to tap ‘Encrypt with Password’ tab and then you will be prompted to key in a password.

3. Make sure to enter a password that you can remember, as losing it might force you to get locked away from the data. Enter the password now and close the document. Now your Excel shared workbook is locked securely.
Note: You will be able to protect one document at a time using this process. You can always cross check whether a document has been ocked or not under the ‘Info’ tab. Every time you want to access the file, you will be prompted to enter the password.
Excel 2007
Among the older versions of Excel, Microsoft Excel 2007 is the most reliable one. Here in this section of the article we are going to explain how to lock Excel workbook with password for Excel 2007 version. Let’s get going.
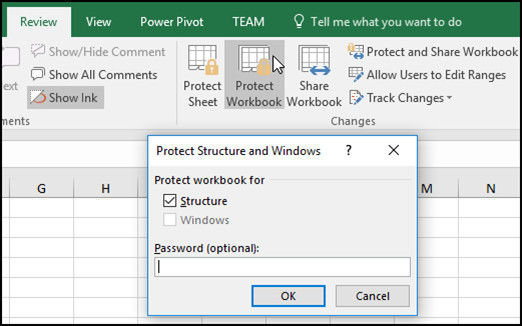
1. Open the desired Excel 2007 workbook on your desktop and hit the ‘Review’ tab > click the ‘Protect Sheet’/’Protect Workbook’ option.

2. There will be a popup window asking about your preferred settings. You need to key in the password here to lock the Excel workbook when being prompted.
You can also lock the Excel workbook from editing, following these steps:
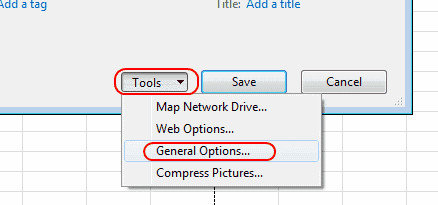
1. You need to open the Excel workbook that you want to password protect and then tap ‘File’ > click ‘Save As’. Proceed to next step now to key in the password when the popup appears asking for file name.
2. After that the drop down menu shows a list, pick ‘Tools’ from there > select ‘General Options’.


Note: By this method your Excel workbook will be password protected and null the chance of unauthorized access. You get double layer protection for your Excel document – workbook level and sheet level.
Bonus Tip: How to Unlock Excel file
Well! Now that you are well aware about how to lock your Excel workbook, how about knowing something extra about that? We mean, what if you have forgotten the password you have just set using the above mentioned methods. What will you do about it and how will you unlock the workbook/spreadsheet?
If you have locked the Excel workbook from editing and lost the password, we are happy to bring the solution to you. PassFab for Excel can easily help you to recover any lost Excel password and then you can unlock the sheet/workbook easily. This supports almost all Excel versions to remove and recover the password of a locked or password protected Excel workbook/sheet.
Here is the step-by-step guide to unlock a password protected Excel workbook or spreadsheet.
Step 1: Get the latest version of PassFab for Excel downloaded on your PC. After that launch it and click the ‘Add’ button in the PassFab interface. Find the locked and password forgotten Excel file from your computer and import it for unlocking.

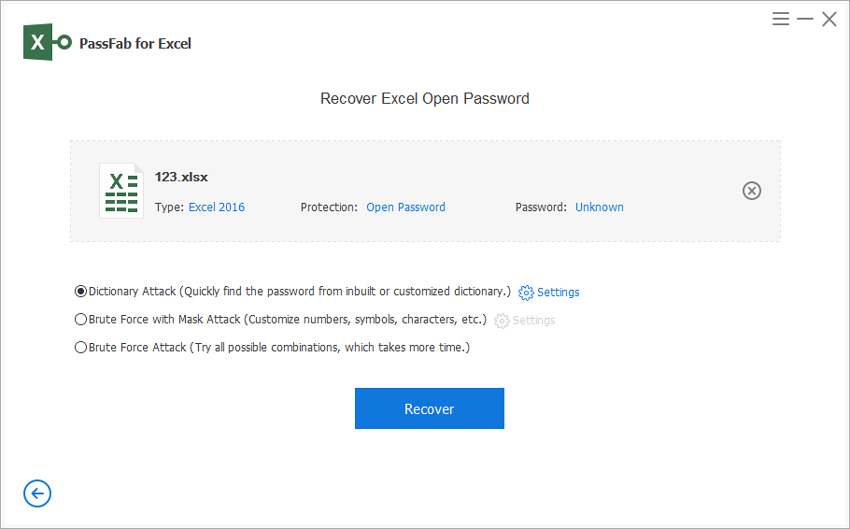
Step 2: Once the file gets imported pick the right password attack type from under the ‘Select a Password Attack Type’ section. Enter the required information under the ‘Settings’ tab against the selected option.
- Dictionary Attack – A password dictionary already exists to provide you the password.
- Brute-force Attack (default Excel spreadsheet password recovery option) – searches the password by verifying all the characters one by one.
- Brute-force with Mask Attack – verifies the customize symbols, characters, and numbers for providing the password, when you remember a part of the password.

Step 3: Click the ‘Start’ button, as soon as you enter the settings and options in the previous step. The password will be recovered now.

Now that the password has been recovered, you can use it to easily unlock the password protected Excel workbook/spreadsheet.
Conclusion
From the above discussion, it is prominent that recovering or unlocking an Excel shared workbook which was locked is not a tough job. When you have the right tool you can easily recover Excel passwords online for Excel 2016 as well. PassFab for Excel can also help you to recover and unlock the Excel sheet/workbook, if the password (both for .xls and .xlsx) becomes unresponsive.
