Microsoft Excel is the most commonly used software for Excel files around the world. So there will always be some files or data that you want to keep secured and uncorrupted. Sometimes you need to share a secured Excel file but you don’t want anyone to edit it without yourself. An excel spreadsheet may contain important data or formulas in the key cells that people doesn’t want to be changed by someone else. You can also question that how secure is Excel password? Actually, it depends on the version of Microsoft Excel that you are using. The more updated version you use, the more security you get. So this article will give you a step by step guide to learn how to secure Excel file.
- Part 1: How to Secure Excel Workbook
- Part 2: How to Secure Excel Sheet
- Part 3: How to Secure Excel Cells
- Bonus Tip - How to Save a Protected Excel File as Unprotected
Part 1: How to Secure Excel Workbook
Securing an Excel workbook is easier than ever. For different versions of Microsoft Excel, the options may be slightly different, but the main thing is still the same. Just follow the below steps to learn how to secure excel workbook file.
For Excel 2010 and above:
1. Open a new blank Microsoft Excel workbook.

2. Go to “File” from the top left corner of the menu, click on “Info” and then click on “Protect Workbook” option from the “Permissions” option.
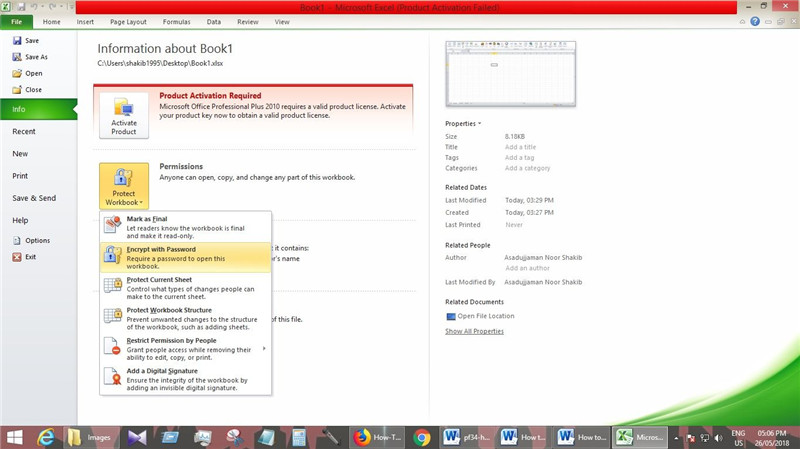
3. You will see a dropdown menu like below and now click on “Encrypt with Password”.
4. Now enter any secure password of your choice which you can remember anytime and press “OK”
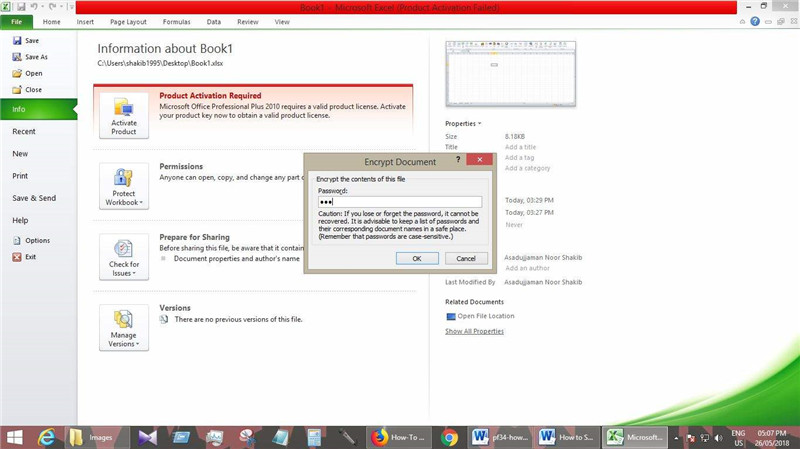
5. Again re-enter the password and then press “OK”, your file is now protected.
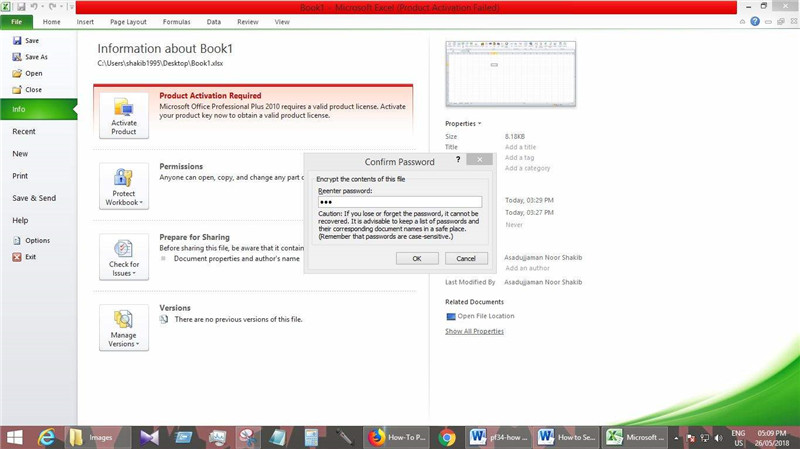
6. Save the file.
Now every time anyone tries to open that Excel workbook file, they will require to enter the password you have set otherwise the file won’t open.
For Excel 2003 and above:
1. Open a new blank Microsoft Excel workbook.
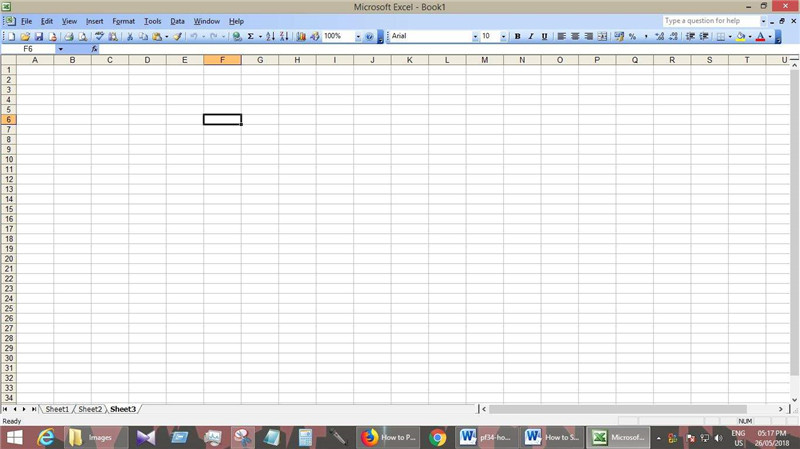
2. Go to “Tools” option from the menu bar and then select “Options…”.
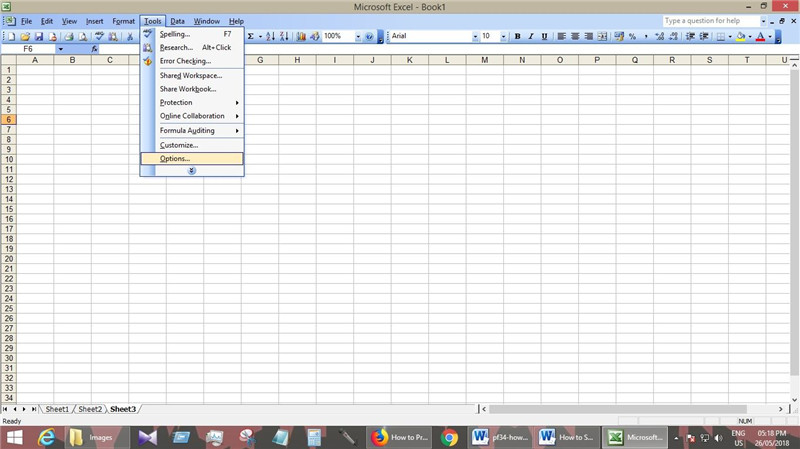
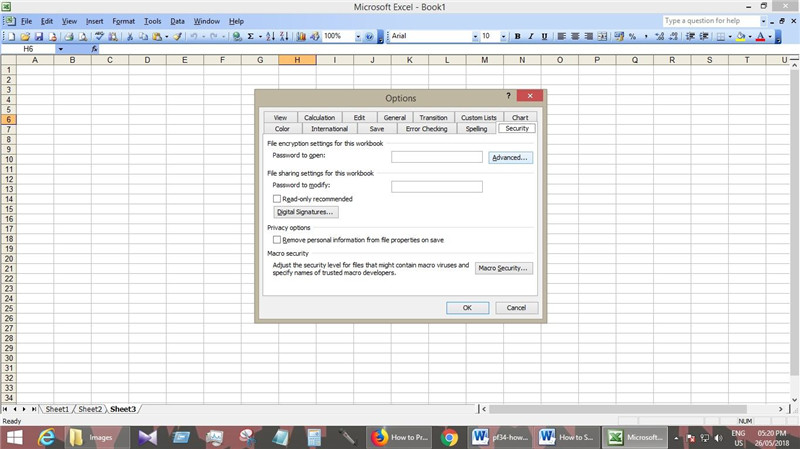
3. Now you will see a new window and you will have to go to the “Security” option from the 13 options presented before you. Then go to “Advanced” option.
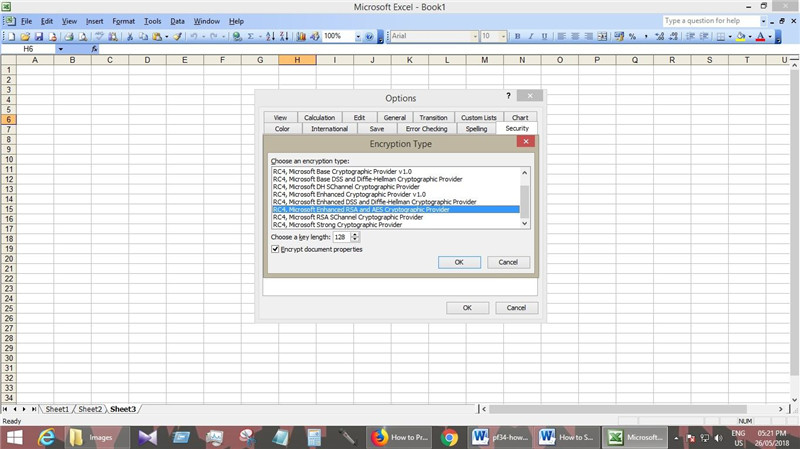
4. From the dropdown menu, you will have to select “RC4, Microsoft Enhanced RSA and AES Cryptographic Provider”. Make sure you check mark the “Encrypt document properties” option and then select “OK” to confirm.
5. Now type in any secure password of your choice and press “OK”.
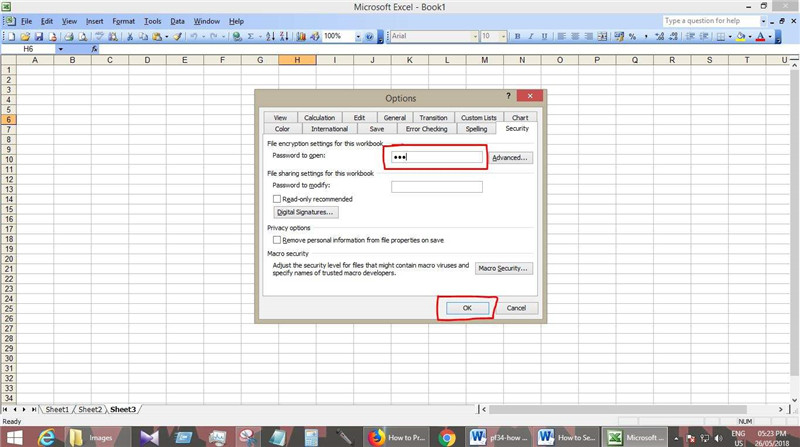
6. Again re-enter the password and press “OK”.
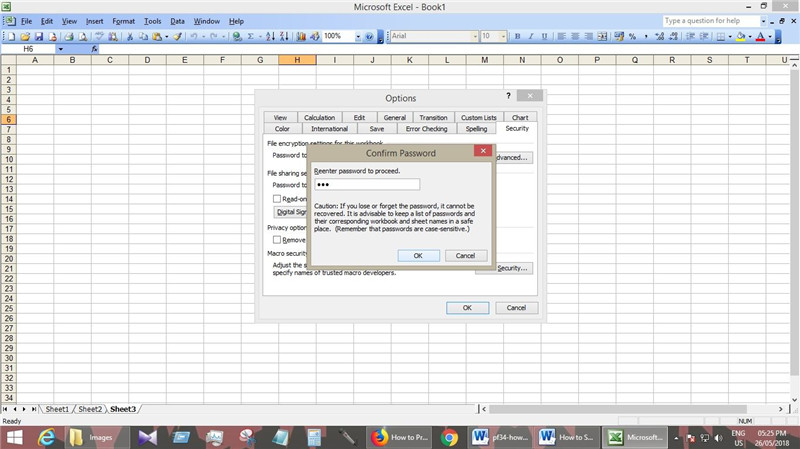
7. Save the file.
Part 2: How to Secure Excel Sheet
Securing Excel sheet is totally different thing then securing an Excel workbook. Follow these steps to learn how to secure excel spreadsheet.
For Excel 2010 and above:
1. Open a blank Excel workbook and go to “Review” option and then select “Protect Workbook” option.

2. Now type in any password of your choice in the small window and press “OK”
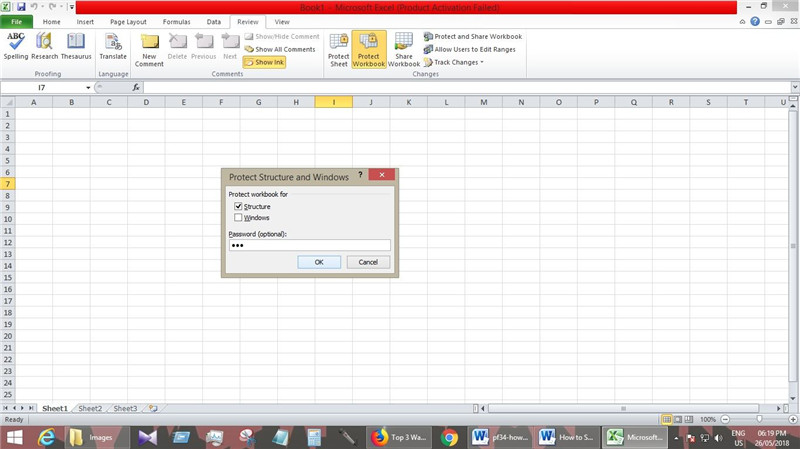
3. Retype the password and click “OK”
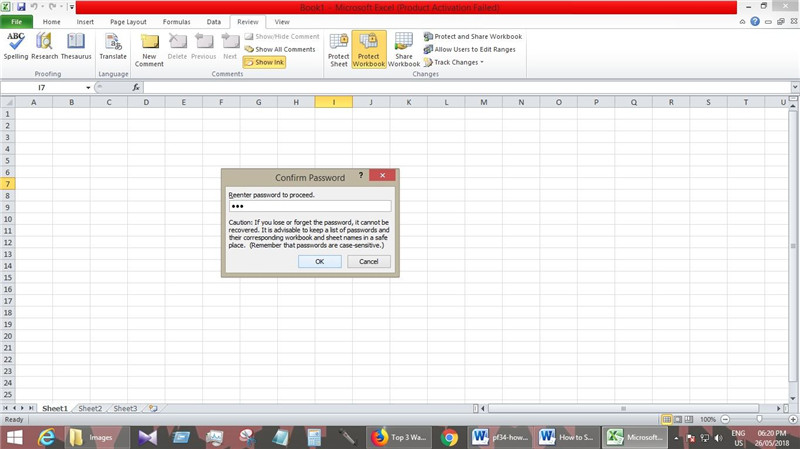
4. Save the file and you will see that you won’t be able to add, edit or delete any sheet from the workbook.
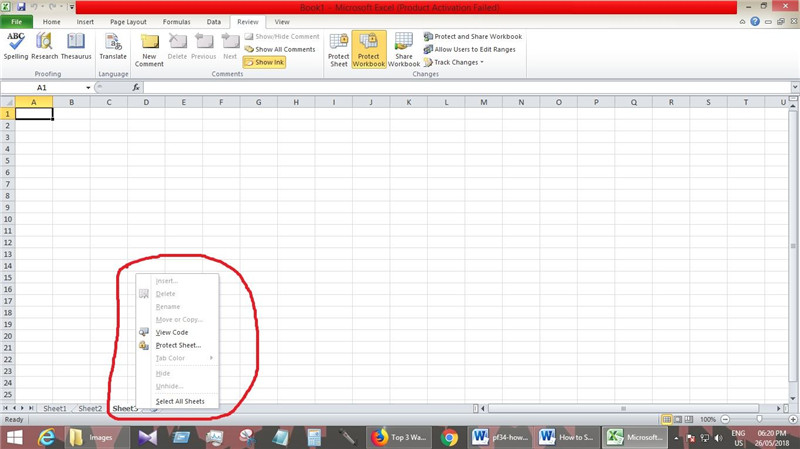
For Excel 2003:
1. Open a blank excel workbook and go to “Tools” option and then select “Protection” option. Now select “Protect Workbook”.
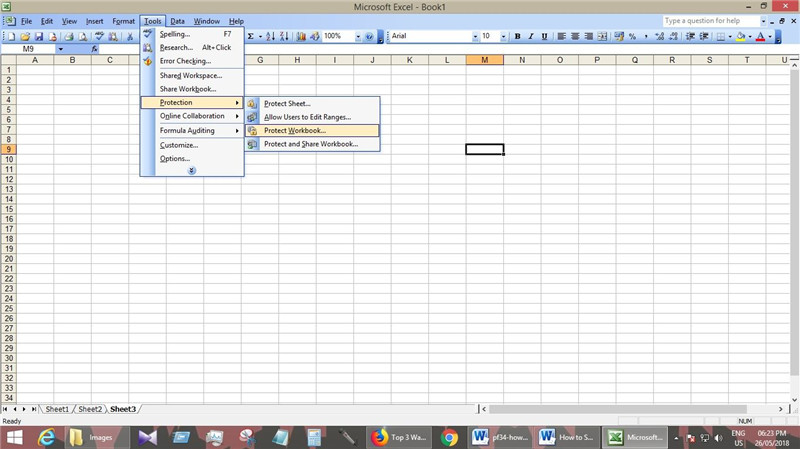
2. Now type in any password of your choice in the small window and press “OK”
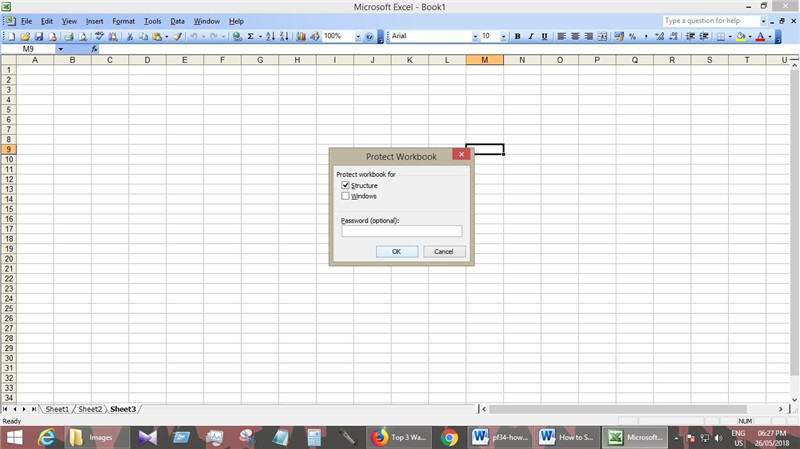
3. Retype the password and click “OK”
4. Save the file and you will see that you won’t be able to add, edit or delete any sheet from the workbook.
Part 3: How to Secure Excel Cells
If you want to secure the cells of your excel file so that no one can edit any data from a spreadsheet, then you should follow the below steps.
For Excel 2010 and above:
1. Open a blank excel workbook and go to “Review” option and then select “Protect Sheet” option.

2. Type in the password of your choice and make sure that both locked and unlocked cell options are tick marked. Now click on “OK”.
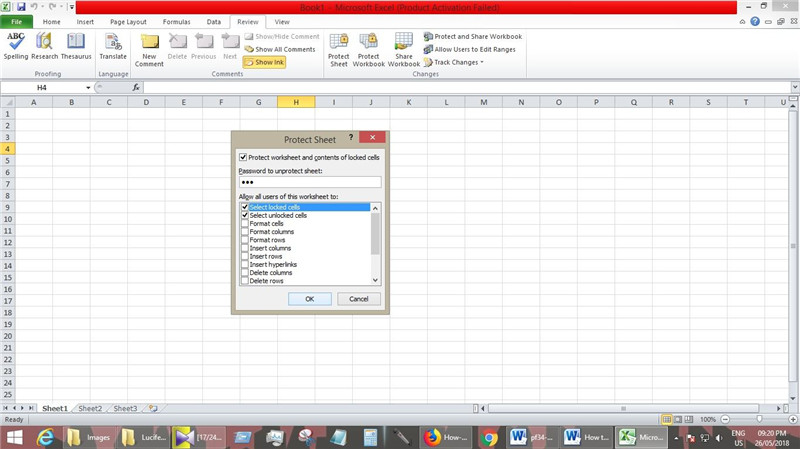
3. Re-enter the password and click “OK”
4. Save the sheet and then nobody will be able to add or edit any cells of that sheet.
For Excel 2003:
1. Open a blank excel workbook and go to “Tools” option, select “Protection” and then click on “Protect Sheet” option.
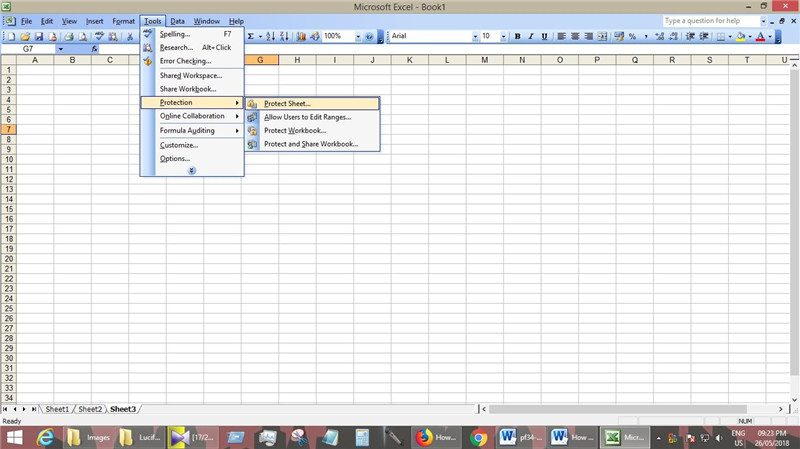
2. Same as before type in the password and then retype it. Finally save it.
Bonus Tip - How to Save a Protected Excel File as Unprotected
A lot of times we forget the password that we used to protect an excel workbook file. This is a common issue so there is always a common solution for a common problem. In this case you can blindly put your trust on PassFab for Excel. It’s the best password cracking software developed by PassFab. It can easily recover your lost password of any Excel file in a short time. How to save a protected Excel File as Unprotected? Here is the deal:
1. Install the Excel Password Recovery software on your PC and launch it to start the process.
2. Add the Excel file and select one decryption method that matches your situation.

3. Click on “Start” and wait till the software decrypts the password. It may take some time depending on your password.

4. You will see a pop up window and get your password.
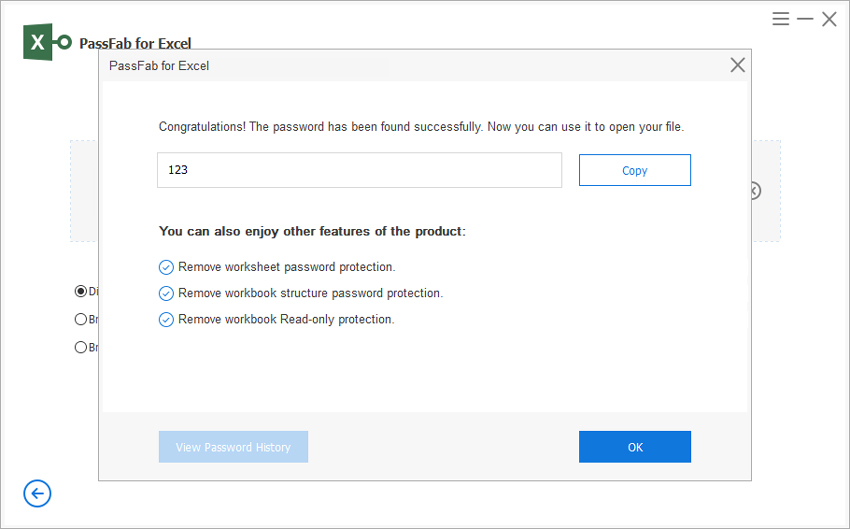
5. Now open your excel workbook file and use the password to unlock it, go to “Review” (or “Tools>Protection” for Excel 2003) and select “Unprotect Workbook” or “Unprotect Worksheet”.
6. Save the file as unprotected.
There can be a lot of reasons for you to protect your Excel workbook or unprotect it. Whatever you want to do, this article will help you understand it all. This is the perfect guide to understand how to secure Excel file easily. Also if you forget the password you can easily crack it using Excel Password Recovery software from PassFab.
