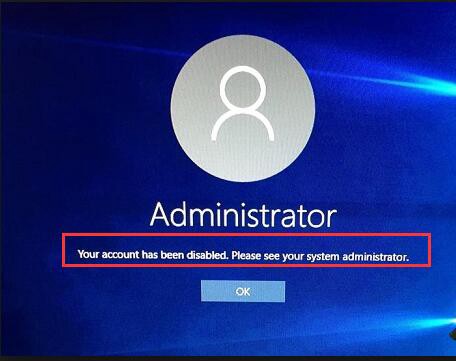
“Your Account has been disabled please see your administrator. What does this mean??” If you are getting; “your account has been disabled please see your system administrator server 2008”, then beware. This is one of the biggest Windows problems, and it completely locks you out of your system. Without specific fixes, it will be impossible for you to access your Windows account. So, if you are getting this error, there are ways to get access again, you can check out the fixes detailed in the article below.
Part 1. Why Does It Keep Saying My Account Has Been Disabled?
‘Your account has been disabled please see your administrator”This particular error locks out users form their Windows accounts completely. It is, a big and genuinely troubling issue and a lot of people, are bothered by it. This error mostly occurs if you have abruptly closed your computer. IT is also happening if you were installing Windows, and before completing the installation, the computer got shut down. So, if you are a bit careful with your computer, you shouldn’t have to face this error. But it happens to be quite a common issue among Windows users. Don’t worry, there are ways to fix this problem, and they are not too difficult.
Part 2. How Do you Fix Your Account Has Been Disabled Please See Your System Administrator?
So, if you are getting; your account has been disabled please see your system administrator Windows 10, you need to use the following fixes to repair the system. The following fixes are simple, but you may struggle with them, so we have listed the necessary details as well.
Fix 1. Enabling the Disabled Account Using lusrmgr.sc
You have to use the ‘lusrmgr.sc’ command to enable the disabled account. But to enable your account using this command, you need to access Windows 10 from another account in Safe Mode. So, after accessing Windows 10 in Safe Mode from another account, follow the steps below.
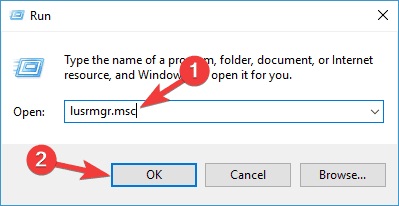
- Step #1: Press ‘Windows + R’ on your keyboard and a dialog box will appear.
- Step #2: Type ‘lusrmgr.sc’ in that box and hit ‘Enter’.

- Step #3: Then, the lusrmgr panel will open. Click ‘Users’ on the left side of the panel, then click on the disabled account on the right side of the panel.

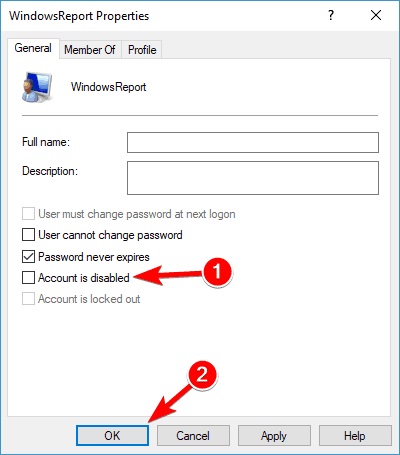
- Step #4: Then, a properties window will appear. Make sure the box beside the ‘Account is Disabled’ option isn’t checked.
- Step #5: Lastly, click ‘Apply’ and then click ‘OK’ to save the changes.

Now, restart your computer. After the restart, you will be able to access your disabled account again.
Fix 2. Activate Administrator Account Using Command Prompt
You can also activate the disabled administrator account using the Command Prompt. This is a bit difficult procedure if you are not used to dealing with the CMD. So, we recommend checking out the steps carefully.
- Step #1: Hold the ‘Shift’ key, while on the login screen. Click on ‘Restart’.
- Step #2: The ‘Advanced Boot’ will open, click on ‘Troubleshoot’. Then, select ‘Advanced Options’ and then click on ‘Command Prompt’.
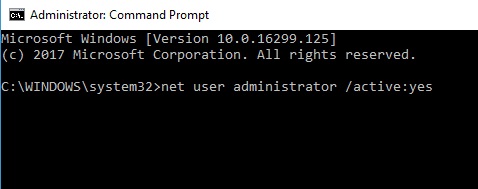
- Step #3: When the CMD panel opens, type the following command and hit ‘Enter’ afterwards:
net user administrator /active:yes
Now, restart your computer and check if you can access the disabled administrator account.
Fix 3. Perform A System Image Restore
In this 3rd fix, we will perform a system image restore to fix; your account has been disabled. Please see your system administrator error. Now, doing a system image restore will not lead to the loss of your files, but it will remove all the updates and installed apps that were installed after the point in time to which you are restoring your system. And you can also perform a system restore without logging in to your user account.
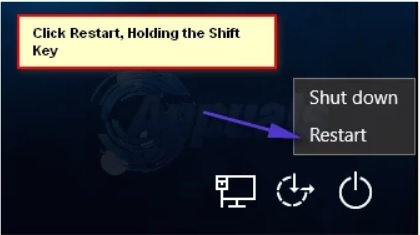
- Step #1: When in the login page, hold the ‘Shift’ key and click on the ‘Power’ button icon on the bottom.
- Step #2: A menu will appear on the screen, click on ‘Restart’. Do everything while holding the ‘Shift’ key.
- Step #3: Release the ‘Shift’ key when the ‘Advanced Recovery Options’ menu appears on the screen.
- Step #4: In the ‘Advanced Recovery options’ menu, select ‘Troubleshooting’ and click on ‘System Image Restore’.
- Step #5: Now, you will get system restore points from which you have to choose one when the said error didn’t bother you.
- Step #6: If a prompt appears to choose an account, click on the account titled ‘Administrator’.
Now, you have to wait for the system image restore to get finished. Once the restore is complete, you will be asked to restart your computer. After the restart, there shouldn’t be any issues.
Fix 4. Reset Your Windows Password Using PassFab 4WinKey
If you are still getting, the account has been disabled please see your administrator error, then we recommend resetting the Windows password. But resetting the Windows password will not be possible without a professional tool. There are several such tools on the internet, but we recommend using PassFab 4WinKey. 4WinKey has an extensive reputation as a reliable tool for resetting Windows password. It implements a simple but effective solution. Let’s check it out.
Part 4.1: Create The Password Reset Disk
In the beginning, you have to create a password reset disk using the 4WinKey. And for that, you have to use a different working computer. After accessing a computer, follow the steps below.
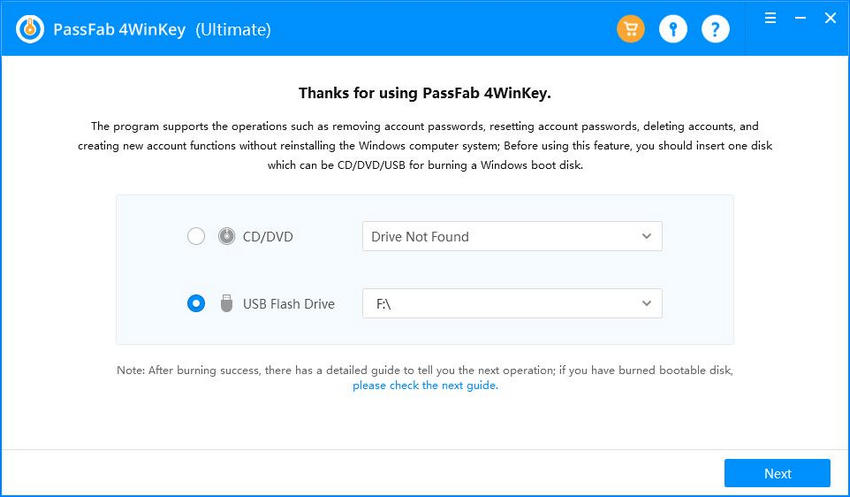
- Step #1: Download and then install 4WinKey on the computer. Launch the program.
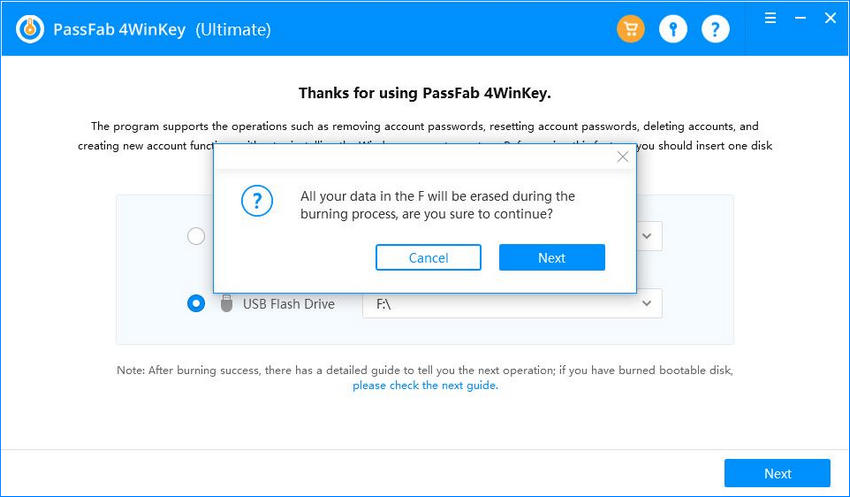
- Step #2: Choose a boot media, USB is preferable. Then, click ‘Next’ to proceed.

- Step #3: The software will prompt that all the data on the USB drive will get erased and it will be formatted. Click ‘Next’ to continue.

- Step #4: The program will immediately start creating a bootable USB drive.

After the disk creating is complete, you will get a notification on the screen. Close the program and disconnect the USB drive.
Part 4.2: Boot Windows From the Bootable USB
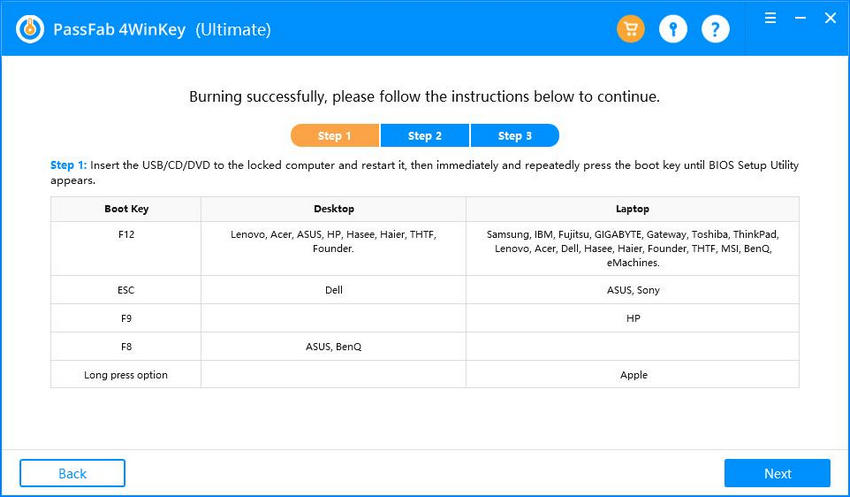
After creating the bootable USB, remove it. Now, connect the said USB drive to the locked computer and restart it, as the computer restarts follow the steps below.
- Step #1: As the computer restarts, start tapping ‘F12’ or ‘ESC’ keys to enter the Boot Menu.

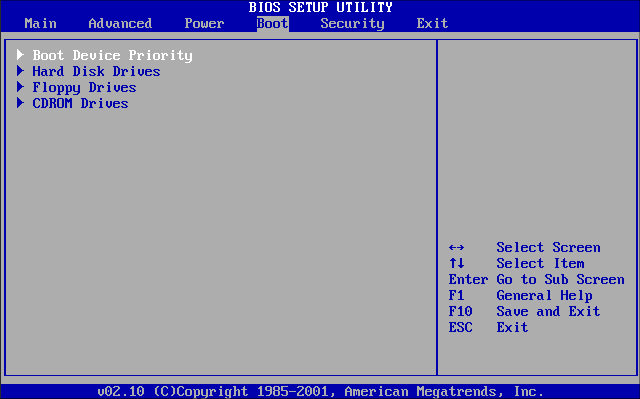
- Step #2: After entering the boot menu successfully, use the ‘Arrow’ keys to make some changes.
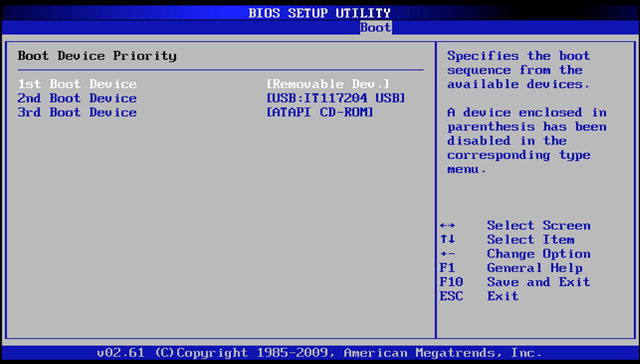
- Step #3: Use the arrow keys to highlight the USB drive and then hit ‘Enter’ to select the boot. Then, just save the changes and exit the Boot menu.

Part 4.3: Reset Windows Password
- Step #1: After you exit the BIOS, the computer will restart.
- Step #2: After the computer starts again, the 4WinKey interface will load.
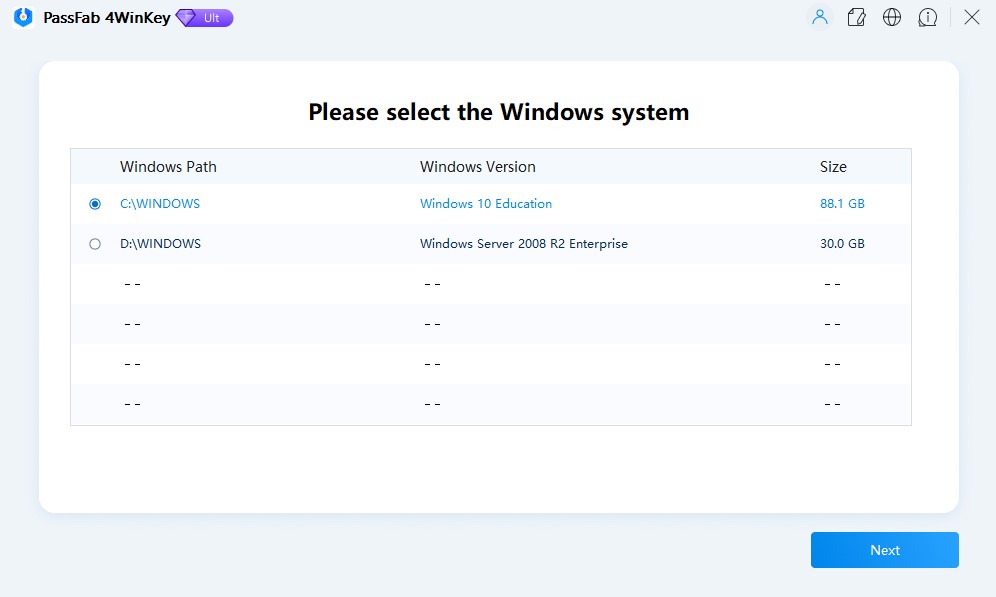
- Step #3: Choose the Windows system and click ‘Next’.

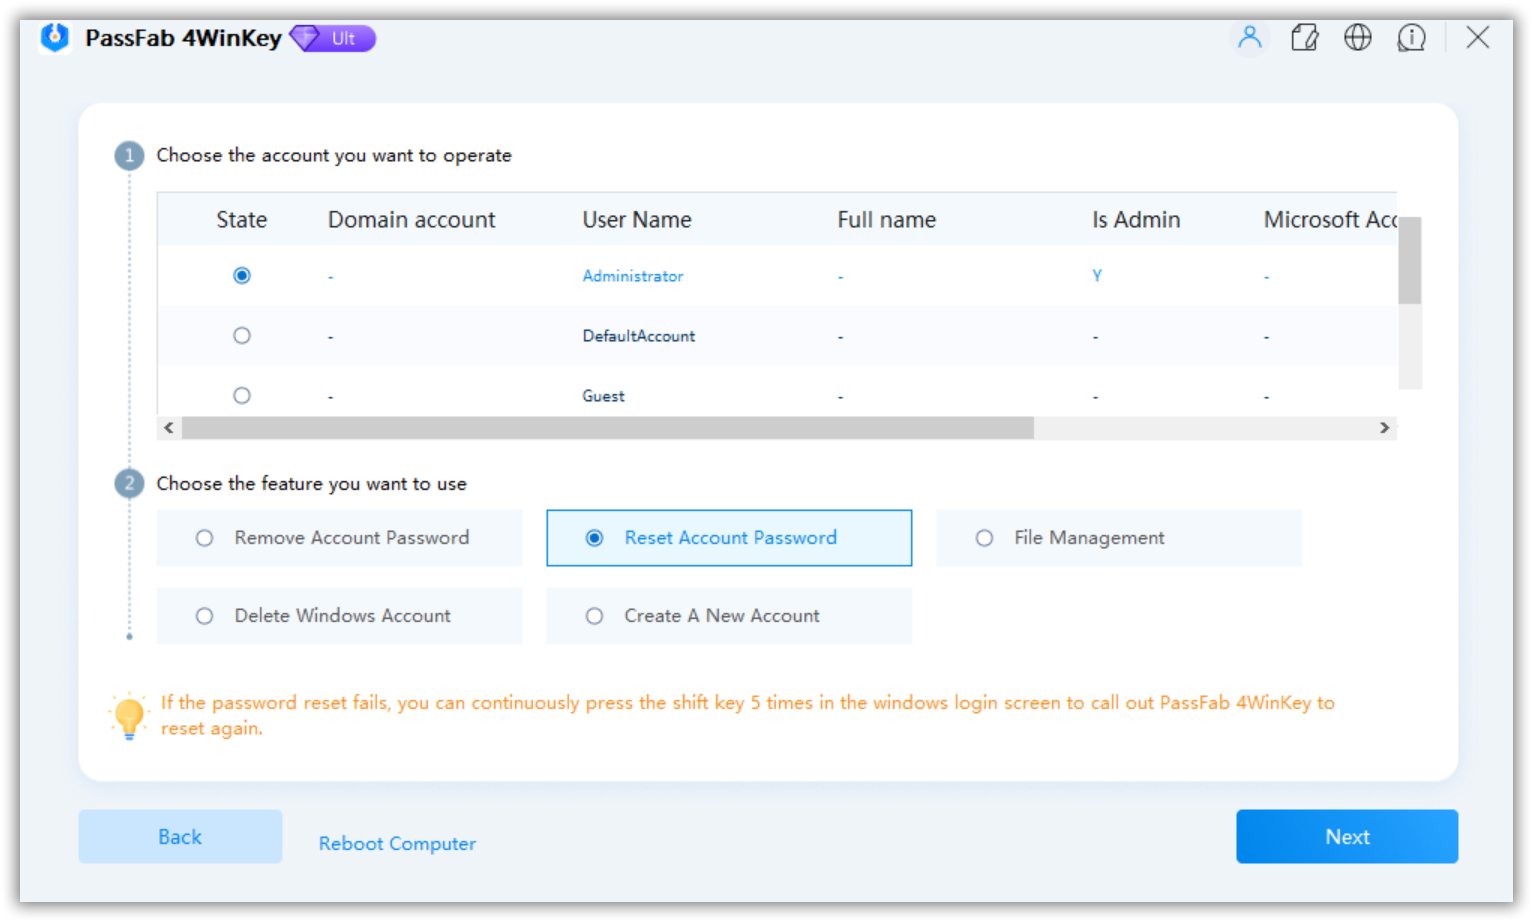
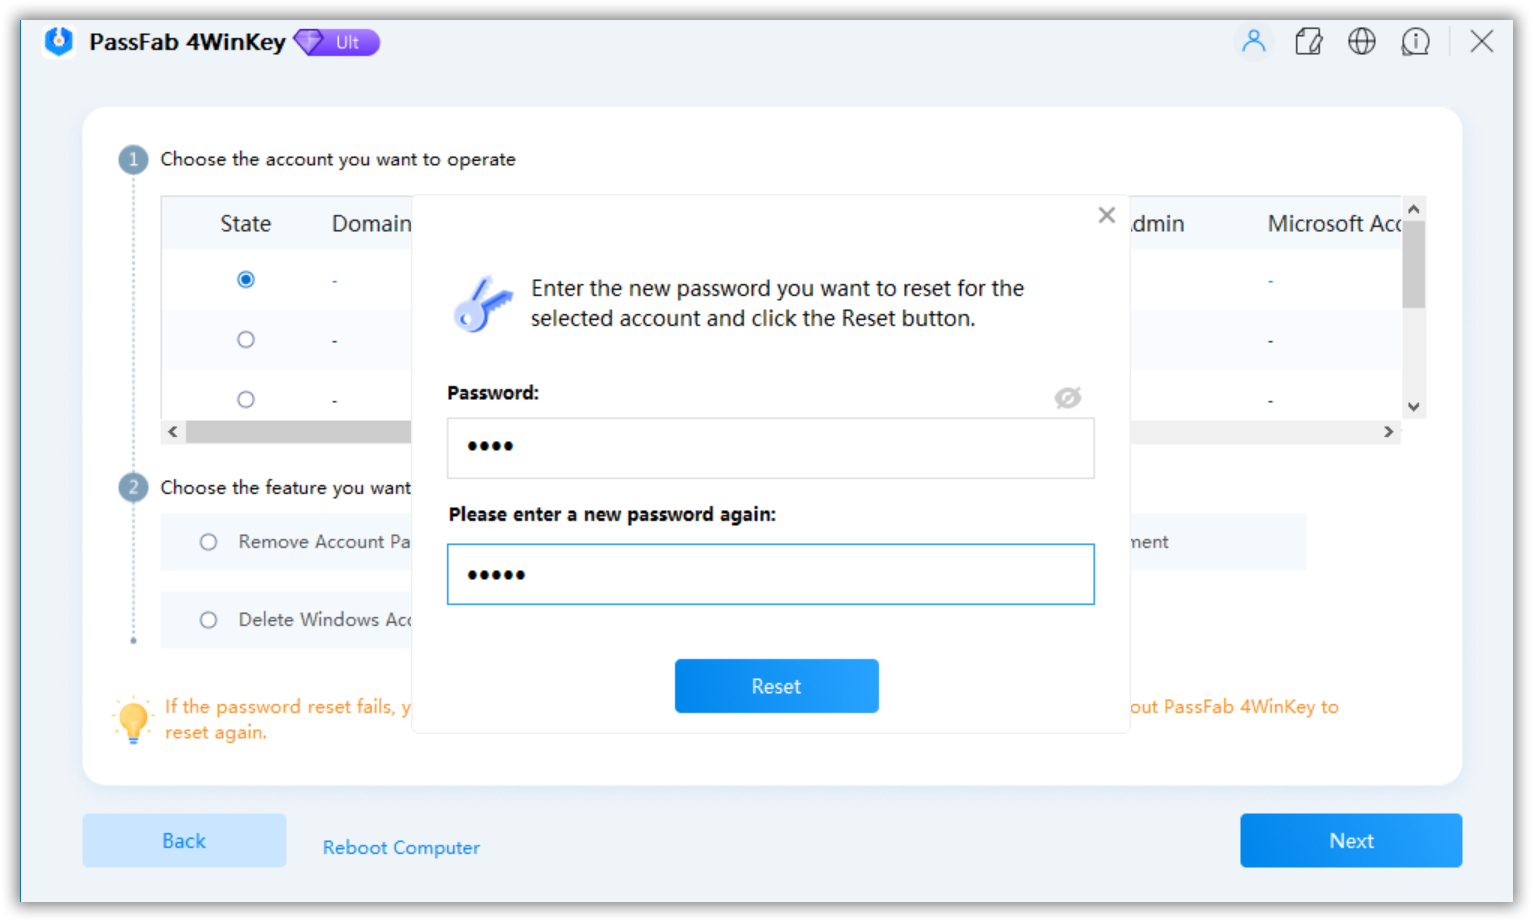
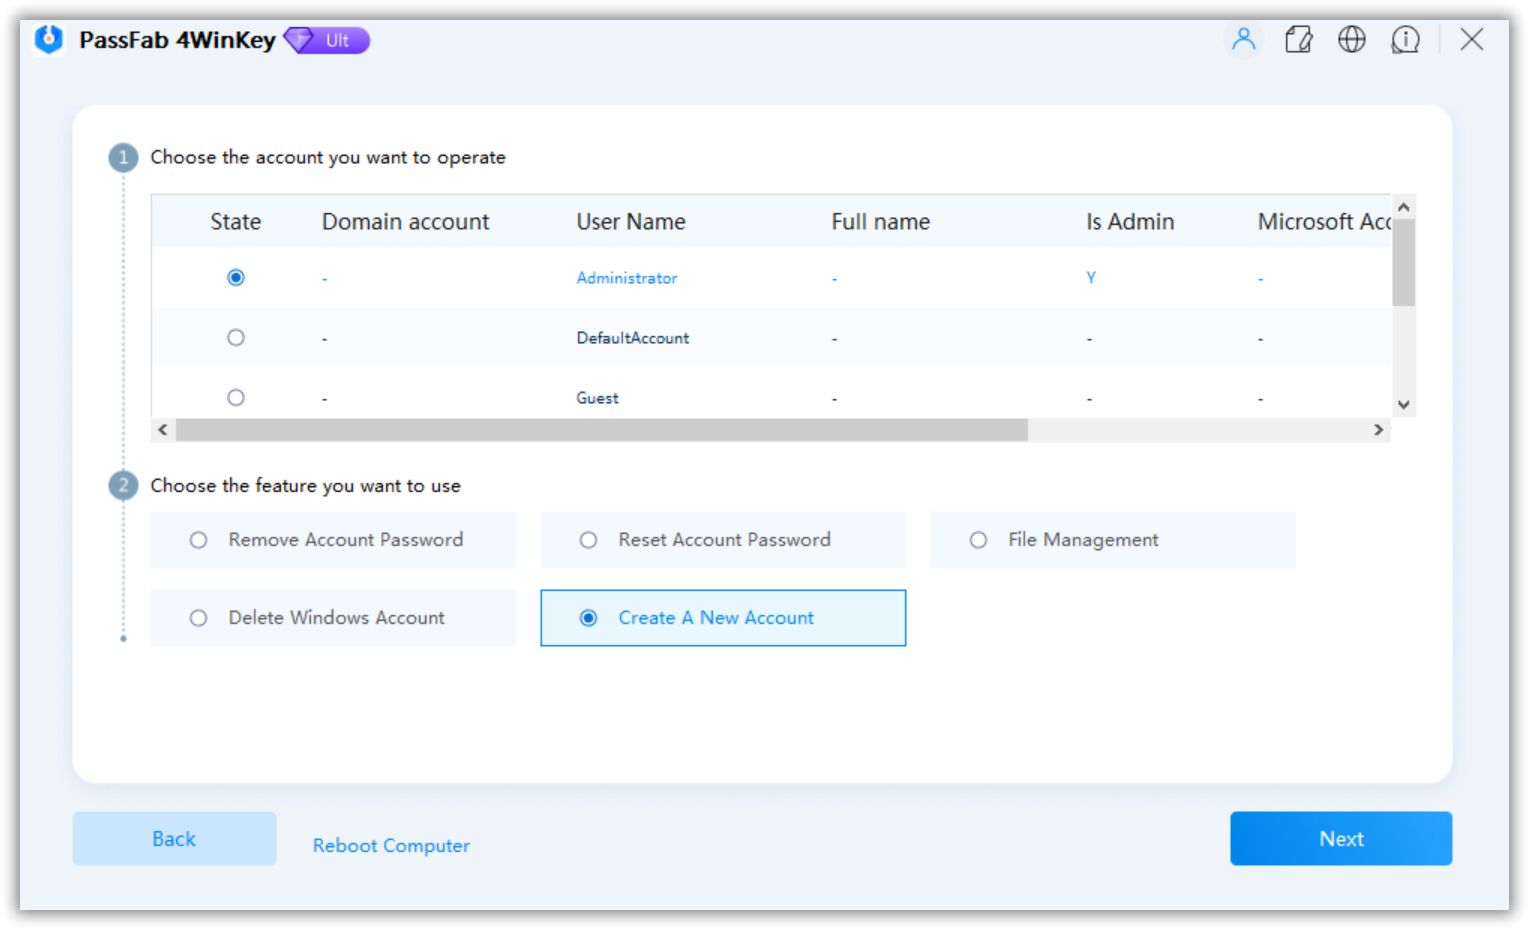
- Step #4: in this panel, you will have 4 options to choose from. Select, ‘Reset Account Password’.
- Step #5: After that, you have to choose the locked account whose password you want to reset. Click ‘Next’ to proceed.

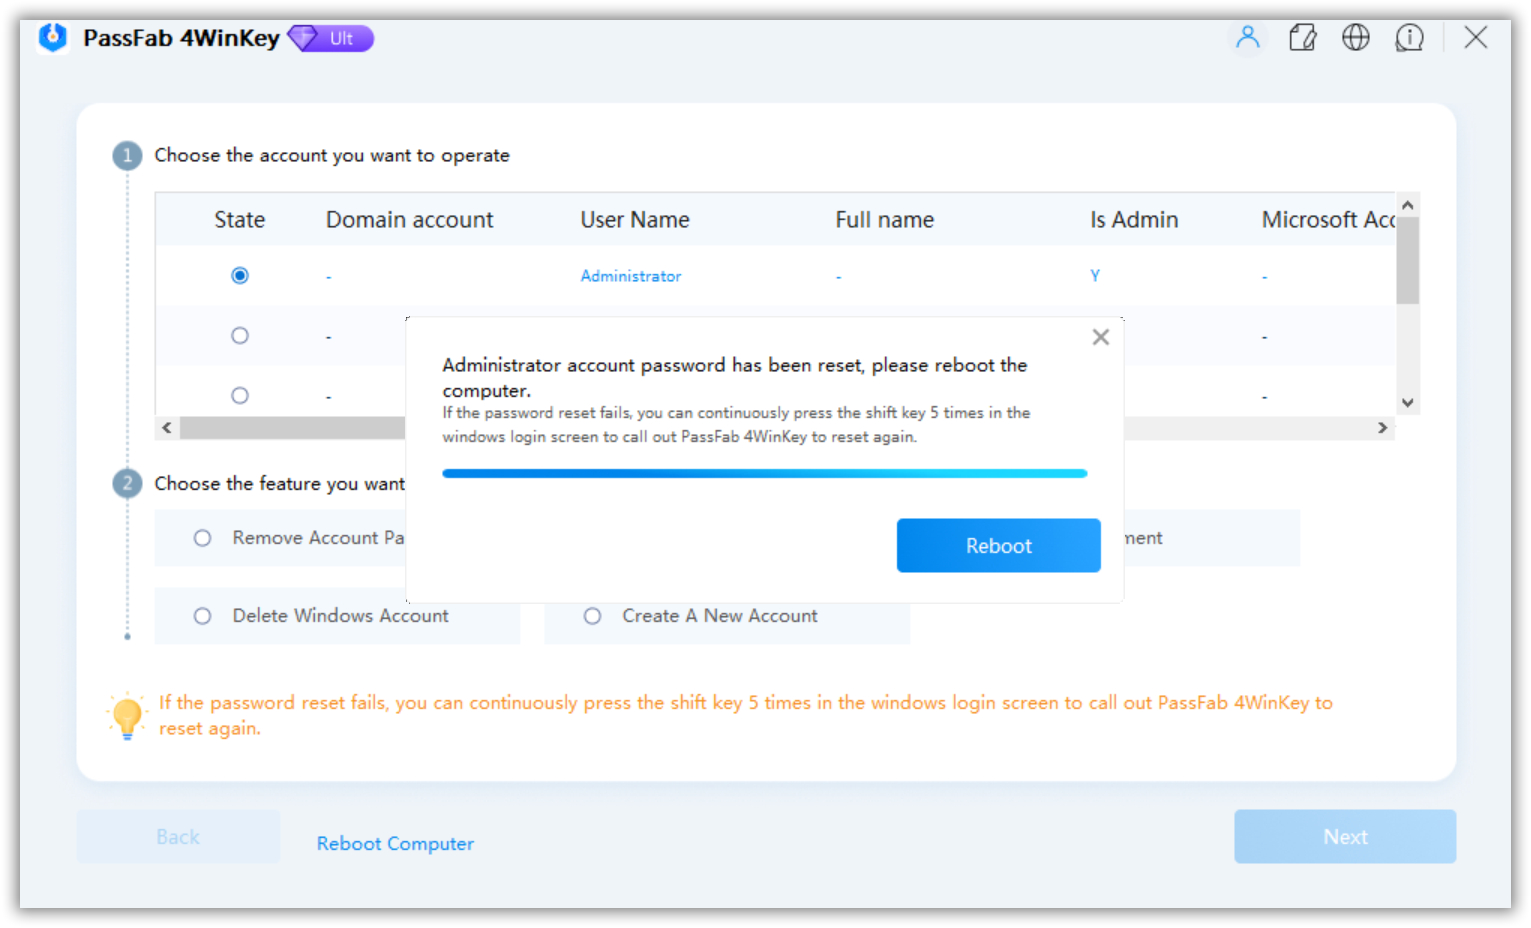
- Step #6: Once the password reset is finished, click on the ‘Reboot’ option.


The computer will restart immediately. After its restarts, you will be able to login using the new password.
Fix 5. Create A New Account with Administrative Privileges
The final fix involves creating a brand new account with Administrative privileges. It is not an easy task. But you will be able to create a new account in Safe Mode using Command Prompt. And there is also another easier method that involves using a professional tool such as PassFab 4WinKey.
5.1 Create New Account Using Safe Mode
The latest version of Windows comes with a hidden Administrator account. Microsoft probably has thought of this type of situation and implemented an Admin account to help the users. But this Admin account can only be accessed via Safe Mode. There are a few specific steps involved, you can check them below.
- Step #1: In the login screen, hold the ‘Shift’ key and then click on the ‘Power; button icon below. A menu will appear, select ‘Restart’ while holding the ‘Shift’ key.

- Step #2: Once ‘Advanced Recovery Options’ appears, let go of the key.
- Step #3: In the menu, click on ‘Troubleshoot’, then go to ‘Advanced Options’ and then select ‘Startup Settings. Finally, click on ‘Restart’.
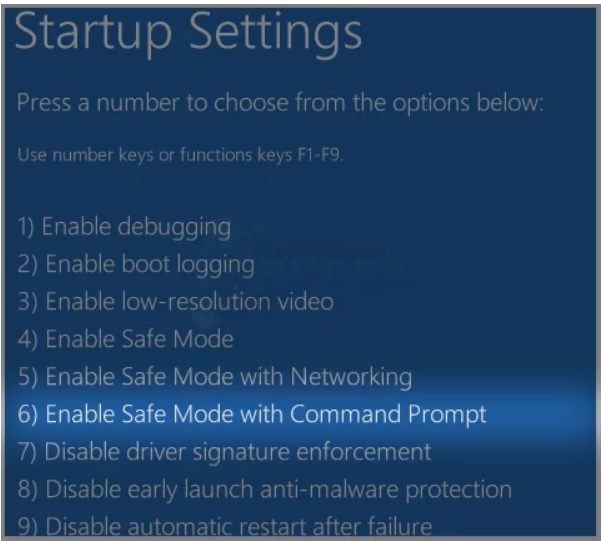
- Step #4: When your computer starts again, it will open with a blue screen with different options. Choose ‘Enable Safe Mode with Command Prompt’.

- Step #5: The computer will boot up immediately, and you will be able to see the hidden Admin account. Log into it.
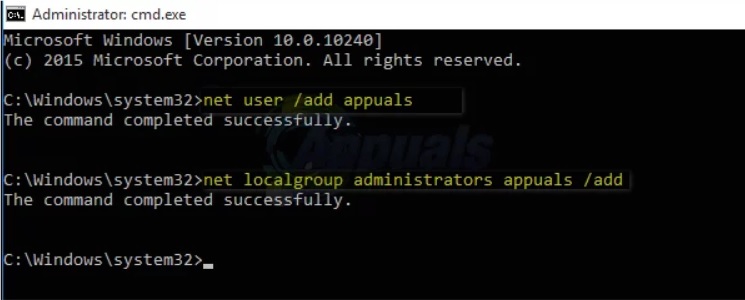
- Step #6: Then, run Command Prompt. Type the following commands in the Command Prompt box and hit ‘Enter’ to execute after each one.
‘net user /add <name of the user account you want to create>’
‘net.localgroup administrators <name of the user account you want to create> /add’
- Step #7: After executing the commands, a new user account with Admin privilege will be created.
Now, you have to restart your computer. So, type ‘shutdown /r’ in the CMD panel. The computer will restart, and you will be able to login with your new account with administrative privilege.
5.2 Create New Account Using PassFab 4WinKey
It is easy to create a new account with Administrative privilege using 4WinKey. Before you proceed, check out the use of 4WinKey from ‘Fix 4’ of this article. You have to perform the ‘Part 1’ and ‘Part 2’ form the detailed procedure. After that, check out the steps below.
- Step #1: After booting the computer with the password reset USB drive, 4WinKey will load. Choose the Windows system you are using and click ‘Next’ to proceed.
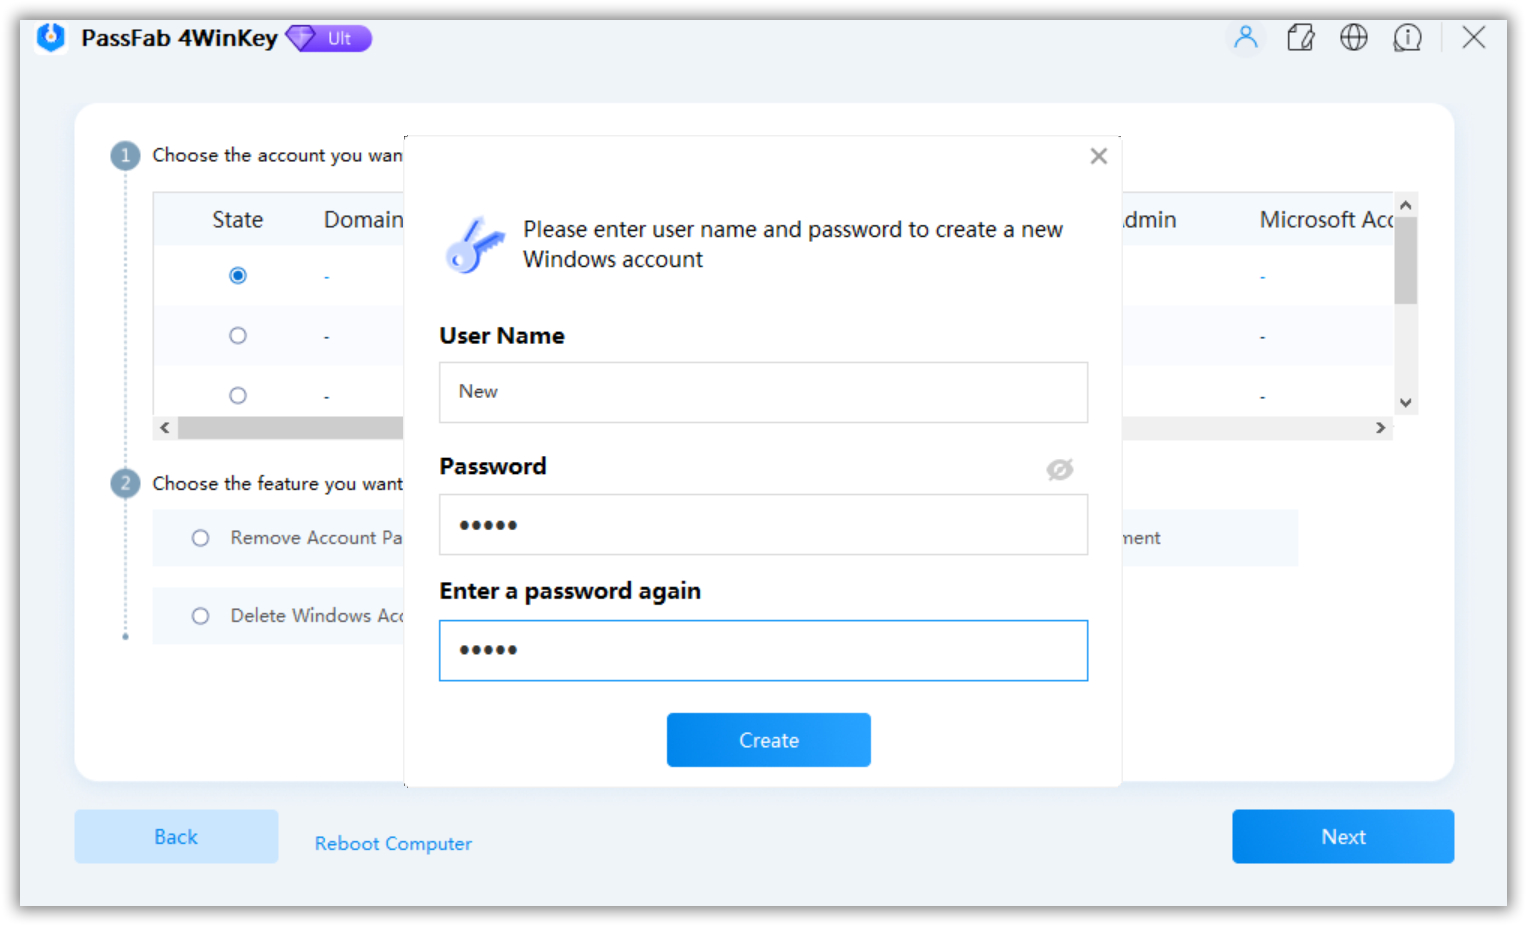
- Step #2: In the following panel, click on the ‘Create A New Account’ option.

- Step #3: Then, click on the ‘Create’ button.

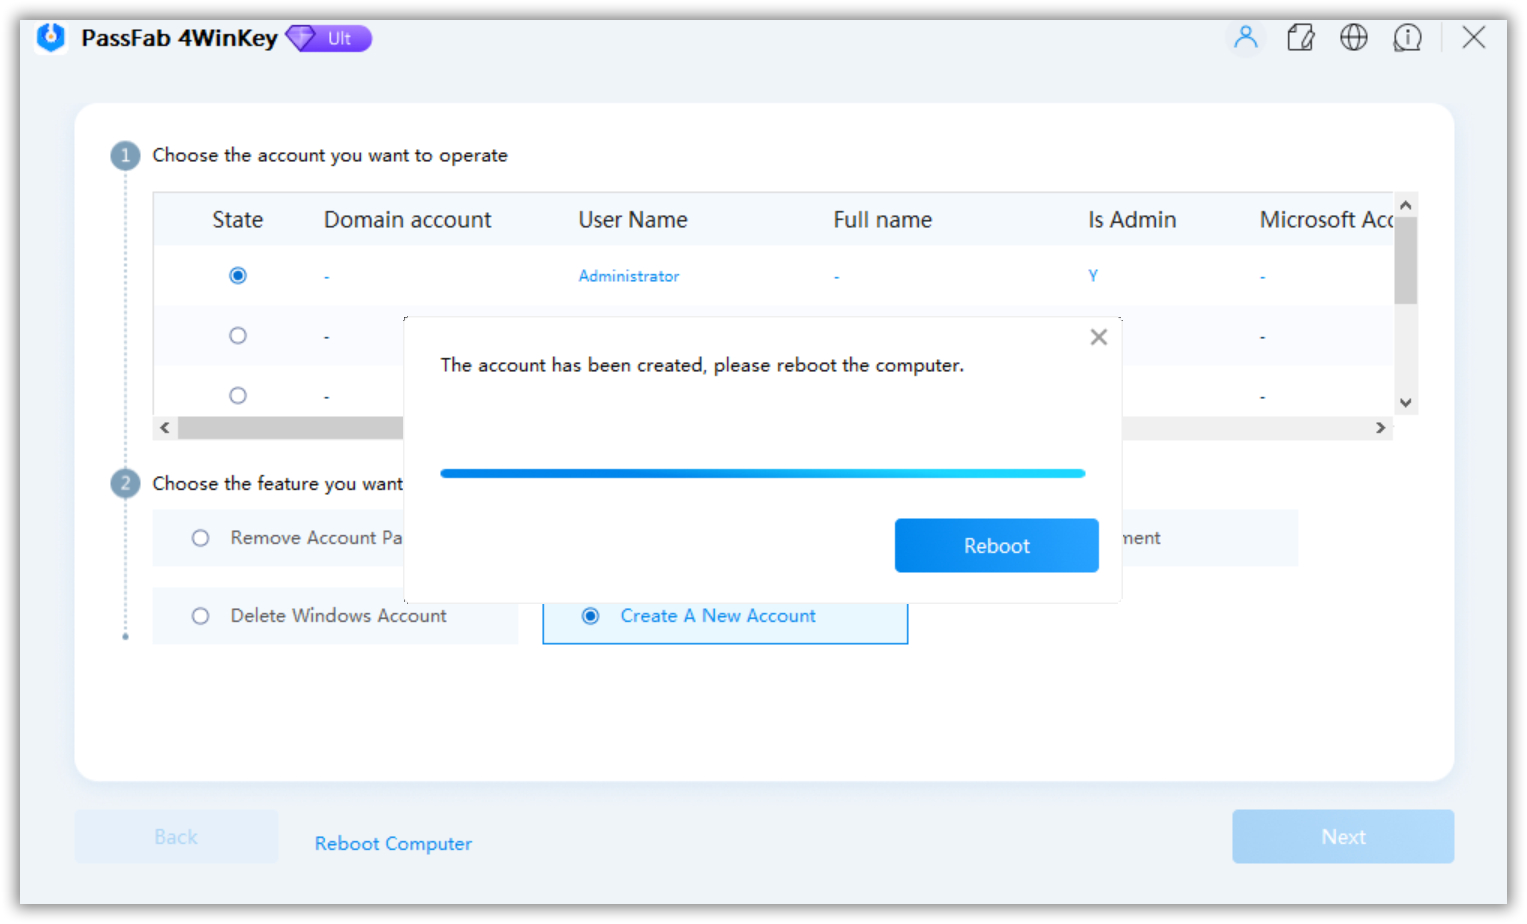
- Step #4: 4WinKey will immediately start creating a new account. After the account creation is complete, click ‘Reboot’.

Now, remove the USB drive and log in using the new Windows account with Administrative privileges.
Final Words
Overall, it is clear that getting locked out of your account is a dangerous problem. It is frustrating and leaves you unable to do anything. But we have detailed 5 different solutions to help you access your Windows account again. These are simple fixes, but we recommend using PassFab 4WinKey to reset the password. It is easier and most successful among all the solutions.
FAQ About Windows Administrator Account
Q1. What happens when a computer account is disabled?
The computer won’t be able to authenticate the domain until it is enabled again.
Q2. How do I find my system administrator?
Go to the Control Panel and click on User Accounts. You will find the system administrator.
Q3. How can I enable administrator account without admin rights?
Open Command Prompt dialog box and type the following command: net user administrator /active: yes. Execute the command, and you will have administrator rights.
Q4. How can I remove administrator account without password?
You have to run Command Prompt and type the following command: net user username /delete.
Execute this command to delete the admin account without its password.
