You may more effectively organize your files and data by partitioning an external hard disc. Utilizing the Disc Management tool, the procedure is simple if you're using Windows 10.
We'll walk you through every step of how to partition an external hard drive in this step-by-step tutorial, from attaching it to your computer to making a new basic volume and assigning a drive letter. This article will make it simple for you to partition your external hard drive, whether you want to segregate your operating system and files or you just want a better method to organize your data.
Part 1.Why Do You Need to Resize Partition in Windows 7?
Part 2.How Do I Resize Partition Size in Windows 7?
- Way #1: Resize Partition Using Disk Management
- Way #2: Resize partition Using PassFab 4EasyPartitionHot
- Way #3: Resize Partition by Repartitioning Hard Drive
Part 3.Bonus Tip
- #1: Some Things to Note When Resizing Partitions
- #2: How to Partition Windows 7 Hard Drive
- #3: Methods to Expand Partition in Windows 7
Part 4. FAQs
- Q1: How do I resize a partition in Windows 7?
- Q2: How do I resize an existing partition?
- Q3: How Do I Resize a Partition in Windows 7 Without Losing Data?
Conclusion
Part 1. Why Do You Need to Resize Partition in Windows 7?
Resizing partitions on Windows 7 may be necessary for several reasons.
- One is freeing up space on the hard drive; this can come in especially handy as your system accumulates files and programs over time, taking up valuable storage space.
- Furthermore, resizing can allow you to create or extend existing partitions; dual boot systems often require you to resize existing ones before adding one for their respective operating system.
overall partition resizing helps manage storage space, optimize system performance, and provide flexibility in organizing files and data more easily.
Part 2. How Do I Resize Partition Size in Windows 7?
While there can be many ways to resize partitions in Windows 7, here are some of the best ones we’ve picked for you.
Way #1: Resize Partition Using Disk Management
-
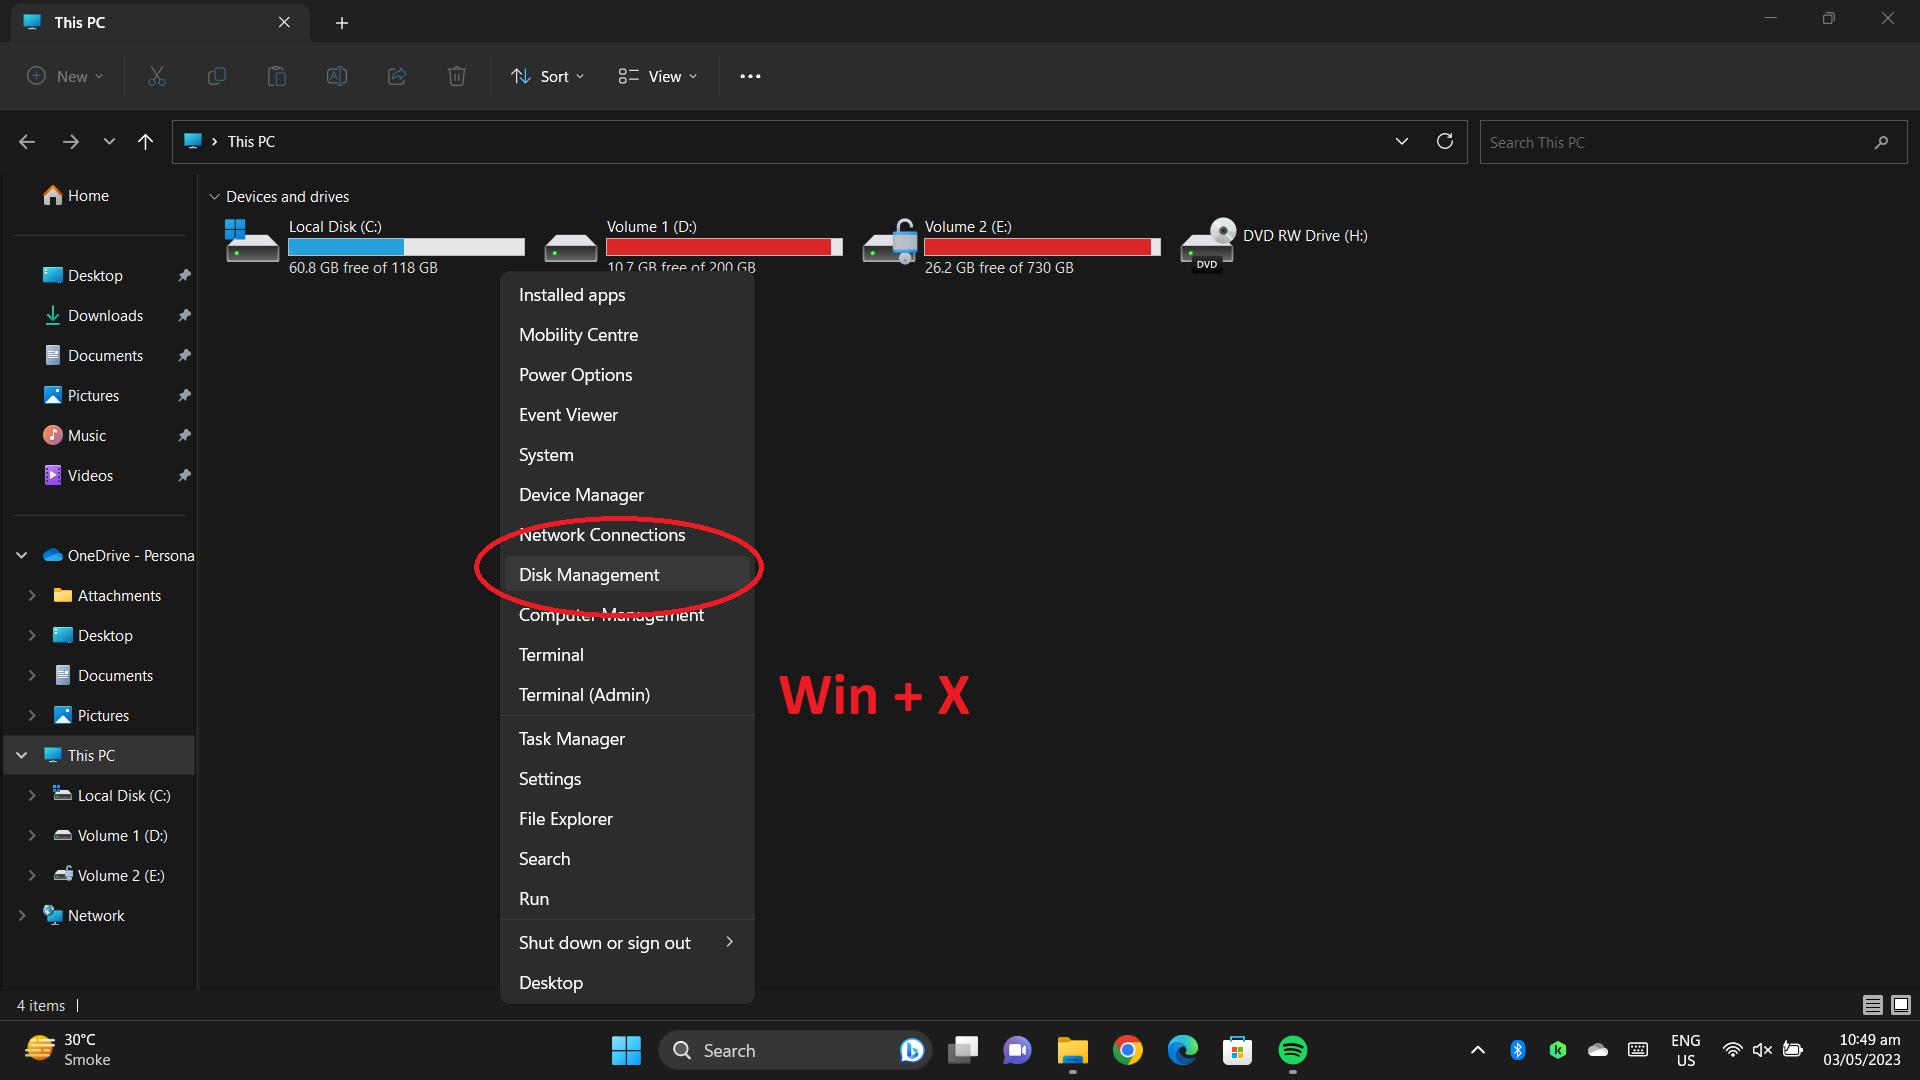
1.Press Windows Key+X and choose Disk Management from the drop-down menu to launch Disk Management.

-
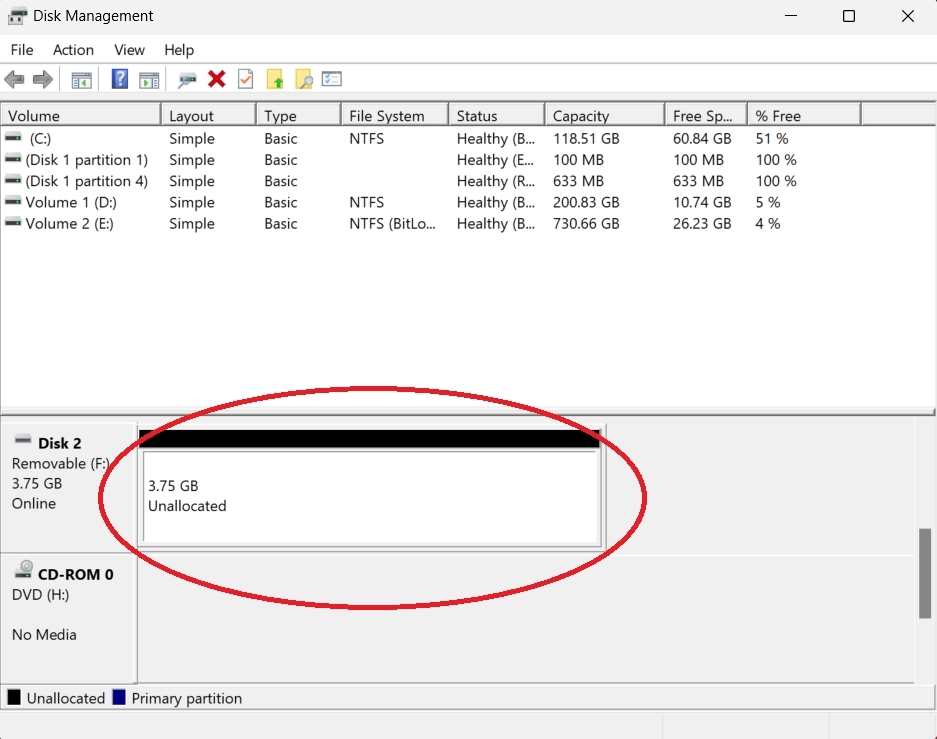
Look for the drive you want to resize: Unused spaces can be identified with black bars with no drive letters attached, signifying they remain vacant and available.

-
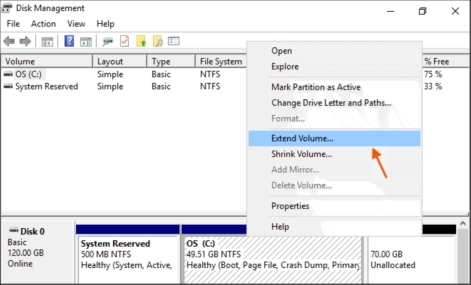
Right-click on the partition that needs resizing and select Extend or Shrink Volume from right-click menu.

Follow the prompts: The Extend/Shrink Volume Wizard will walk you through each step of resizing a partition, such as selecting how much additional space should be added and which unallocated areas you should make use of.

Way #2: Resize partition Using PassFab 4EasyPartition
-
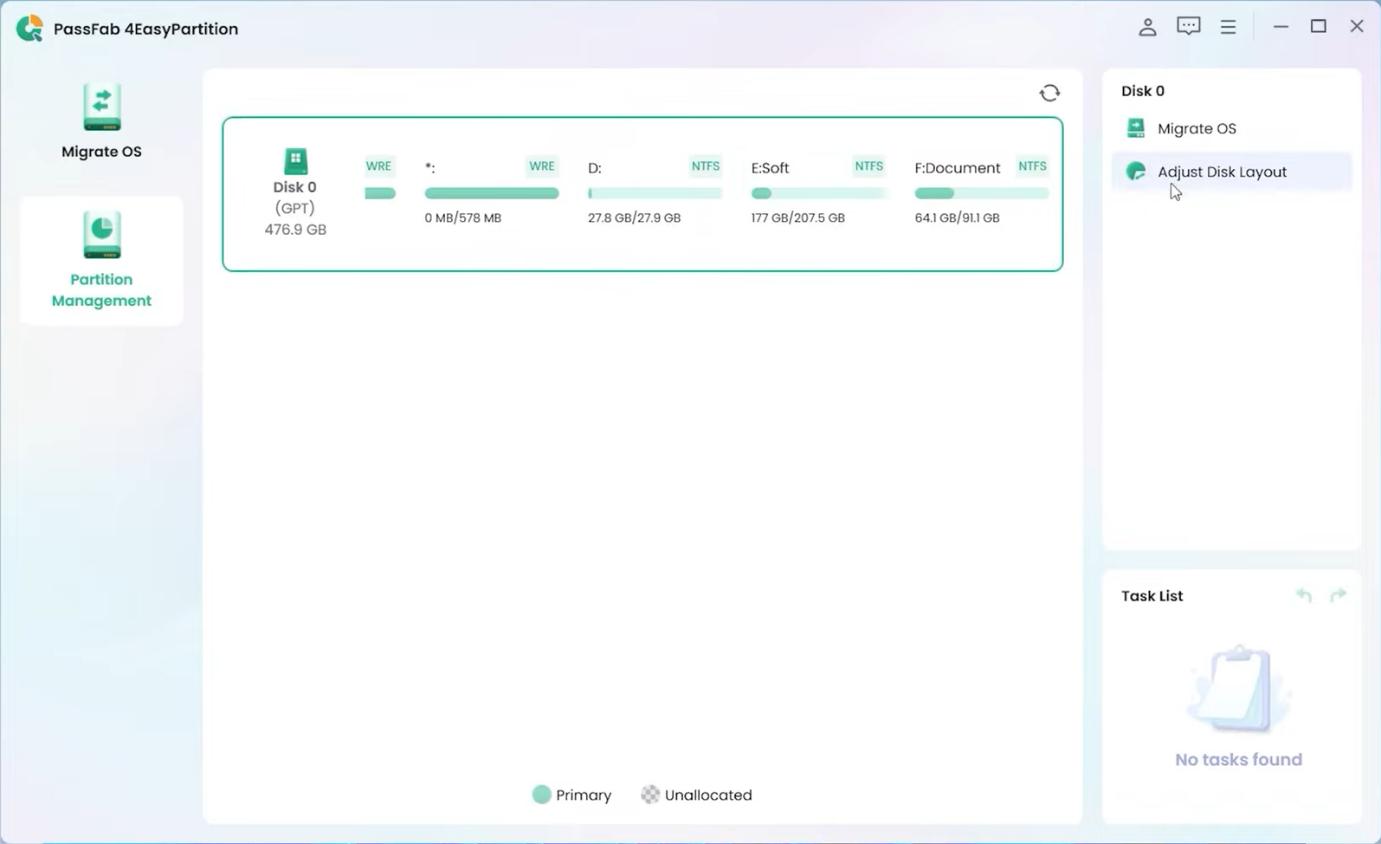
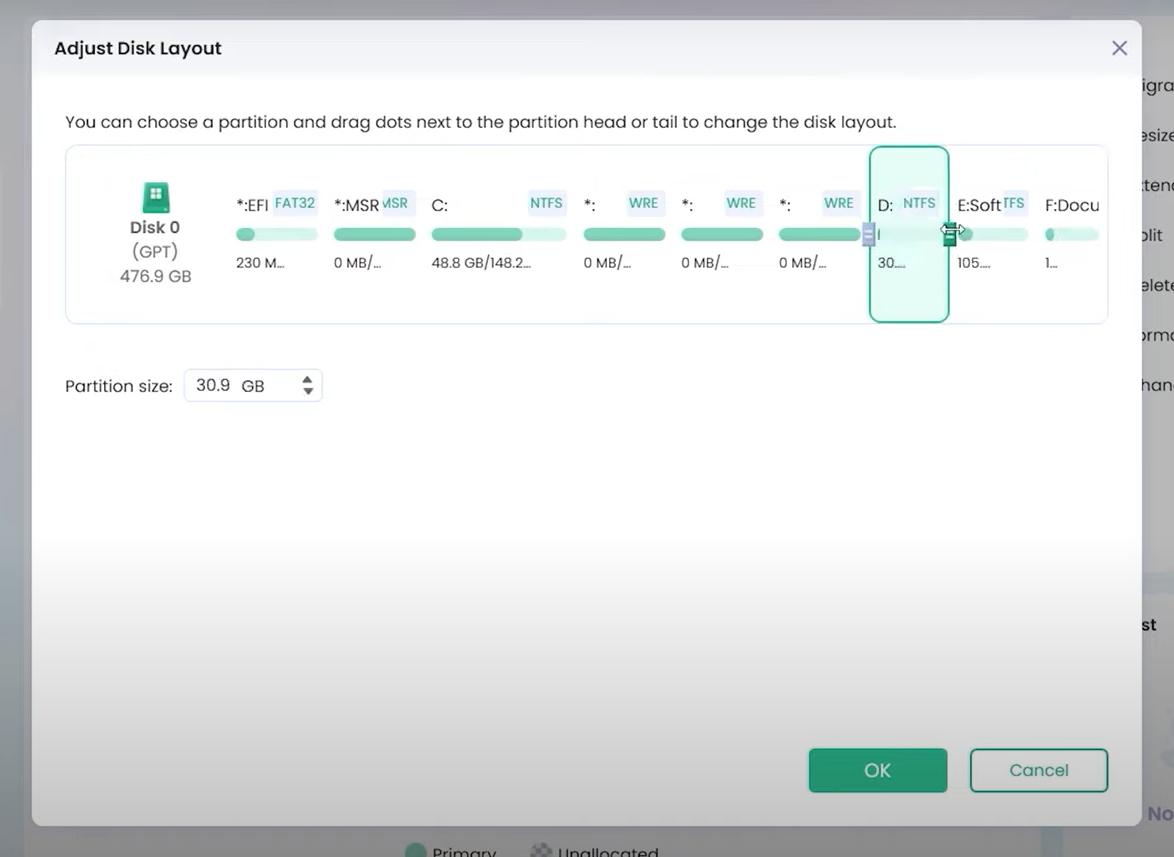
Launch PassFab 4EasyPartition and right-click on the drive whose partition you wish to resize and select "Adjust Disk Layout" from the top-right menu.

-
Once in the pop-up window, you will see the current size of a partition with sliders for you to change it using. Adjusting is easily done by dragging its bar; once complete click "OK" to save these changes and preview in main interface.

Way #3: Resize Partition by Repartitioning Hard Drive
-
Backup Your Data
Before repartitioning, it is imperative that all important files and information are securely stored in an external storage device or cloud service for safekeeping.

-
Open Disk Management Tool
To gain access to this feature, right-click on the "Computer" icon and select "Manage," followed by choosing "Disk Management" from the left menu. Or press “Window Key + X” and select “Disk Management”.

-
Create, Shrink, or Format an existing partition
Right-click on the space you have just created and choose "New Simple Volume," following its prompts for creating partitions with desired sizes. Or, Right-click on the partition you wish to resize and select "Shrink Volume," follow its prompts until entering an amount of free space that needs freeing up, then follow your computer's directions as necessary to achieve that effect. You can also format a partition from here. Right-clicking on the new partition and selecting "Format," follow the prompts until completing the setup of your preferred file system for formatting of this partition.

- Allocate Drive Letter and Paths
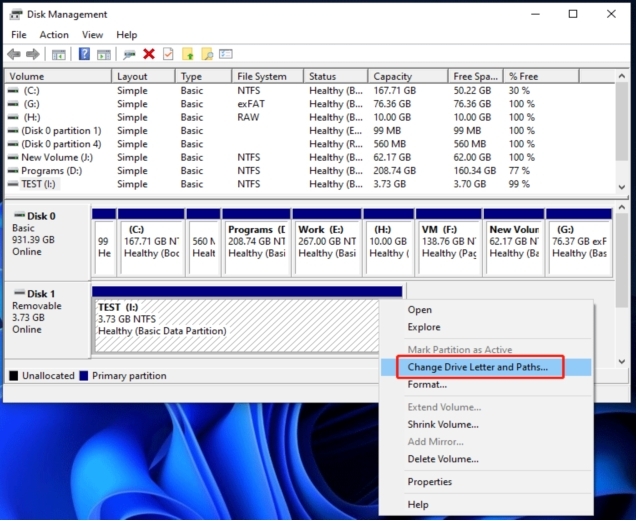
On the new partition and follow its prompts to assign its drive letter. Once done, copy back all your backed-up data over to this partition from where they had previously been saved.

- Restoring Your Data onto New Partition
Copy your backed-up data to this new partition.
Part 3. Bonus Tip
#1: Some Things to Note When Resizing Partitions
Resizing partitions on Windows 7 involves several important considerations that must be kept in mind:
-
Before changing any hard drive partitions, it is crucial to have all important files safely backed up to an external hard drive or cloud storage. Doing so ensures that no important files will be lost should something go wrong during the partition resizing process.

-
When shrinking partitions, try to free up as much room as possible to increase flexibility when creating or expanding existing partitions. This will give you greater room to adapt as necessary and expand new or extend current ones as desired.
-
Before selecting to delete one of your partitions, double-check that it contains essential data, or it could lead to accidental loss.
Resizing the system partition can wreak havoc and put your operating system at risk of malfunction.

#2: How to Partition Windows 7 Hard Drive
Partitioning a Windows 7 hard drive can help create multiple partitions to help organize and manage data more effectively. To partition, you need to access the Disk Management tool. To do so, right-click the "Computer" icon and choose "Manage." Or you can press WinKey+X and select Disk Management. From here you can shrink an existing partition as well as create a new one. After that, you can format it in your desired file system & assign a drive letter as required - be sure to back up data before partitioning!
#3: Methods to Expand Partition in Windows 7
There are three methods to expand a partition in Windows 7.
Disk Management
If there is free space adjacent to a partition that you wish to expand, use Disk Management's Extend Volume feature to extend it and follow any prompts as required to allocate this extra space to it. To use it effectively right-click a partition and choose this feature; follow prompts until all allocated space has been allocated back onto its respective partition.
PassFab 4EasyPartition
If there is no unallocated space next to the partition, you can use PassFab 4EasyPartition, to expand the partition. PassFab 4EasyPartition allows you to move and resize partitions, even if they are not contiguous.
Command Prompt
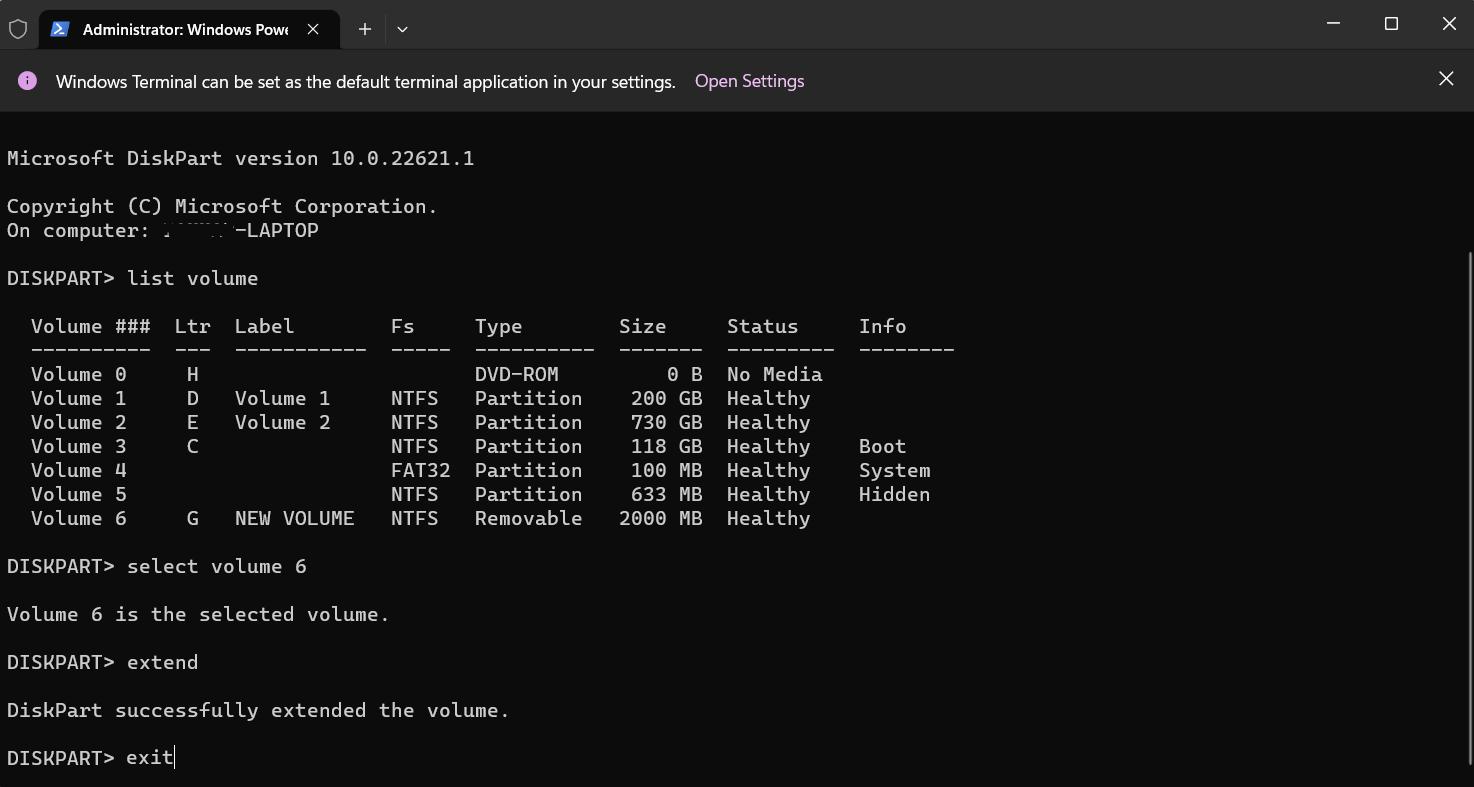
If you are an expert user, you can even use the “DISKPART” utility to expand the partition in Windows 7.
The commands are:
C:\users\user>diskpart
diskpart> list volumes
diskpart> select volume “x” (X corresponds to the dive letter)
diskpart> extend
Part 4. FAQs
Q1: How do I resize a partition in Windows 7?
To resize partitions on Windows 7, use the Disk Management tool and right-click on any partition you would like to resize. If there is unallocated space nearby, you can extend the partition by allocating this unallocated space as additional partitioning space. Keep in mind there may be limitations involved with partition resizing - such as being unable to shrink below-used space levels or extend without adjacent unallocated areas.
Q2: How do I resize an existing partition?
To resize an existing partition, use Windows’ Disk Management tool. Simply launch it and right-click on the partition you wish to resize and select "Shrink Volume" or "Extend Volume." If there’s no unallocated space exists near the partition, PassFab 4EasyPartition may also help. But there may be restrictions when it comes to shrinking below-used space resizing partitions.
Q3: How Do I Resize a Partition in Windows 7 Without Losing Data?
To resize partitions without losing data in Windows 7, use either the built-in Disk Management tool or PassFab 4EasyPartition. First, back up all important data onto an external device or cloud storage. Next, launch Disk Management and right-click on the partition you wish to resize - Shrink Volume will free up space while Expand Volume will extend it if there is unallocated space next to it.
Conclusion
All in all, resizing and partitioning hard drives on Windows 7 can be accomplished using various tools, from the built-in Disk Management utility to third-party partitioning software such as PassFab 4EasyPartition. Resizing partitions can help optimize storage space and make managing files and data simpler, but before beginning it is essential to back up all critical files before changing a partition size.
