“I have a PowerPoint presentation that contains sensitive information regarding my work. I am all set to present it in front of the board members, but I need to lock the document. Is there a way to do it?”
Well, of course, it is straightforward to implement a password on to a PowerPoint document. The steps are easy. But the steps vary depending on the Operating System used by you. So, we have taken the liberty and have detailed the way to password protect a PowerPoint on both Windows and Mac. Check out the article below.
The steps to password protect the PowerPoint file are simple. But there are two options. The steps are different on the Windows and Mac platform. So, we have decided to detail both of them. Check them both out.
Option 1. How to Password Protect PowerPoint on Windows System
The first part includes the steps to encrypt a PPT document on Windows OS. But there are 2 distinct ways to do it.
1.1. Add Password to PowerPoint (for Open Password)
If you want to add a password to open on the PPT, then you will have to enter the password just for viewing the document.
- Step 1: Press ‘F12’ on the keyboard to choose ‘Save As’.
- Step 2: Then go to the ‘Tools’ menu.
- Step 3: Choose ‘General Options’ from the drop menu.
- Step 4: Now, tick the box beside ‘Open’.
After that, you have to confirm the password, and we recommend you rename the document. Lastly, click ‘Save’, and then you will have successfully secured the PPT.
1.2. Password Protect A PowerPoint (for Modify Password)
If you add a password to modify the PPT, then the document will be a read-only file. But if you want to edit the file, you have to enter the password.
- Step 1: Press ‘F12’ on the keyboard to choose ‘Save As’.
- Step 2: Then go to the ‘Tools’ menu.
- Step 3: Choose ‘General Options’ from the drop menu.
- Step 4: Now, tick the box beside ‘Modify’.
Now, you have to confirm the password and save the document.
Option 2. How to Password Protect PPT on Mac System
Well, the procedure to add password to PowerPoint on a Mac is completely different. Unlike Windows, there is only one method available. The procedure is simple enough, but it is a bit elaborate.
So, we have laid out all the details on the encryption process. Check it out.
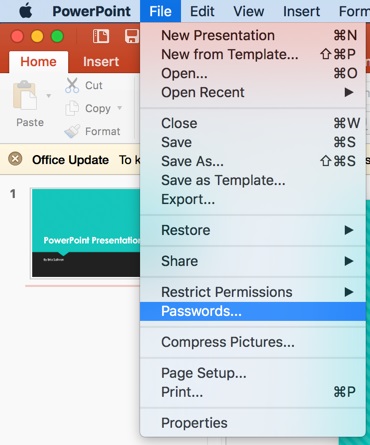
- Step 1: Obviously, the MS Office needs to be installed on the Mac. After that, launch PowerPoint.
Step 2: After that, navigate to ‘File’ and click on ‘Password’.

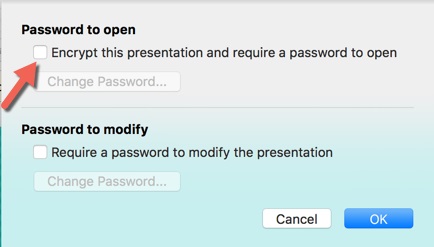
Step 3: In the password section, check the box beside ‘Encrypt’.

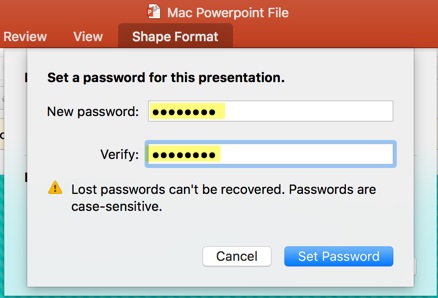
Step 4: Then, in the ‘New Password’ section, you have to type a password.

- Step 5: Type the password again for verification.
- Step 6: Next, click ‘Set password’ and then finally, click ‘OK’ for confirmation.
The said PowerPoint files have become encrypted successfully. Next time you want to open that file, you will have to enter a password.
Extra Tips: How to Open Password-Protected PowerPoint File
Now, we have already discussed all there is to know about password protect PPT. The procedure is different on Windows and Mac, but it is simple enough. Some users find it necessary to encrypt their documents. Which can be a necessary precaution due to the nature of the said document.
But it is normal for the user to get stuck while opening the app as they were unable to remember the implemented encryption code. It is funny that the security that you had placed to keep others away is now stopping you too.
But don’t worry, the encryption can be bypassed easily. There are professional programs available for this procedure, namely PassFab for PPT. It is one of the best password recovery programs.
Its operation is very simple. Still, we have detailed the user-guide below. Check it out.
Step 2: After that, click ‘Add’ and import the locked PPT document.

Step 3: Now, you have to decide on an attack type. There are 3 choices; Dictionary Attack, Brute Force Attack, and Brute Force with Mask Attack.

Step 4: Lastly, click on ‘Start’ after choosing the attack type to recover the password.

Step 1: Download PassFab for PPT on your computer and then complete the installation. Then, run the program; the main interface will be displayed on the screen.

If you follow the steps properly, you will be able to recover the password within 5 minutes, successfully. But if you still confused about how to use, you can watch the video below:
Bottom Line
Hence, the encrypting a PPT document is very simple. The main procedure varies depending on the Operating system. But it is safe to say that the encryption on a PowerPoint document can be implemented successfully.
But there is also the possibility that you may get stuck while opening the PPT if you are unable to type the required password. If that is the situation, you should use PassFab for PPT for the recovery of the said password.


