Network Discovery is a feature offered by Windows operating system that allows other the computers and devices to see your computer. While the feature is made for convenience, it puts your computer at a risk of virus entry. Disabling Network Discovery for Windows 7 and 8 is a little different than Windows 10, which often confuses Windows users who recently updated their computers.
In Windows 7 or 8, you have to go to Control Panel or Command Prompt to disable network discovery, whereas in Windows 10, you need to go to Settings > Network & Internet > Dial-Up. And like expected, former windows 7 and 8 users keepfinding in the Control Panel or Command Prompt and get agitated.
Part 1. How to Disable Network Discovery in Windows 10
Disabling network discovery in Windows 10 is quick and easy, but you need to know how to do it.
1. Network & Internet method
To disable network discovery Windows 10, you need to follow these steps:
Step 1. Click on Start and open Settings. Click on Network & Internet followed by Dial-Upor Ethernet or Wi-Fi connection (whichever you are connected to). Let's consider you are connected to a Dial-upconnection.
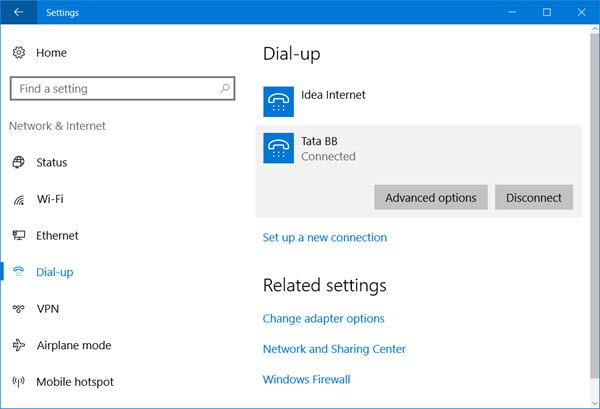
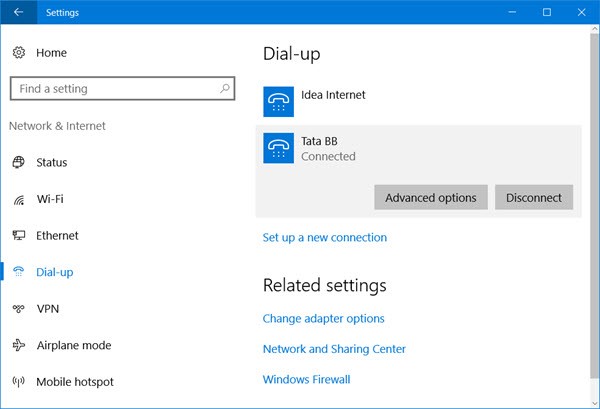
Step 2. Select the connected network and click on Advanced Settings.
Step 3. In the Make this PC discoverable section, slide the On to Off.
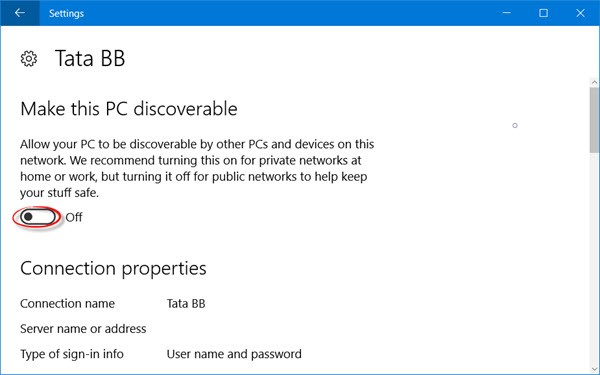
You have successfully network service discovery disabled of your Windows 10 computer. If you want to enable Network Discovery again, you have to follow the same steps but only Slide the Off to On.
In case you are connected to Ethernet, you'll have to go to Settings > Adapter > Make this PC discoverable switch.
In case you are connected to a Wi-Fi connection, you'll have to go to Settings > Network & Internet > Wi-Fi > Manage known networks > Select a WiFi network > Properties > slide On to Off in the Make this PC discoverable window.
2. Control panel
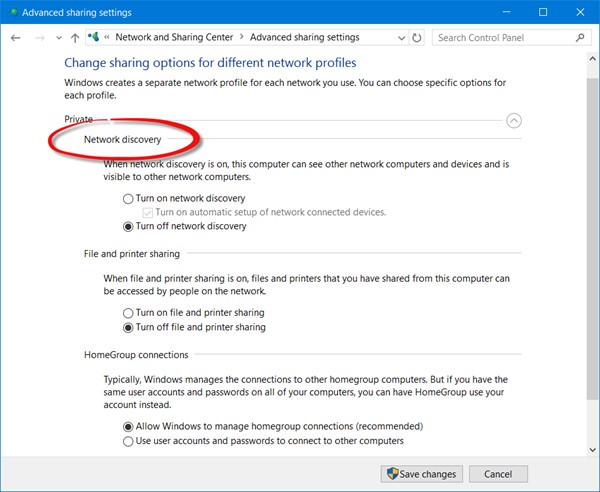
Step 1. Go to Setting and then Control Panel. Click on All Control Panel Items followed Network and Sharing Center and Advanced sharing settings.
Step 2. Search for Network Discovery. Below it, there will be two boxes. Click on the second one that says Turn Off Network Discovery. Click on Save Changes.
Part 2. How to Reset Administrator Password in Windows 10
Windows 10 works a little differently than Windows 7, 8, or any other earlier versions. When we have to access certain settings, we need to give the admin password. Since we don't use that password often, we tend to forget it. Instead of having to factory reset your Windows 10 computer, you can use a third party software to remove or reset the password.
There are free as well as paid softwares. Just like you guessed, free softwares are difficult to use and need concentration and technical knowledge. They also take more time. Don't panic because we have an affordable solution to you that not only retrieves the admin password but also protects your files and folders from getting lost. PassFab 4WinKey is a paid software that helps you recover the password in less than seven steps.
Here's how you can reset Administrator password in Windows 10 using PassFab 4WinKey:
Step 1. Download PassFab 4Winkey software on another computer. Install it. Insert a USB Flash Drive or CD/ DVD, whichever you are comfortable with, to burn the software.
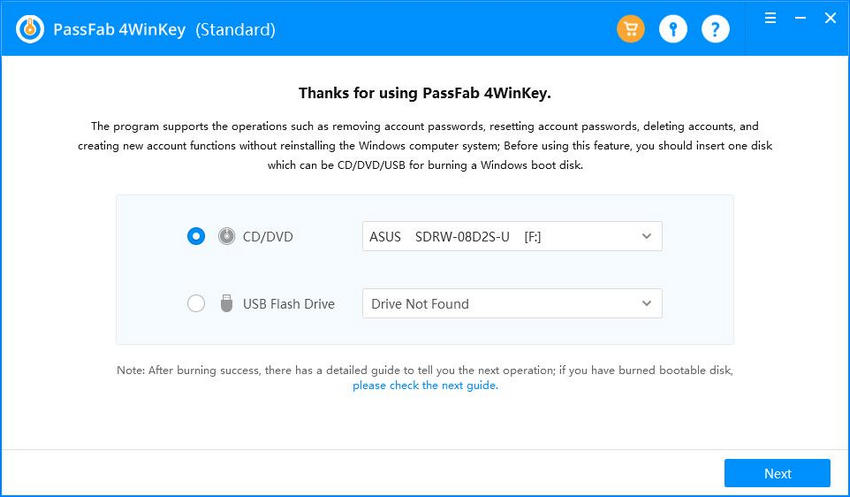
Step 2. Click on Burn. All the data you saved on it will be lost, so make sure you save it somewhere else before hand. You'll be notified once the process is complete. Eject it and enter in your computer.
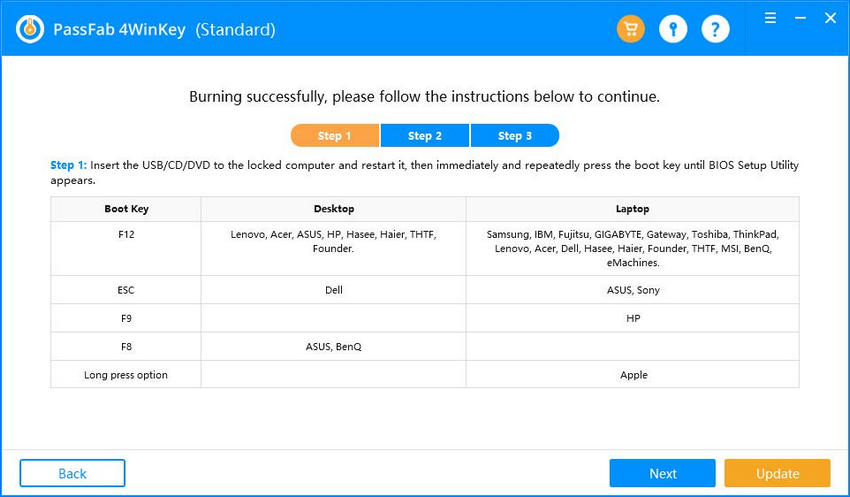
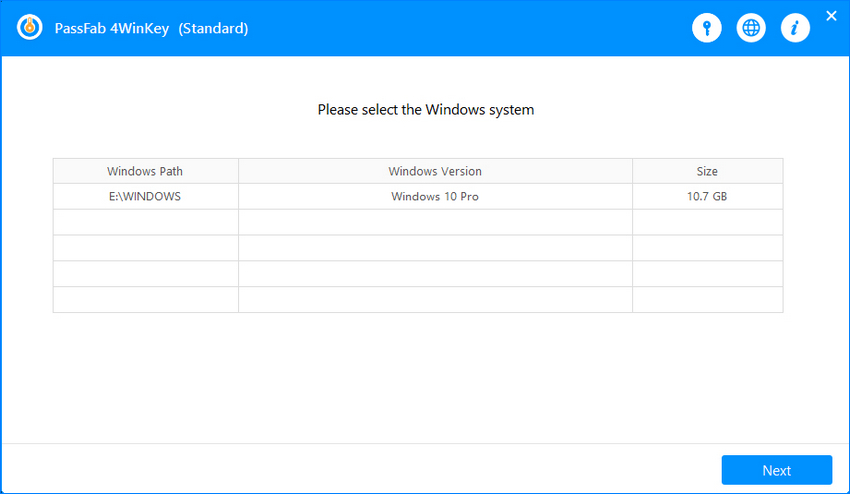
Step 3. PassFab 4WinKey dialogue box will popupon your screen. The first thing you'll see is Select Windows section. Select the operating system of your computer. Hit Next.
Step 4. Proceed to Manage Accounts section and select the Administrator account. Hit Next.
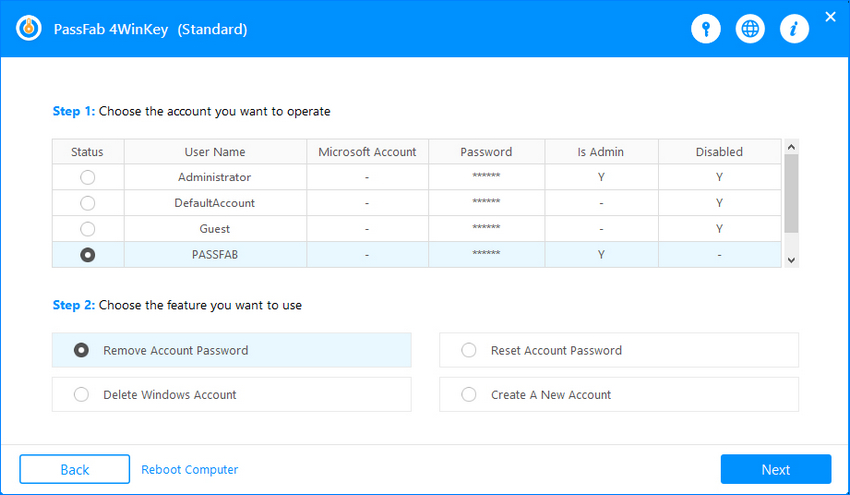
Step 5. In the last section, Process, the resetting process will begin on its own. Once it is complete, hit reboot. After your computer switches on, go to Settings and set a new password for the the Administrator account.

Part 3. Know More About Administrator Account
Every Windows 10 computer has two admin accounts - Administrator and Super Administrator account. When you install or update to Windows 10, you are asked to create a username and password, which is for the Administrator account. However, this is only not the true Administrator account.
Super Administrator is the real one but it is disabled by Windows for security reasons. It remains disabled until you switch it on for performing elevated tasks including troubleshooting. It is hidden so that any other person who uses your computer doesn't misuse other accounts. To activate it, you'll have enter a blank password. It is so to purposely fool strangers who access the computer. They'll keeptrying different passwords but all of them will be wrong.
The process is difficult and is done intentionally, so you'll have a hard time navigating around. Windows 10 also has one more type of account called guest account, which has authorities lower than administrator, super administrator, and user accounts.
Summary
In this article, we talked about how to Windows 10 disable network discovery and PassFab 4WinKey to recover Administrator account password. We also talked about the different types of Administrator accounts and why Super Administrator account is hidden.
