When you have a Windows 10 computer, there are a wide range of features that you are unaware of, though they are significant. One of such features is the UEFI firmware settings. This facility on your Windows 10 system has taken over the age old BIOS you were used to. In an old computer, you won't be able to switch from BIOS to UEFI. Latest UEFI implementations are compatible with BIOS, due to BIOS emulation. UEFI can run in 32-bit or 64-bit mode, can boot from larger drives, offers secure boot, and acts like a micro operating system that runs over the computer's firmware for enhanced performance.
When you are upgrading to a higher version of Windows and adding latest hardware and firmware, it is recommended to upgrade to UEFI firmware settings. In this article, we are about to talk about how to access and change UEFI firmware settings in Windows 10.
- Part 1. How to Access UEFI Firmware Setting on Windows 10
- Part 2. How to Change UEFI Firmware Setting on Windows 10
- Part 3. Getting Know More About UEFI BIOS
Part 1. How to Access UEFI Firmware Setting on Windows 10
As most computers having UEFI firmware also offers you to activate the legacy BIOS compatibility mode, this legacy BIOS mode turns the UEFI firmware to function as a basic BIOS. It helps older OS like Windows 7 systems compatibility to run with enhanced settings. You can change the UEFI settings, only if yourcomputer has the option to enable it.
In order to access UEFI firmware setting on Windows 10, first you need to know the basics about UEFI and BIOS. In a BIOS setup, it's easy to enter the boot menu by hitting "F12" right away. But, for UEFI setting entry in Windows 10, you got to follow the under mentioned process:
Step 1. Login to your Windows 10 system and tap "Start Menu".
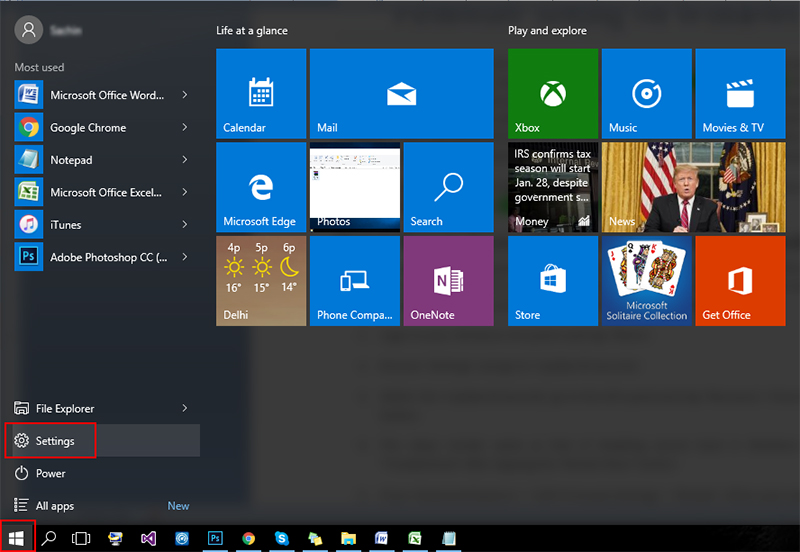
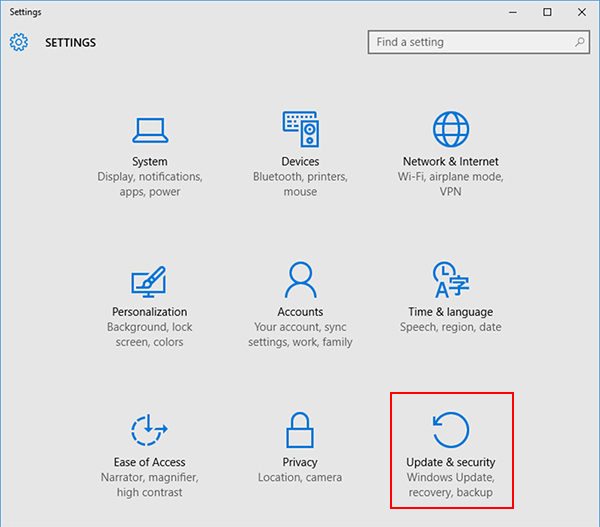
Step 2. Browse "Settings" and go to "Update & Security".
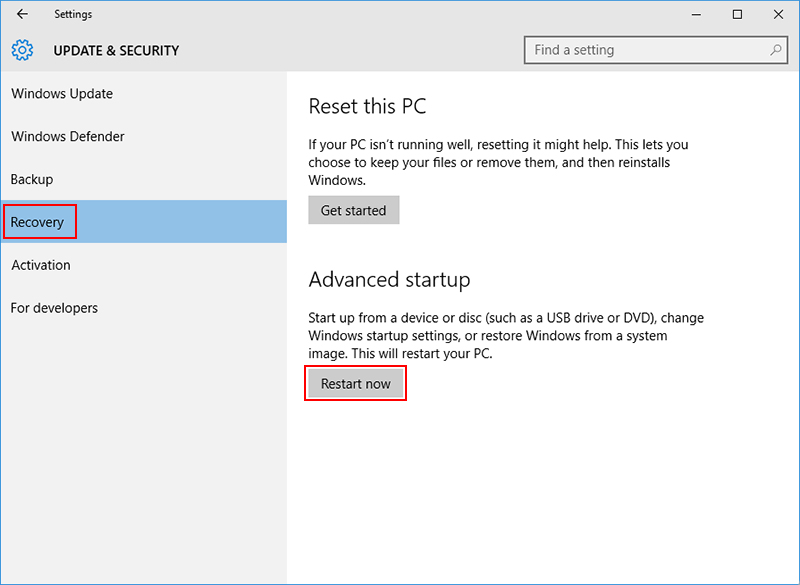
Step 3. Within the "Update & Security" go to the left-panel and tap "Recovery". Press the "Restart Now" button.
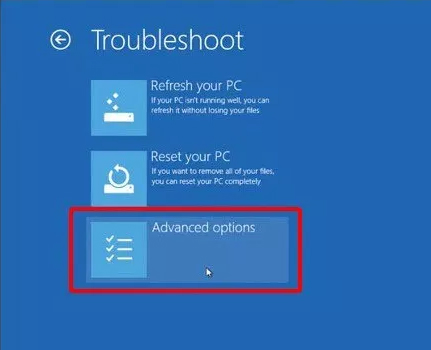
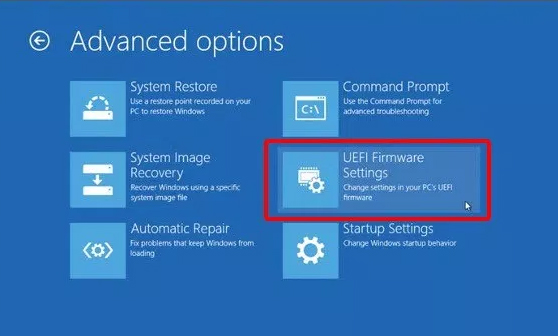
Step 4. Click, "Troubleshoot" option from the upcoming screen and then opt for "Advanced Options".
Step 5. Press "UEFI Firmware Settings" > "Restart". When your system restarts, you will be taken to the UEFI firmware settings.
Also Read: How to Install Windows 10 from USB with UEFI Support
Part 2. How to Change UEFI Firmware Setting on Windows 10
So you've successfully gained access to UEFI Firmware Settings on Windows 10. Let's now understand the step by step tutorial on how to change the UEFI Firmware settings, more particularly to disable Secure boot setting so that we can boot our system in Dual Boot mode.
Step 1. First, reboot your PC and hit the default F12 or Esc button to boot into the "Setup" menu.
Step 2. Get under the "Boot" section and then look for "Secure Boot" option, hit Enter. Then disable the Secure Boot settings from here.
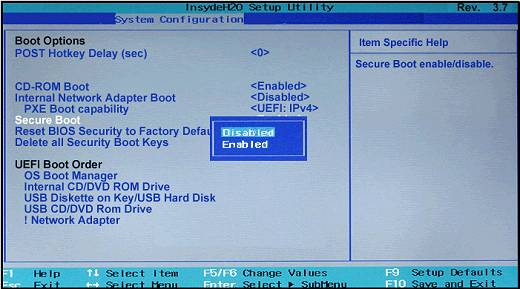
Step 3. Next, you can change other UEFI firmware settings like the "UEFI Boot Order" depending upon your requirements.
Part 3. Getting Know More About UEFI BIOS
Before going deeper in UEFI firmware settings, you need to understand the difference between BIOS and UEFI.
What are the Difference Between UEFI and BIOS?
It is a low level software located on your computer motherboard. It starts up the entire system and makes sure to run the bootloader to boot the operating system. Whereas UEFI is an advanced program, which surpasses BIOS as it can boot larger drives with more efficiency.
Here is the comparison:
| Features | UEFI |
BIOS |
Secure boot and remote troubleshooting |
You can configure it remotely |
Manually set sitting in front of a computer |
Flash Memory |
EEPROM is here to take the pain out with Flash memory. |
It depends of CMOS to store things not Flash memory. |
Booting capacity |
GPT partitioning allows around three times more speed than BIOS. |
Not so great due to M/p. |
Code running |
Uses EFI executables to boot system |
Uses M/p for launching bootloader. |
Why Choose UEFI?
- A UEFI firmware setting is capable of running in 32-bit or 64-bit mode.
- With more addressable space compared to BIOS, the boot process becomes faster than that of a BIOS.
- You get a sleeker and smarter setup screen with UEFI that has mouse cursor and graphics support as well.
- BIOS boots after undergoing POST (Power-On Self Test).
- Ensures that the hardware works in sync with your software.
- UEFI functions faster and smoother. To overcome the restrictions of BIOS you need to move to UEFI.
- A BIOS is unable to boot beyond 2.1 TB due to M/p's way of work and runs in 16-bit mode with 1 MB executable space.
- Initializing multiple hardware is troublesome with BIOS.
What You Should Know Before Using UEFI Instead of BIOS?
On your Windows 10 system, go to "Start" menu and then hit "Shift" + "Restart" to enter power options menu.
- Secure Boot – UEFI allows you to boot your device securely. You can enable or disable it.
- Booting from removable media – It allows you to boot your system from CD/DVD drive, USB drive, and network booting.
- You can enable a legacy BIOS mode even if you have UEFI firmware settings in your computer.
Conclusion
That was all about accessing and changing UEFI firmware settings. We now hope that you have in depth understanding about the differences in the UEFI firmware and BIOS settings. Well, apart from it, if your Windows 10 computer undergoes other issues such as forgotten or lost password. You can always look for PassFab 4WinKey to recover, remove, change or create a Windows password, be it a local, domain, admin password or a Microsoft account. Due to its high recovery rate and 100% secure features, you don't need to bother about any data loss while unlocking a password forgotten system.
