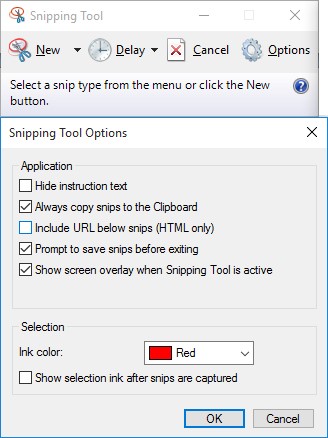
If we ask you what a snipping tool is all about, what would be your response to that? Well! Don't worry, we are not going to do that. We are here to help you understand what a snipping tool is and how to open snipping tool hotkey in Windows 10 computers. Basically, a snipping tool is meant for taking a screenshot of the screen you are on. Apart from capturing a screenshot, the features involve save, annotate and share the image. The supported systems are Windows 10 and Windows Vista/7/8.1/RT 8.1. Further in the article, we have elaborated the functionalities. Keep reading and exploring.
Part 1. How to Open Windows 10 Snipping Tool Hotkey
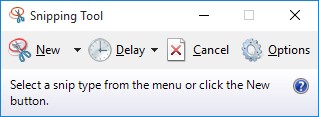
While speaking of opening snipping tool hotkey or print screen hotkey, you need to know what else it can do for you! It can help you perform a variety of exercises such as saving and sharing news stories, reviews, recipes, and reviews etc. You can capture the entire screen or a part of it using the snipping tool, include notes, save it or share it through email right from the "Snipping Tool" interface.
Using a tablet or a mouse, you can annotate the snip and store as a PNG, JPEG or GIF image file. There are various colored pens, highlighter and an eraser to carry out basic image editing of the snapshots with the "Snipping Tool".
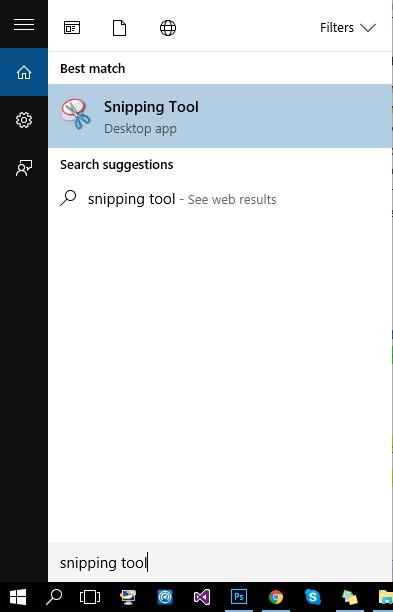
- To launch the "Snipping Tool" you can tap the "Start" button and type "snipping tool". From the results click on "Snipping Tool" and you are ready to use it.


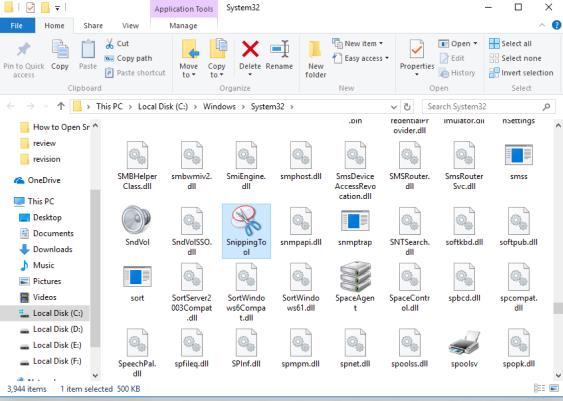
But, for frequent users, setting up hotkeys is the best bet. Here is the process to open snipping tool, through hotkey.
- /powse the "System32" folder and look for "SnippingTool.exe" file over there. You can also find it by following "Program/Accessories" folder.

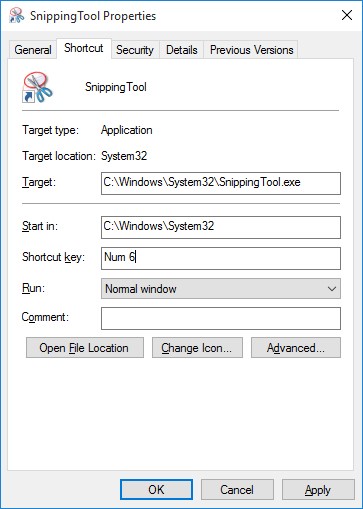
- Tap on "Properties" and then set a hotkey of your preference. Next time, when you click on the hotkey, it will directly launch the "Sniping Tool" with ease.

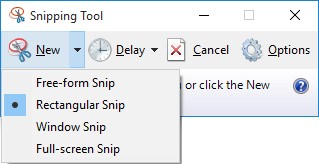
There are various types of snips that you can capture, such as rectangular snip, free-form snip, full-screen snip, and window-snip.
Part 2. How to Use Snipping Tool properly
After knowing, how to open the "Snipping Tool" and understanding the screenshot hotkey, how about exploring some more. Free-form snips help in drawing free-form shape covering the object and a rectangular snip to draw a rectangle around the object. Likewise, a window snip captures a dialog box or /powser window, whereas a full-screen snip is meant for the entire screen. The captured snip gets auto copied on the "Snipping Tool" window, which can later be used as you desire.
You can use these quick keyboard shortcuts-
- Alt + N - Make a new snip with the most recent snipping mode
- Alt + M - Select a snipping mode
- Alt + C - Copy the snip on your clipboard
- Alt + D - To delay capturing the snip by 1 to 5 seconds
- Ctrl + S - Save the snip
For capturing a snip
- Go to the "Snipping Tool" and then choose "Mode" and what type of snip you want to take. Define the area on the screen.
To capture a "Menu" snip
- Go to "Snipping Tool" > open the desired screen > "Ctrl + PrntScr". The entire screen is captured.
For annotating a snip
- Once you capture the snip > "Pen" or "Highlighter" > select area around object to annotate. You can click "Eraser" to remove the pen or highlighter markings.
For saving a snip
- Capture a snip > "Save Snip" > "Save As" > enter a file name, location, type > "Save".
Removing the URL from snip
- Go to the "Snipping Tool" > "Options" > unselect "Include URL below snips (HTML only)" > "OK". You can save the snip from a /powser window as an HTML file.

For sharing a snip
- You can share a snip by clicking the arrow adjacent to the "Send Snip" button right after capturing the snip. Choose the suitable option from the displayed list after that.
Partial screen capture through hotkey
- Using these hotkey tools, you can easily capture parts of a screen. Go to "Windows 10 Creators Update" and press "Win Key + Shift + S" together. Alternatively, create a desktop shortcut through the "snippingtool/clip" command under the "Location" box.
- If you want to captur "Context Menu" through "Snipping Tool", launch "Snipping Tool" > "Esc". Right-click on desktop, folder, or file > "Ctrl" + "PrntScr". The right-click "Context Menu" will be captured this way.
While using hotkey tools there are situations that demand Administrator password. In case you have forgotten the admin password, it becomes tough to carry out the snipping practice. So, to make things easier, you can opt for PassFab 4WinKey and recover the lost or forgotten password. Moreover, this tool assists you in resetting, removing, creating or changing various passwords on your Windows 10/11 computer. If you think it can only retrieve or reset the local password on your Windows PC, then you are mistaken. You can manage the local, domain (Windows Active Directory) or Microsoft password with this amazing tool.
Conclusion
After reading this article, I believe you already know how to open snipping tool now. Besides, we provides a solution if you have any windows password problem. So, if like this article don't forget share it with your friends and family.
