The days of booting Windows from a DVD are long gone. Today, anyone who needs to reinstall Windows on their system uses a USB drive to do the job. Booting Windows through a USB flash drive is easier and far more convenient as compared to burning Windows' ISO image on a DVD. That's why the majority of people have replaced DVDs with bootable USB flash drives.
As long as you have a bootable USB drive, you can easily perform Windows 10 USB boot on any laptop/PC. So, in today's article, we're going to guide you through the steps you should follow to boot from USB drive Windows 10.
- Part 1: An Easy Way to Boot from USB on Windows 10
- Part 2: How to Create a Windows 10 USB Boot Drive If You Don't Have One
- Extra Tips: How to Fix Windows 10 Boot Problems with Windows Boot Genius
Part 1: An Easy Way to Boot from USB on Windows 10
After you've created a Windows 10 bootable USB drive, you can use it to either reinstall Windows 10 from scratch or troubleshoot your system to get rid of various BSOD errors. In either case, you'll have to follow the exact same instructions to boot from USB.
Here's how to boot from USB Windows 10 on your desktop/laptop.
Step 1: Insert the bootable USB drive on your PC.
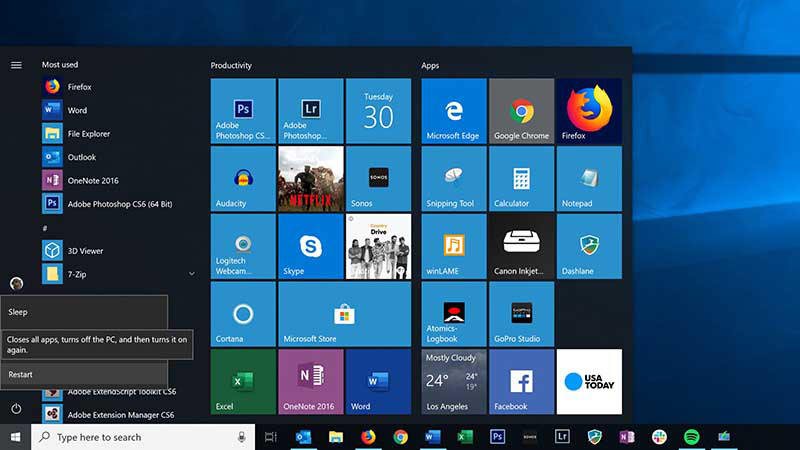
Step 2: Now, click the "Start" button to launch the Start menu.
Step 3: Tap the Power button to load different shutdown options. Press and hold the "Shift" key and click "Restart".
Step 4: Your computer will restart and you'll be directly prompted to the "Advanced Startup Options" screen. Click on the "Use a Device" option.
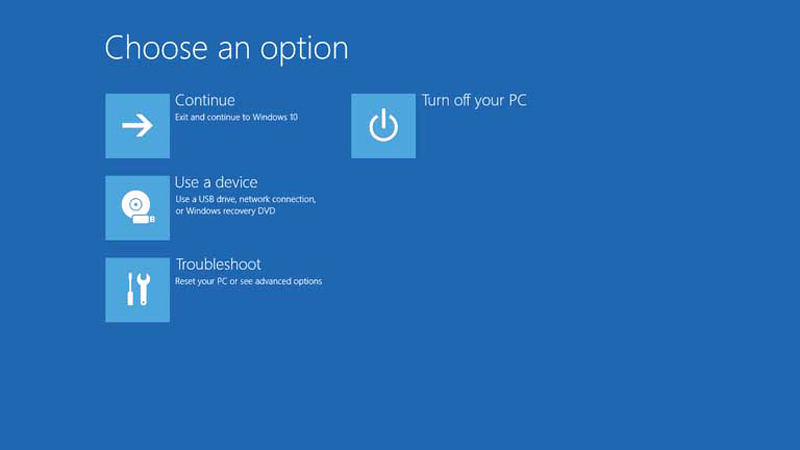
Step 5:Choose the particular USB drive and your PC will automatically start booting from the USB drive.
Now, follow the on-screen instructions to either reinstall Windows 10 or repair your existing OS.
Part 2: How to Create a Windows 10 USB Boot Drive If You Don't Have One
First things first; you must have a USB flash drive that contains a bootable version of Windows 10. Fortunately, Microsoft has made it quite easier for users to create a bootable Windows 10 USB drive. If you don't have one, you can use the official Windows 10 Installation media tool to download the installation files directly onto your USB drive.
Follow these instructions to use Windows 10 installation media tool, and creating a Windows 10 Boot USB will become a cakewalk.
Step 1: Go to the official Windows 10 download page.
Step 2: Under the "Create Windows 10 installation Media" tab, click the "Download Tool Now" button to save the file on your computer.
Step 3: Let the file completely download. Now, launch the Media Creation tool by double-clicking the MediaCreationTool.exe file.
Step 4: Accept the Terms & Conditions and select "Create installation media (USB flash drive, DVD, or ISO file) for another PC" in the next window.
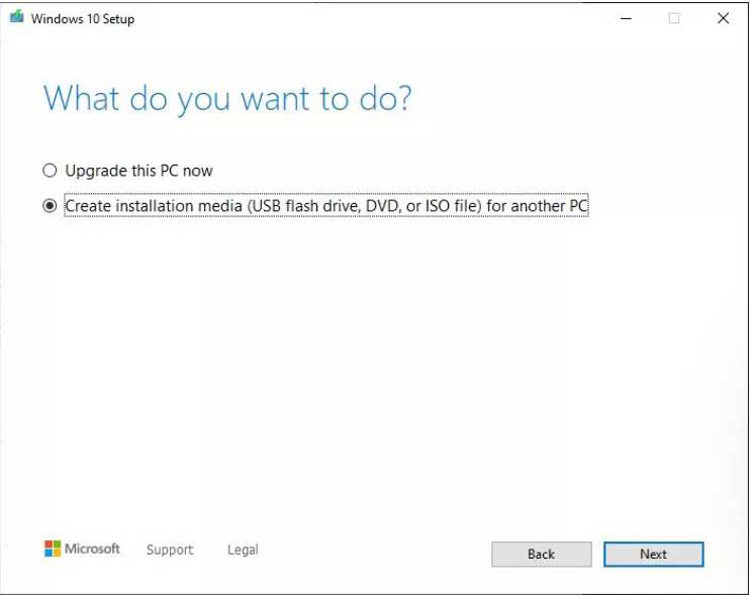
Step 5: Click "Next" and you'll be asked to choose the language, architecture, and Windows edition. Use the drop-down menu next to each category to choose the right option and click "Next".
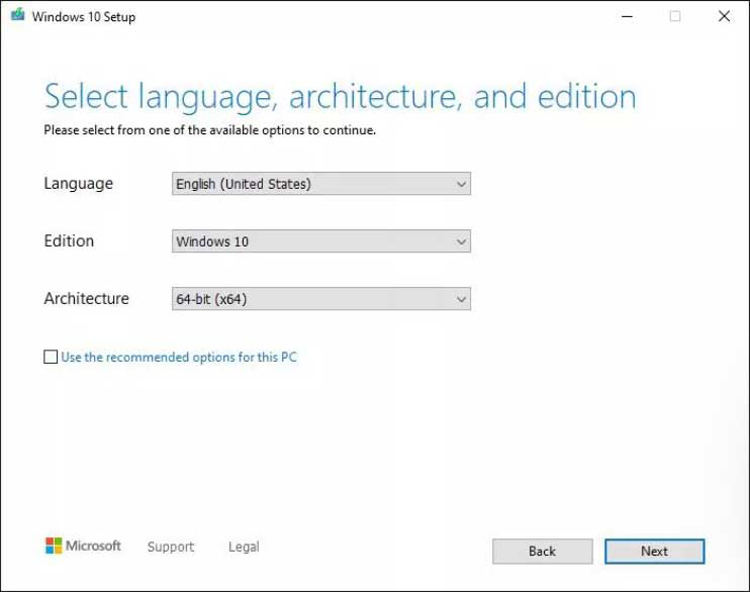
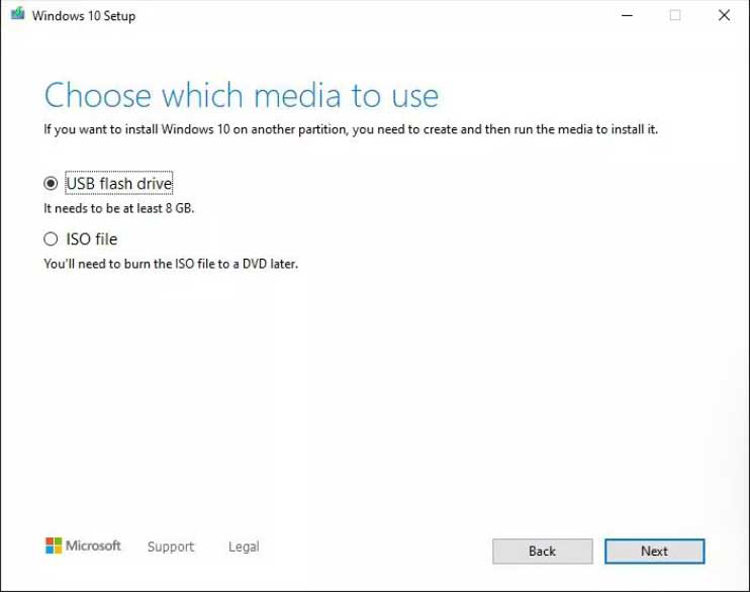
Step 6: Connect the USB drive to your computer. Make sure to use a flash drive with at least 8GB space. Now, choose the "USB Flash Drive" option on your screen and click "Next".
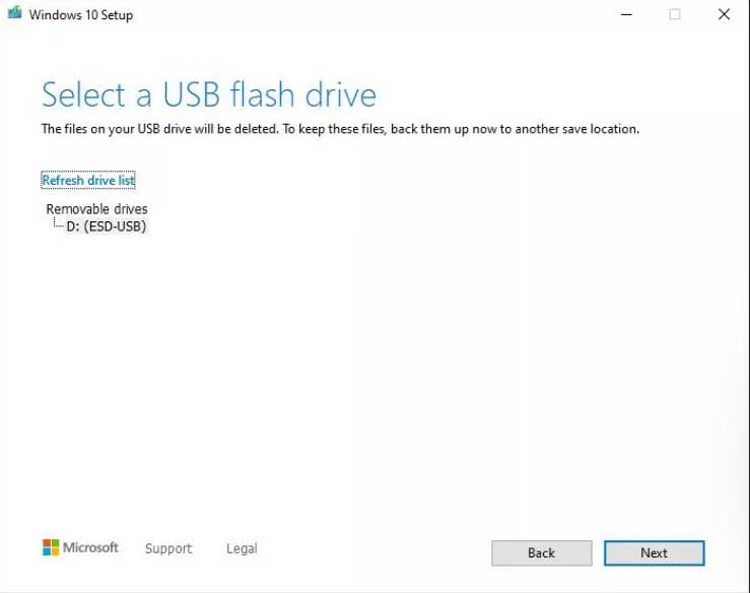
Step 7: Now, select the particular removable drive from the list and click "Next".
Step 8: Tap the "Finish" button to complete the process.
That's it; the bootable version of Windows 10 will be installed on your USB drive and you can use it to reinstall Windows on your system.
Extra Tips: How to Fix Windows 10 Boot Problems with Windows Boot Genius
With time, it's common for a Windows system to run into several booting issues. Some of these issues include frequent Blue Screen of Death (BSOD) crashes, Windows stuck in an update loop, screen freezes, etc.
If you have started to witness these issues more frequently in between the Windows 10 USB boot, it's imperative to diagnose your system and find a solution immediately. One of the ways to fix various Windows 10 booting issues is to use Tenorshare Windows Boot Genius.
It's an all-in-one Windows diagnosing tool that'll help you fix a wide variety of booting issues, ranging from screen freezes to unexpected blue screen crashes. You can also use the tool to recover the password of your Windows system when you're locked out and have forgotten it.
Here's how you can use Tenorshare Windows Boot Genius to Fix Different boot issues.
Step 1: Install the software on your PC and launch it.
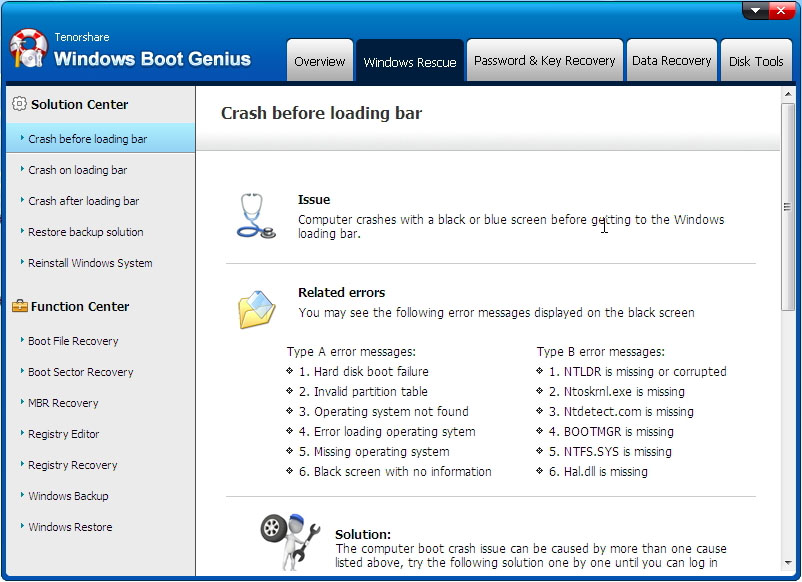
Step 2: In the left-side panel, you'll see different crashing scenarios. Go through the list and choose the right booting issue you're facing with your system.
Step 3: In the right-side panel, you'll see different tabs, containing dedicated fix-methods to fix the problem. You can try all the fix-methods until your system starts booting up normally without displaying any errors/crashes.
Conclusion
We hope that the above guide helped you Windows 10 USB boot on your system and fix whatever issues you were facing. Before bidding adieu, we would also like to point out that you might not always be successful while creating a bootable USB flash drive using Windows media creation tool.
So, if you already have a Windows 10 ISO file, you can use a third-party tool like PassFab 4WinKey to create a bootable USB drive. The tool offers a complete straightforward user-interface and you'll be able to create a bootable USB drive within a couple of minutes.
