Wondering how to take a screenshot on Windows 10 PC? You are in the right place. In today's advanced and digitalized world, your laptop or computer has some built-in tools that can literally take a picture of the screen on it's own. In modern language, it is not called a 'picture' but a 'Screenshot'. Taking screenshots can be extremely helpful for users. It can be used as a copy of temporary information, you can use it in your presentations and what not!
These days, no one goes a day without taking any screenshot of their liking. People usually do that on their mobile phones but modern technology has allowed users to capture shots of their computer screen as well. In this article, we have provided all the methods you can apply to take a screenshot on your computer. To find out more, continue reading!
Part 1: How to Screenshot on Windows
Windows have provided a number of ways through which you can capture screenshot of your pc screen. It is possible to take a shot of your entire screen or just mere parts of it. This is done by some in-built tools in your Windows. These tools show their magic if you follow some easy instructions related to them. There are multiple ways and you can choose any method that suits you the best. So, still wondering how to take screenshot on Windows 10? Don't worry, we have got you all covered. Keep reading to find out!
Way 1: Take A Screenshot on Windows with PrtScn key
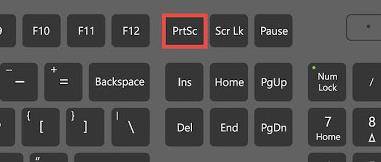
One of the most basic ways to capture a screenshot is through the PrtScn ( Print Screen) command. This command is present on every keyboard (find it near F12). Press this key and it will automatically copy your screen to the clipboard. Now, it might look like nothing happened. But if you check your clipboard, your screenshot is saved there. You can save this as a file without any hassle.

Also, if you are using a PC with Windows 10, you press “Windows Key” + “PrtSC” simultamiously and it will automatically take a screenshot of you entire screen. Your screen will blink like a camera shutter when you take the screenshot using this command. Finally, your screenshot will be saved in “Pictures” folder in documents.
Way 2: How to Screenshot on Windows via Snipping Tool
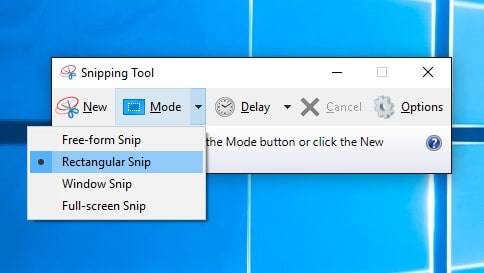
You might not be aware of this but the snipping tool has been with Windows since a long time. It also might be true that you have never come across it. This little tool is like a magician. Snipping Tool alone can be the best method to take a screenshot. It is an amazing desktop app that lets you edit and create shots of whichever screen you would like. You simply need to go to the 'Start Menu' and search for 'Snipping Tool'. There are different modes available and you can choose any one of them. Let's talk about these modes in little detail:
- 01Free-form Snip: It allows you to draw lines around any selected area.
- 02Rectangular Snip: This option enables you to take a rectangular shaped screenshot. You can simply drag the cursor around an area or object and it will take your screenshot.
- 03Window Snip: This feature enables you to select a dialogue box or window and the screenshot will be captured.
04Full-Screen Snip: This allows you to take a screenshot of the entire screen. It is almost just like the Print Screen key.

Extra features of this tool include changing Ink color, including links, hiding instruction texts etc. I am sure that now you know how to take a perfect screenshot with the help of the Snipping Tool! I hope it works well for you.
Way 3: Take A Screenshot on Windows Using Paint
We have all used Microsoft Paint atleast once in a while. Taking a screenshot of your screen with the help of Ms.Paint is also very easy. To get to know how to take a screenshot of your pc with the help of Ms.Paint, just follow these commands:
- 01Press the PrtScn key on your keyboard. This will copy everything on the clipboard.
- 02Press Alt+PrtScn if you want to capture your current display only.
03Search 'Paint' on the 'Start Menu'.

- 04When the screen of 'Paint' will pop up then press Ctrl+V. This will paste your screenshot on the Paint screen. You can edit your captured screenshot.
- 05To save this screenshot, simply press Ctrl+S and you are good to go!
Summary
If you have reached the end of the article, then I am hopefully believing that you have been succesful in capturing screenshots on your computer! Go through every method thoroughly and I am sure that you will find one that suits you the most. Also at times, your computer asks you to enter your Windows password. It could be possible that you have forgotten it. If that is the case, you can use PassFab 4WinKey to get access to your password back within little to no time! Cheers!
Part 2: FAQs About Windows Screenshot
Q1: How do you take screenshots on laptops?
There are a number of different ways to capture screenshots on a laptop. You can use the very simple PrtScn command, snipping tool, or even Ms.Paint! To use these features, you have to follow some instructions. Read the article to find out more.
Q2: Where do screenshots go on PC?
When you capture a screenshot of your screen, it is saved on clipboard. It might look like nothing happened but the screenshot is saved automatically. Also, you can look into the “Pictures” folder in documents if you are using Windows + PrtScn command.
Q3: How do I edit screenshots on Windows?
If you wish to edit screenshots then you can easily do that on Microsoft Paint. You can use all the features that Paint allows and work on your captured shot just as you like it!


