Lenovo ThinkPad is a business-oriented laptop, which is categorized as one of the best available in the market. It offers a wide range of features that can help you with multitasking, gaming, and other high-end business operations. But unfortunately, most of these laptops bring some internal hardware and software issues that suddenly make the screen black. Lenovo ThinkPad’s black screen is a common issue and most users face it because of different reasons. Let’s discuss the major causes of Lenovo black screen on startup issue and its relevant fixes.
Causes of Lenovo thinkpad Black Screen
1. Disk Errors
One of the most common causes of the Lenovo ThinkPad black screen is problematic drive errors. The usual causes for hard drive errors are fluctuations, poor system maintenance, viruses, etc. When these problems occur, it is likely to affect the system's external and internal hard drives. It also leads to data loss in most cases.
2. Graphics Card Errors
The graphics card malfunctioning or errors results in the black screen of Lenovo ThinkPad. The signs of graphics cards malfunctioning are black or blue screens, excessive fan noise, screen glitches, and shutters. In most cases, you will not see your screen’s display as this error will turn everything black. This indicates that your graphic card has stopped working.
3. Windows OS Behaving Unexpectedly
The uneven behavior of Windows is also a significant reason behind the Lenovo ThinkPad black screen issue. The system starts operating slower than usual, creating strange beeps of notifications, files changing their names, deletion of files, etc. These are the various reasons that cause black screen issues in the Lenovo ThinkPad caused by Windows errors.
4. Faulty Laptop Battery
The laptop’s faulty battery can also be the reason behind the Lenovo ThinkPad not booting up and showing a black screen at the startup. The laptop indicates battery failures by showing signs like short-run times, frequent shutdowns, charging failures, overheating, etc. These problems occur due to the defective battery.
- Effected or failed graphics cards or drivers.
- Corrupted drivers or failures.
- Display issues in the monitor or the display drivers.
- Certain conflicts in the system.
- Problems in the application you are running.
It is important to identify the reason for the issue so that you can utilize the fix in the right way. Now that you know the significant reasons for the issue let’s look into the fixes to solve the black screen with cursor left on the screen issue.
Solutions To Fix The Lenovo Black Screen Error
You can utilize different techniques to restart a computer that won’t start. However, it is important to follow each step closely to avoid any issues or data loss. Let’s take a look at the five different methods that you can utilize to fix lenovo thinkpad black screen on startup issue.
1. Reset The Display Or Screen Mode
In most cases, the Lenovo ThinkPad witnesses a minor glitch in the form of a black screen. It is likely to occur when a Windows drops a connectivity issue to the display. The issue is common and most of the time, the black screen occurs because of this issue. To fix the problem, simply press Windows + Control + Shift + B shortcut to get the issue resolved.
This technique will help you reset the connection and regain your Lenovo ThinkPad’s screen display. After completing it, check to see if your screen is displaying fine or not. If this trick doesn’t work, move to the next fix.
2. Disconnect The Non-Essential Peripherals Devices
Peripheral devices like printers and external hard drives can cause the popping up of a black screen on your Lenovo ThinkPad. The reason can be the incompatibility or malfunctioning of any particular peripheral. These two factors mostly result in the Lenovo ThinkPad black screen issue. Also, the virus in an external hard drive can harm your system's functioning, leading to data loss.
In these situations, you must detach the non-essential peripheral devices from your system and check to see if your lenovo laptop screen black issue is fixed.
3. Hard Reset Your Lenovo Laptop
Errors in the internal programs of certain software can also result in various issues. The spinning dots in the booting process indicate that you should hard reset your Lenovo ThinkPad to check it. Let’s look at the steps you can follow to hard reset your ThinkPad.
- Shut down your Lenovo ThinkPad.
- Unplug ThinkPad power cords.
- Remove the battery gently.
- Detach all the devices from the laptop.
- Leave your ThinkPad idle for 30-40 seconds.
- Press the power button for 1 minute.
- Connect the battery and switch it on.
4. Update Graphics Driver
Using a wrong or outdated graphic card driver can also lead to the popping up of a black screen on your Lenovo ThinkPad, and there is no such way to update the graphics driver on a black screen. However, using the system in a Safe Mode can enable you to edit the graphics card driver. Let’s discuss steps you can follow to operate your ThinkPad in a secure mode.
Boot in Safe Mode First
- Repeatedly press the F8 key as soon you turn ON the power supply.
- Click on Safe Mode with Networking in Advanced Boot Options and press Enter.
You can now operate Windows in Safe Mode if you follow the above steps correctly. Once it is booted correctly, you should follow further steps to update your graphics card drivers.
-
Simultaneously press Windows + R key to the open Run box.
-
Type in devmgmt.msc and hit Enter to open Device Manager.

-
Right-click on Display Adapters and click Update Drivers.
5. Restart The Explorer.exe Process
Explorer.exe operates several important operations carried out on a taskbar, desktop, etc. If your system Explorer.exe is closed, it will disappear from your taskbar and desktop. This causes the lenovo laptop screen black issue.
-
Press Control + Shift + Escape keys to open the task manager.
-
Select the Details tab (It is the Processes tab in Windows 7).
-
Look for the explorer.exe and click on End Task.
6. Disable Fast Startup
Fast Startup is embedded in Windows 10 and improves the booting speed of your system. However, it can also mess up the process of booting since it compresses the processing time of the computer while it starts. Take a look at the steps to disable the Fast Startup feature of the computer.
-
Press Windows + R simultaneously to open the Run box.
-
Type powercfg.cpl and press Enter. It will open the Power Option tab.
-
Click on Choose What The Power Buttons Do.
-
Click on Change Settings That Are Currently Unavailable.
-
Un-tick the box Turn On Fast Start-Up.
-
Click on Save Changes and close Windows.
7. Perform A System Restore
Sometimes new upgrades or installations also cause a black screen on your Lenovo ThinkPad. The possibilities of the system glitches are due to the incompatibility of the program versions with the Windows version. In this case, the most efficient way to restore your screen’s display is a system restore.
-
Search for System Restore in the Control panel and click on it.
-
Turn ON the protection of your drives.
-
Click Next, and complete the process to successfully restore the system.
8. Smart System Repair By Using Passfab FixUWin
The PassFab FixUWinis an effective tool that can help you in repairing the black/blue screen issue and booting the system properly. It is also efficient in resetting the Windows domain and local passwords. Additionally, it can recover data from unbootable hard disks too and shred undeletable files completely. Take a look at the steps to fix the black screen with the PassFab FixUWin.
-
Download and launch the software and select your boot media. The easiest way is to choose USB Flash drive.
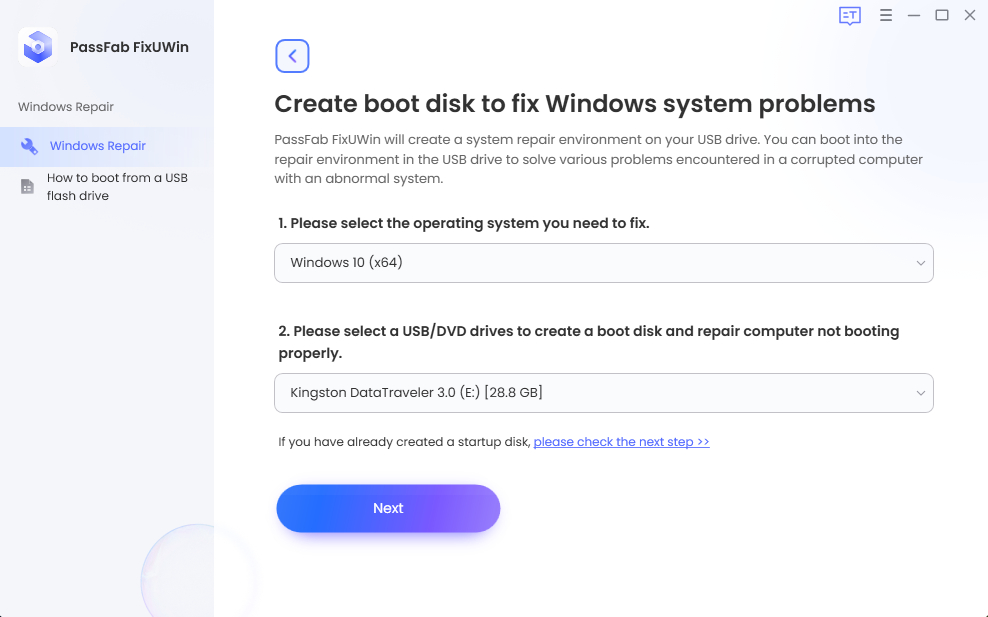
- Insert the bootable USB, CD or DVD to the black screen computer.
-
Restart the computer and press "F12" or "ESC" to enter Boot menu.
Boot Key Desktop Laptop Motherboard F12 ASUS, Acer, Founder, HP, Hasee, Haier, Lenovo, THTF Acer, BenQ, Dell, Emachines, eMachines, Fujitsu, Founder, GIGABYTE, Gateway, IBM, Lenovo, SAMSUNG, ThinkPad, Hasee, TOSHIBA, THTF, MSI Great Wall, Dell, TOSHIBA, Foxconn, GIGABYTE, Fujitsu, Gamen, Haier, IBM, Lenovo, Topstar, SONY, THTF, SAMSUNG, ThinkPad, Acer, HP, Hasee, Founder Esc Dell ASUS, Sony Great Wall, Foxconn, ESC, SOYO, MAXSUN, Colorful, SONY, SAMSUNG, Spark, UNIKA F9 BenQ, HP BISOTAR, HP -
Click “Automated repair” to start repair your laptop
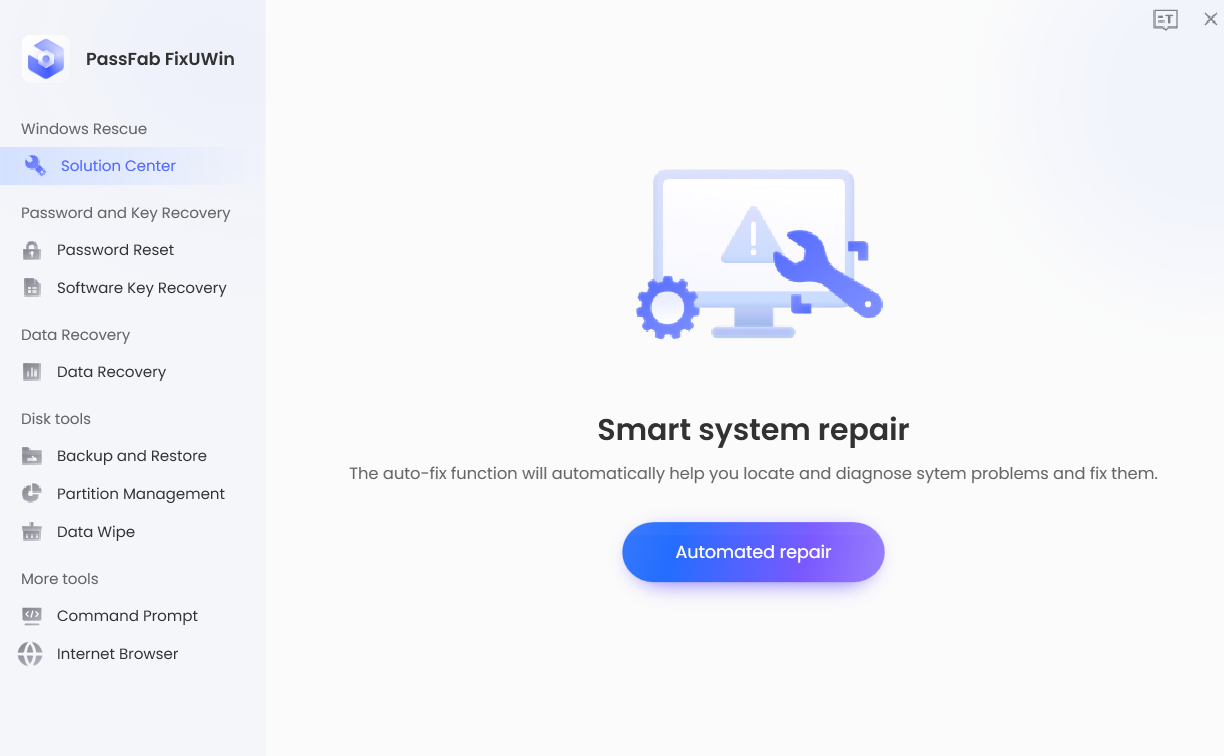
- After repairing complete successfully, click “restart” to start your computer. After that you can check whether lenovo thinkpad black screen won't turn off exist or not.


Conclusion
There are various reasons behind the Lenovo ThinkPad black screen issue. It can be really irritating as you won’t be able to access the screen. You can apply various techniques to solve the issue. Some of them can be time-consuming while others might require some technical knowledge. The best technique that offers great value is the use of the PassFab FixUWin . The tool provides you with an all-in-one solution to fix not just the Lenovo ThinkPad black screen, but all the other similar problems.