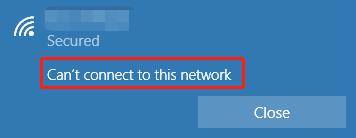
Almost every Windows 10 user faces the can't connect to this network error once in a while. Access to the internet plays a fundamental role in everyone's daily lives. So, it can be quite annoying if you are facing this issue continuously. Basically, this error makes it impossible to connect to any available network. But then again, there is a solution for everything. There is no need to worry at all! Here, we have gathered the methods that will help you resolve this problem once and for all.
Part 1: Why Won't My Computer Connect to WiFi
In some unfortunate events, your PC may refuse to connect to the WiFi at all. There can be several reasons behind the can't connect to this network WiFi error in Windows 10. It can be possible that you are facing any one of the following issues:
- The network cables, modem or routers could be unplugged or loose. It is very common for people to miss this point out.
- The range of the WiFi network is not sufficient. If you are trying to get hold of the internet outside your range limit, then your PC will not connect to the WiFi.
- At times, the network is unable to connect due to corrupted device drivers.
- Your router is faulty.
- The software packages installed on your computer are incompatible. Corrupted programs can also be a reason behind this issue.
If you are facing the same problem, then you need to check out the following methods to resolve it for good.
Part 2: How to Fix Can't Connect To This Network
There are definitely a bunch of different ways to fix “can't connect to this network” error in your Windows 10. In this part, we will talk about how you can solve this issue by trying out different methods.
- Method 1: Restart WiFi and Reboot Windows
- Method 2: Run Network Troubleshooter in Your Computer
- Method 3: Disable and Enable Network Adapter in Device Manager
- Method 4: Set WLAN Auto-Config Service to Automatic Running
- Method 5: Reinstall Your Network Adapter Driver
- Method 6: Method 6: Manually Add Connections
Method 1: Restart WiFi and Reboot Windows
This is the first and foremost method that you should try. For this purpose, you simply need to restart your router and reboot your Windows. Follow these steps carefully:
1. Turn off the device by pressing the power button on your router.
2. Now, press the power button again to restart the router.
3. Finally, connect to the WiFi on your computer. Now, your WiFi is restarted.
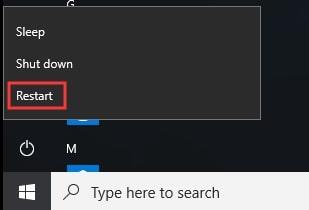
4. Now, it is time to reboot Windows. Open Start Menu and press the Power Button.
5. Here, click on Restart from the pop-up.
We hope this will resolve your issue regarding WiFi network problem. If this method didn't work for you, there are 5 more methods that you can try. So, without further ado, let’s check the method 2.
Method 2: Run Network Troubleshooter in Your Computer
Network Troubleshooter is one of the easiest ways to figure out network issues. The steps are very simple:
1. In the taskbar of your computer, click on the search bar and type Network Troubleshooter. Now, hit enter to open the program.
2. Select “Identify and repair network problems” from the main interface.
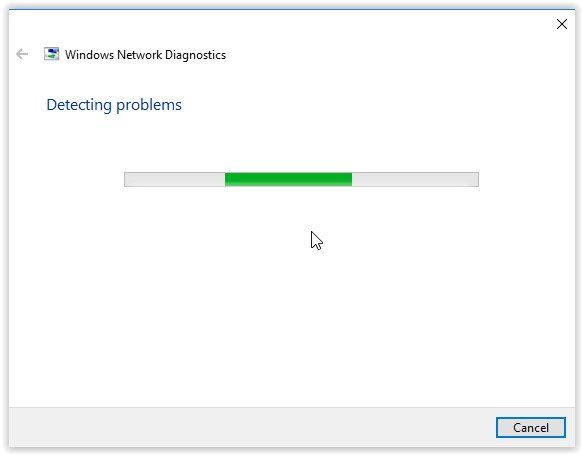
3. The Network Troubleshooter will start detecting problems.
Method 3: Disable and Enable Network Adapter in Device Manager
A network adapter is an essential part of your computer system. I understand that facing the can't connect to this network error in windows 8/10 can be devastating. However, don't worry, guys. The fix for “windows 10 can't connect to this network” error may be as simple as disabling and re-enabling the network adapter. You can easily use Device Manager for this purpose.
1. To disable, open Start and search for Device Manager.
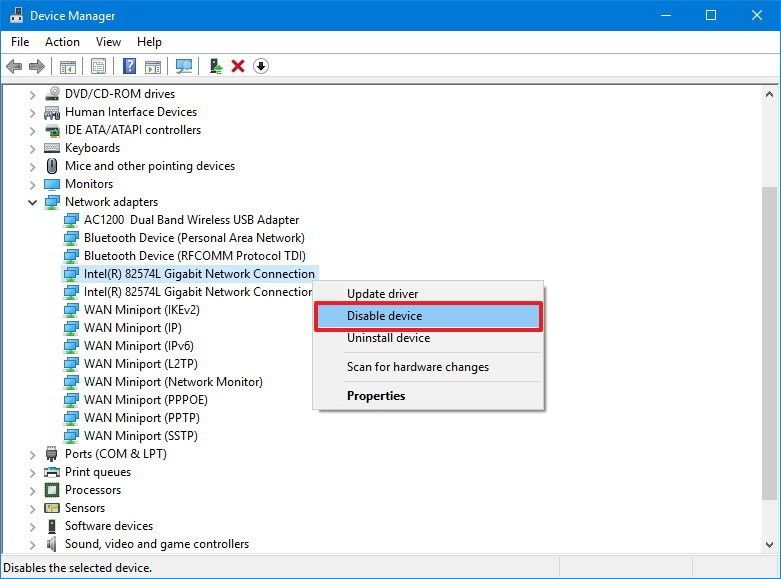
2. Once you are in Device Manager, find out the “Network Adapter” categories.
3. Right-click the adapter of your wish to disable and click Disable.
4. Now to enable an adapter, go to Start once again and follow the same procedure.
5. Finally, select the Enable option instead of Disable.
Method 4: Set WLAN Auto-Config Service to Automatic Running
This Wireless utility allows a user to connect or disconnect the adapter from the network in little to no time. Follow these step by step instructions to set WLAN Auto Config Service to Automatic running.
1. Go to Control Panel.
2. Click on System and security.
3. Select Administrative Tools.
4. Click on Services.
5. Now, look for WLAN Auto Config and select it.
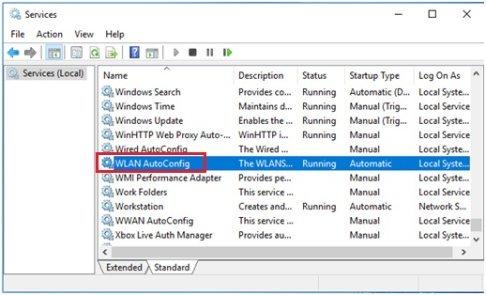
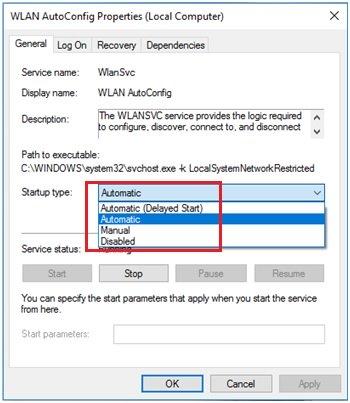
6. Now, check the Startup type and turn it to Automatic.
Method 5: Reinstall Your Network Adapter Driver
One of the most prominent reasons behind the “can't connect to this network” error in Win 10 is faulty Network Adapter Drivers. This can happen due to 2 reasons, either the drivers got corrupter, or they have become outdated. Here, we will let you know how to update your network adapter driver. Anyways, reinstalling or updating the drivers may fix your “windows 10 can't connect to this network” error. You can either update the drivers manually or use an automatic utility tool to do the job for you.
Options 1: Manually update network driver in Device Manager
1. Click Start, type Device Manager, and press Enter.
2. Look out for the Network Adapters option.
3. Right-click on a specific network driver and select Update Driver Software.
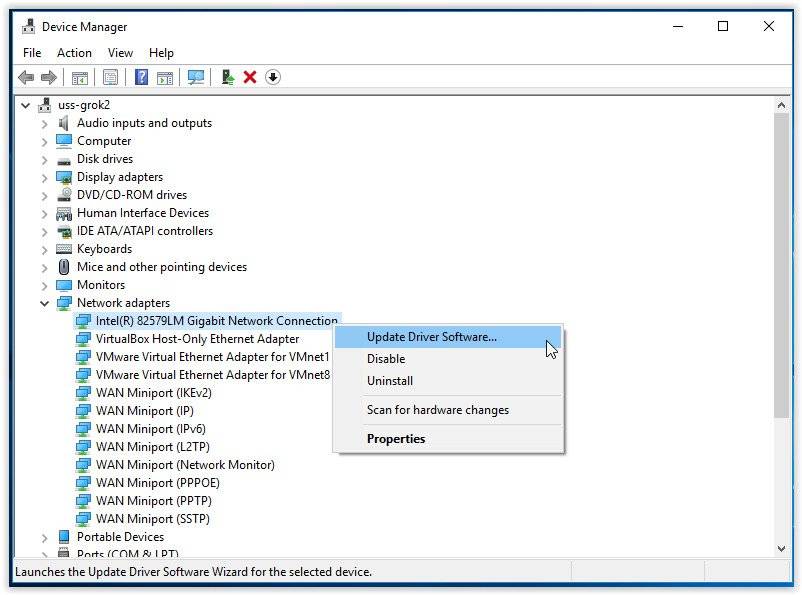
4. Select Browse my computer for Driver Software.
Note: You must have downloaded and saved the driver somewhere in your PC.
5. Finally, click Browse, select the driver file for update, and select Next.
Option 2: Update network driver using a driver updater
For this, you need to install any Automatic Driver Updating Tool. Now, there are several such tools available on the internet. However, most of them don't work at all. Therefore, we have made your work easy and found a tool that is very easy to use. The tool I am talking about is none other than the famous "Driver Easy."
1. Download and install Driver Easy on your PC.
2. Run the software and scan your computer for all outdated drivers.
3. Once the scan is finished, it will show you a list of all the issues related to drivers on your PC.
4. This way, you can easily see all the outdated drivers and update them without any hassle.
Method 6: Manually Add Connections
Fortunately, Windows 10 offers a wide range of ways to add connections to your computer. In this part, we will learn how to add connections manually while using the Control Panel.
1. Open Control Panel and click on Network and Internet.
2. Now, select Network and Sharing Center.
3. Go to the Set up a new connection link.
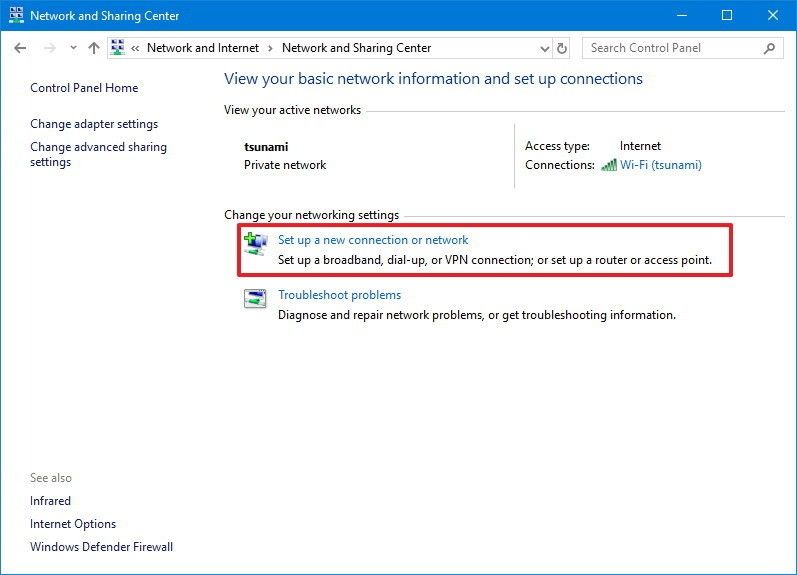
4. Now, select the "Manually connect to a network” option.
5. Click Next and start entering details, including SSID, Security Type, and Password.
6. Now click on Start this connection automatically.
7. Click Next and then Close.
Summary
It can be quite troublesome if your laptop shows the “can't connect to this network” error. As the name suggests, this error doesn't let you connect to the internet. As we know, an active internet connection is necessary to surf any website. We have shared 6 different methods that you can use to fix “can't connect to this network” error in Windows 8 and 10. By the way, if by any chance you forget your WiFi password, you can try the PassFab WiFi Key to recover it without any hassle. You can thank me later!
