- Before removing the Activation Lock, you are required to jailbreak your device.
- Before jailbreaking, you need to create a jailbreaking environment(Checkn1x) in your USB with PassFab Activation Unlocker for Windows.
- Then boot from the USB to jailbreak your device in the jailbreaking environment(Checkn1x).
- This turorial will guide you how to jailbreak your iOS device step by step.
Part 1. Preparations for Jailbreaking iDevice on Windows
Please ensure that the jailbreaking environment(Checkn1x) has been installed in your USB with the help of PassFab Activation Unlocker for Windows.
Part 2. Detailed Guide to Jailbreak iDevice on Windows
Step 1. Boot System into the Jailbreaking Environment
Restart the computer. When the computer is turned on, press F12 shortcut key to choose boot options before loading operating system.

Note:
For most computer brands, the shortcut key for boot options is F12. You are supposed to search for the correct key matched your computer if F12 doesn’t work. Here are some common shortcut keys for boot options.
Boot Key Desktop Brands Laptop Brands Motherboard Brands of Assembly Computer ESC Dell ASUS, Sony MAXSUN, UNIKA, SUPOX, Spark, SOYO, EPOX, UNIKA, Jetway, J&W, Colorful, ECS, SOYO, FOXCONN F8 ASUS, BenQ ASUS, YESTON, J&W F9 HP, BenQ BIOSTAR, GUANMING F10 MSI MSI, ASRock, ONDA, Colorful,ECS, Gamen, Topstar F12 Lenovo, HP, Acer, Hasee, eFound, THTF, Haier Thinkpad, Dell, Lenovo, TOSHIBA, Samsung, IBM, Acer, Hasee, Haier,eFound, THTF, GIGABYTE, Gateway, eMachines GIGABYTE, Intel, Cthim, SOYO, FOXCONN, Gamen, Topstar If you can't enter Boot Menu, enter BIOS/UEFI to change Boot Options settings. So that you can run Checkra1n on Linux. Please read the following articles to get detailed information.
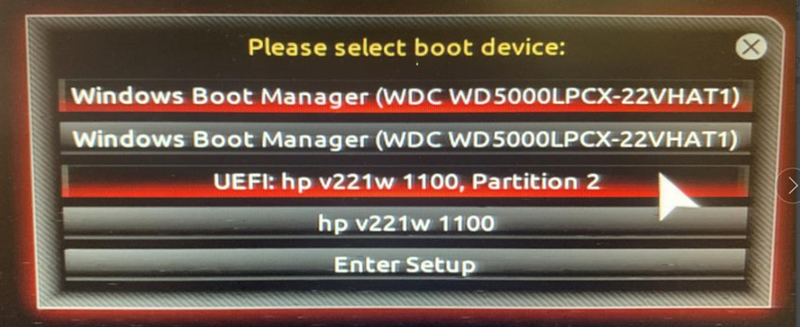
In the boot options window, choose the USB you’ve created the jailbreaking environmet(Checkn1x) in it with PassFab Activation Unlocker.

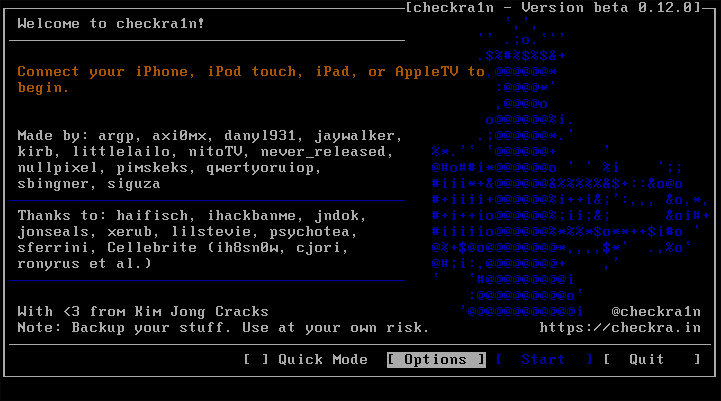
If your computer shows as below, it is already in the jailbreaking environment(Checkn1x).

Step 2. Jailbreak iDevice via Checkn1x
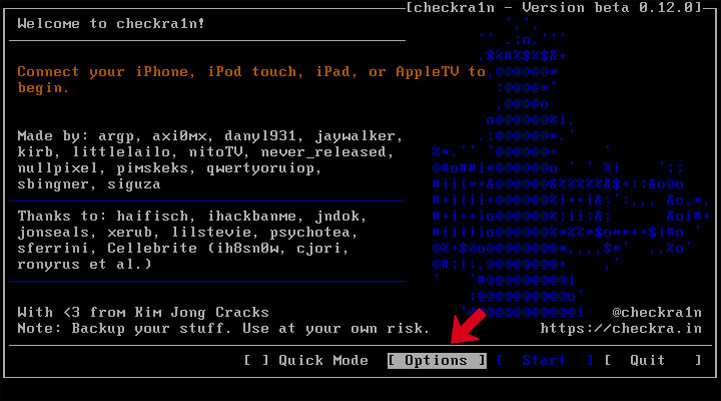
Once it shows this interface, connect your iOS device to the computer. Use arrow keys to navigate to Options, and press Enter key to set the jailbreak tool.

-
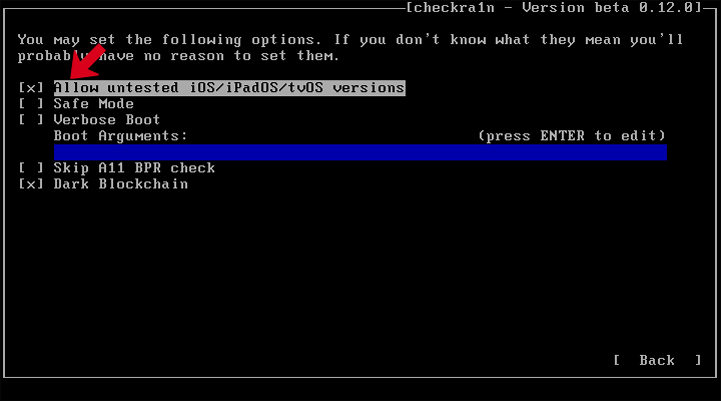
In the settings page, use arrow keys to select Allow untested iOS/iPadOS/tvOS versions in settings and press Enter key.

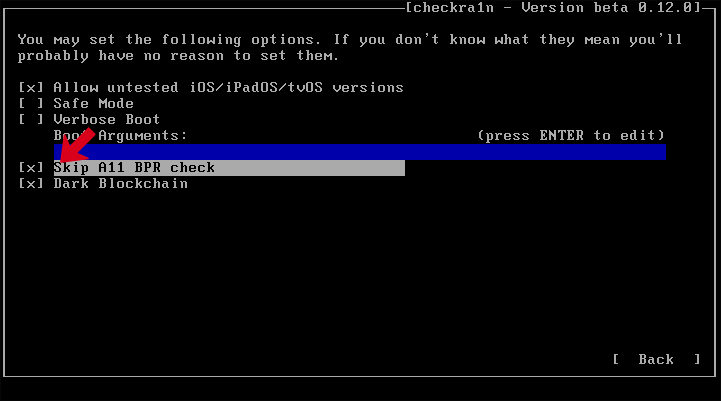
Navigate to Skip A11 BPR check, and press Enter.

Notes:
- 1. Only whose iPhone 8/8 Plus/ X with iOS 14 system need to check "Skip A11 BPR check" option.
- 2. iPhone 8/8 Plus/ X running iOS 14 with lock screen passcode could not be jailbroken, unless the device has been deep flashed before jailbreaking.
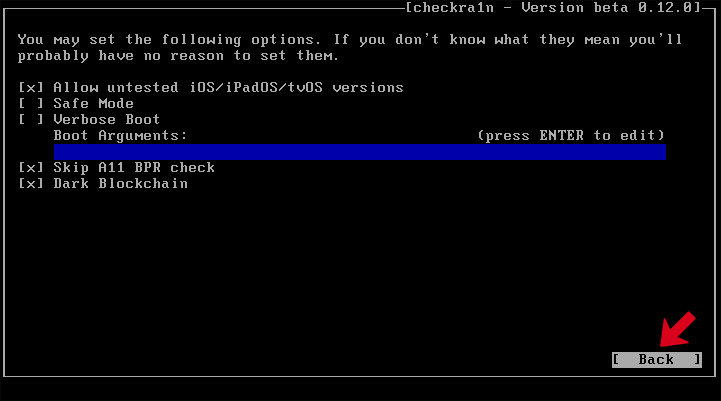
Then navigate to Back and press Enter key to return to the main interface.

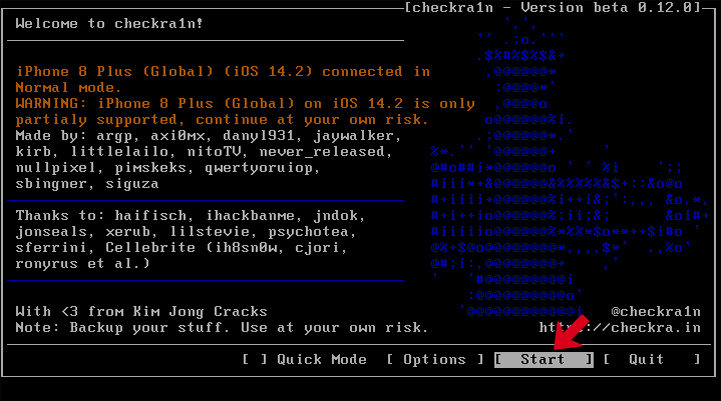
Hit the Start button to start to jailbreak the device.

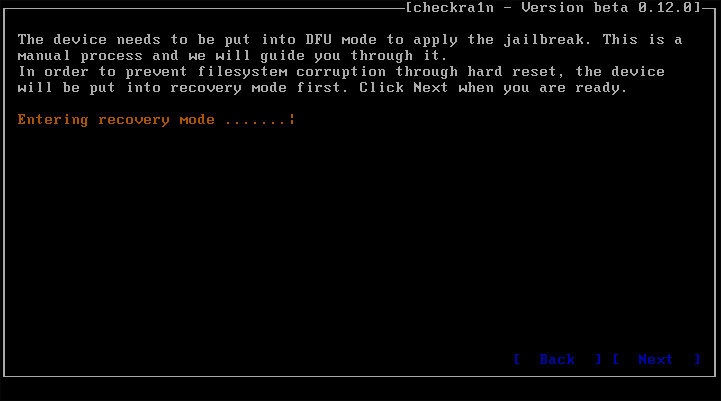
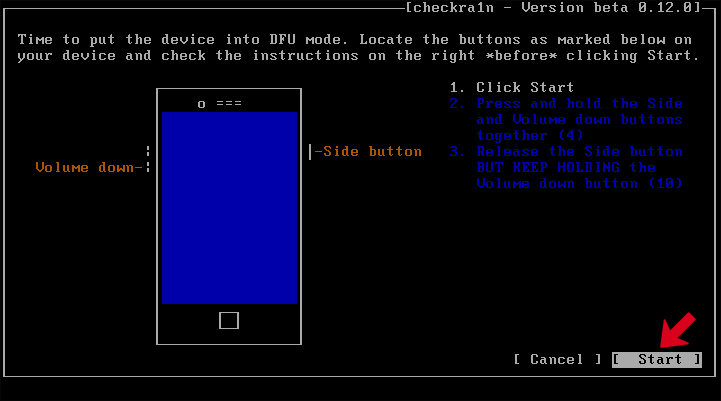
To jailbreak your iDevice, it requires your device to be in DFU mode. Please select “Next”, and the program will guide you to put your device into DFU mode.

Checkn1x will put your iDevice into Recovery mode first automatically when you select “Next”.

Hit “Start” when your iDevice is in Recovery mode. Then follow the guide of checkn1x to put your iDevice into DFU mode.

Once your device has entered DFU mode successfully, checkn1x will automatically jailbreak your iDevice. Select “Done” when the jailbreaking process completes, and then unplug the USB.

Part 3.How to Remove the iCloud Activation Lock After Jailbreaking Successfully?
- Please restart the computer, you computer will enter Windows operating system automatically. Then use PassFab Activation Unlocker to bypass the iCloud Activation Lock.
- Go to How to Use PassFab Activation Unlocker to check how to remove iCloud Activation Lock.
Tips for You:
Tip 1: If the jailbreaking process gets stuck:
Change a different USB flash drive and try to jailbreak again.
Restart your iOS device and computer and try to jailbreak again.
Tip 2: If failed to jailbreak:
Re-plug your device into the USB port on the back of your computer host and try again.
Tip 3: For iPhone 8/8 Plus/ X devices with iOS 14 system:
Don't set screen passcode for these devices after removing the Activation Lock. Or the device will go back to the status before jailbreaking.
Tip 4: If failed to jailbreak iOS devices with iOS 14.2 system:
While jailbreaking some devices with iOS 14.2 system, Checkn1x may report that fail to jailbreak your device with a prompt of [Error code-92]. But actually, your device has been jailbroken successfully. Continue to use PassFab Activation Unlocker to remove the Activation Lock. (Devices with iOS 14 & iOS 14.1 do not have this issue.)
Tip 5: The USB flash drive cannot be formatted or written:
After creating a jailbreak environment in the USB flash drive with PassFab Activation Unlocker, the USB flash drive is probably unable to be formatted and written. Use the built-in disk management tools to format your USB flash drive.
