I have a Sony VAIO laptop with windows 7. When I turn it on, it gets through the VAIO screen perfectly fine, but, after that, the screen turns black and stays that way. So, I decided to format laptop to its factory settings. When I get to the screen that says “recovery setting is being launched please wait” it just keeps loading. I can move the mouse around so it isn’t frozen. What should I do?
The reason for the above situation is that the drive partition may be damaged or even non-existent, so you need to format the Sony VAIO. Therefore, in this situation, how to easily and effectively restore the Sony VAIO diskless to the factory has become a thorny issue. No worry, the problem is not as difficult as you think. You can format your Sony VAIO laptop through VAIO Recovery Center or VAIO Care. If you follow this paragraph, it won’t take too much effort and time to solve the problem.
Just choose one and put it into practice:
Part One: How to Format Sony VAIO Laptop without Disk?
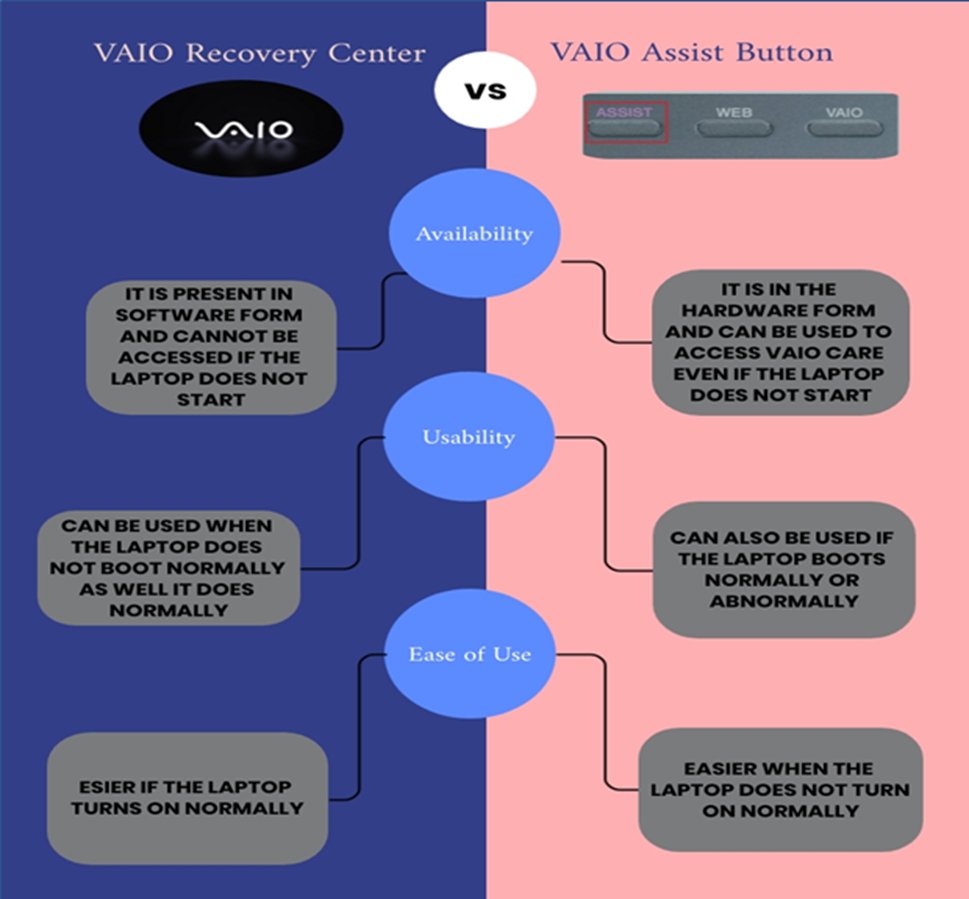
As you might know that the VAIO Laptops do not come with a recovery disk, then how to reset Sony VAIO? To format or recover it, we can either use VAIO Recovery Center or Sony VAIO Assist Button. Here is a comparison table between both the methods. You can choose the option that suits you.
Warning:
Remember that formatting sony vaio removes all the data that is stored in your laptop,so if you do not want to lose any data, please make a backup before following this procedure.
Option 1: Format Sony VAIO Laptop with VAIO Recovery Center
Scenario 1: If your Sony VAIO Laptop cannot Boot Normally
- Turn on or restart your Sony VAIO laptop.
When the VAIO logo appears as shown in the following image, press the F10 key several times to enter the Sony VAIO BIOS Boot menu.

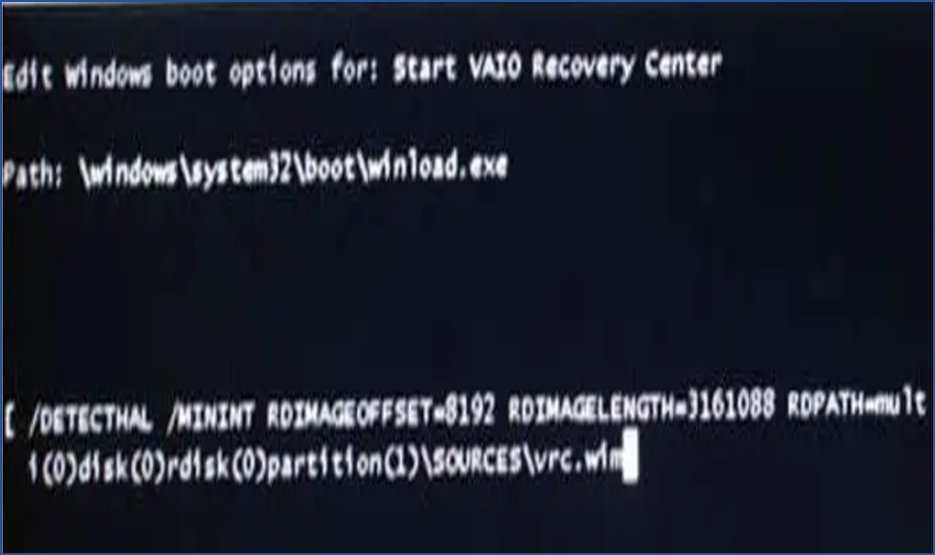
Edit Boot Options screen will appear. Press Enter to proceed.

Scenario 2: If your Sony VAIO Laptop can Boot Normally
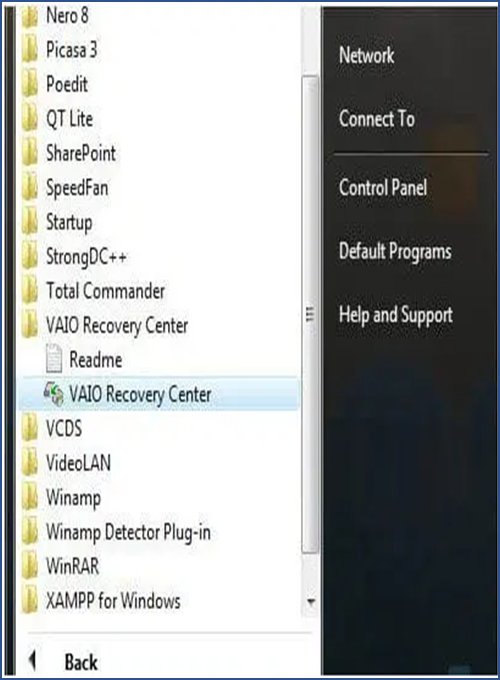
- Open the Start menu.
- Go to All Programs.
Click on the VAIO Recovery Center to launch it.

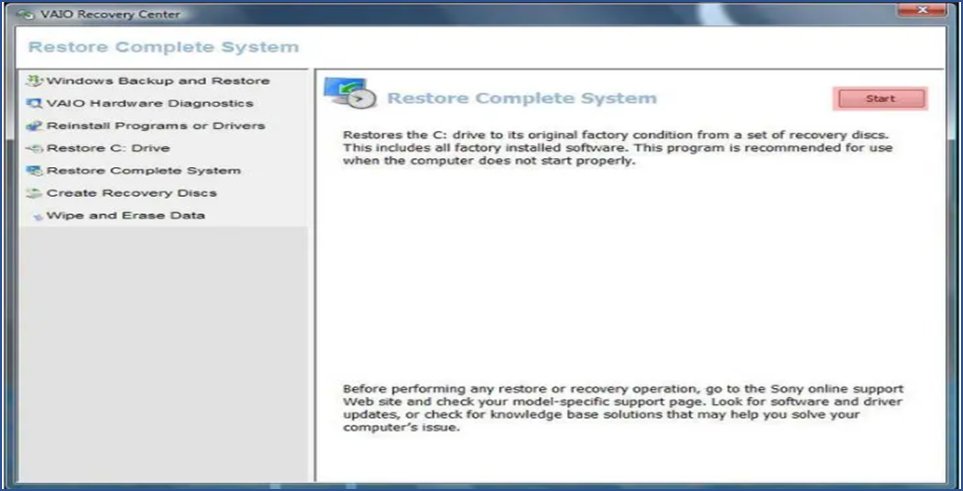
- When the VAIO Recovery Center window opens, choose Restore Complete System from the left navigation menu.
Now click on the Start button to proceed.

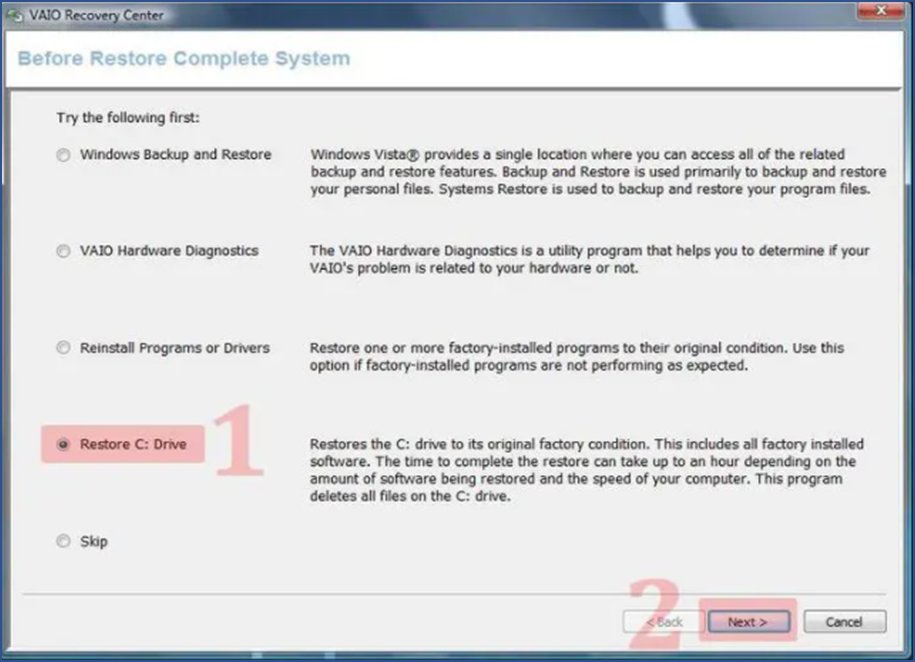
In the following window, choose Restore C drive and click on the Next button

- A warning will appear on the screen. Check the ‘I understand’ box and click on the Start button. The process of restoring the Windows and reformatting the Sony VAIO laptop will start.
After the process completes, all the settings in your laptop will be set to default, Windows will be reinstalled and all the other software will be removed. You can now reinstall the programs and make partitions in the C drive.
Option 2: Format Sony VAIO Laptop with ASSIST Button
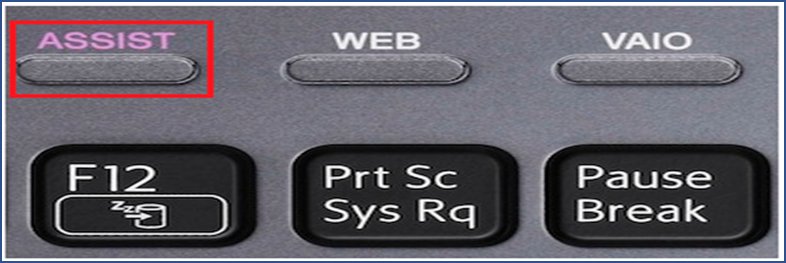
You may ask how to format Sony Vaio laptop if it doesn't turn on normally? In this case you can use the ASSIST button on Sony VAIO. What is the assist button on sony vaio? It is an additional button used to perform the regular maintenance of the laptop and to solve the problems that may occur while using the computer. The ASSIST button does different things based on the condition in which it was pressed.
Tips:
1) It starts VAIO Care when pressed while the laptop was on.
2) Displays VAIO Care in Rescue Mode when pressed while the laptop was off. You can use this option to recover the laptop in case of an emergency. Keep in mind that if the VAIO Care screen is displayed and no operation is performed for more than 5 minutes, the laptop gets turned off automatically.
You can use the assist keys to format your Sony VAIO laptop by the steps below.
- If your PC is turned on, you need to turn it off by pressing and holding the power key until the laptop turns off.
Restart the system and press the “Assist” button present on your laptop. The location of Assist button can vary based on different models of Sony VAIO series.

- The VAIO Care will open in Rescue Mode. A list of options with key names will appear on the screen.
Press the F10 key to choose Recover and maintain your system.

Now choose the preferred keyboard layout from the options displayed in the following window. Note that this layout will be used throughout the recovery process.

In the next window, choose Troubleshoot.

When the following options appear, choose Recovery and maintenance.

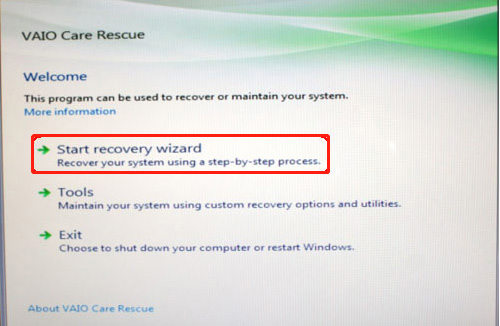
A list of Windows versions will appear. Choose the version that you want to install. The VAIO Care Rescue window will open. Click on Start Recovery Wizard from the options.

Now, you will be asked whether you want to rescue your data or not. It is good to rescue your data as it saves you from data loss while performing the recovery.

- Connect the hard disk.
Choose the drive and click Next.

- Click on the Start Rescue button to start backing up your data. Once the rescue has been completed, click on the Next button.
You will be asked whether you are sure that you want to start recovery. Check the ‘Yes, I am sure’ checkbox and click on the Start recovery button.

When it asks you to restart the laptop, click on the Restart button.

Tips:
If you reformat laptop without rescuing data, no backup will be available after the factory restore.
• Now, you will have two options i.e. Easy Rescue and Custom Rescue.
If you choose Easy Rescue, the system will automatically choose the location to store the backup of your data on the hard disk. If you choose Custom Rescue, you will have to choose the location to store the backup on the hard disk yourself.
Congratulations! Your Sony VAIO factory restore without disk has been completed successfully. It will automatically reset to factory settings. You can now install the required programs and change settings according to your requirements.
Part Two: No Format, No Password, How to Login Sony VAIO Laptop?
Forgetting or losing the device password is the worst thing that can happen to someone. There is nothing wrong with formatting your laptop system if it is a problem. But if you choose to format Sony Vaio because of forgetting your password, then you are totally wrong,which will put all data stored on your laptop at risk.
There are many ways to recover or reset a forgotten password, such as using an administrator account, using a password reset tool, etc. For your convenience, here are some of the best solutions:
Method 1: Resetting Sony VAIO Laptop Password Using PassFab 4WinKey Password Reset Tool
The best, recommended, easiest yet least risky way of resetting the password of your Sony VAIO laptop is using the PassFab 4Winkey windows Password Reset Tool. This tool provides you an attractive yet easy-to-use graphical interface that guides you step by step throughout the process of resetting the password. Using this tool, you can create a temporary recovery disk and unlock the password in few simple steps. To use this tool, follow these steps:
-
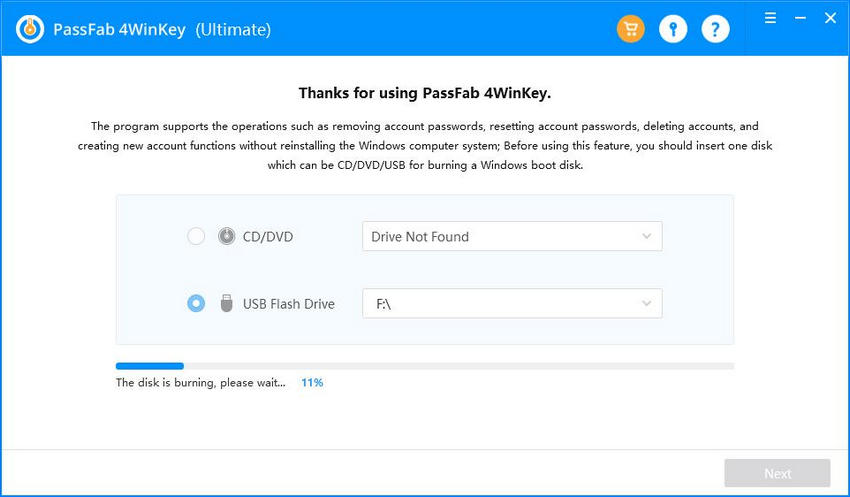
Download and install the PassFab 4WinKey Password Reset Tool on an unlocked PC and insert a USB/DVD/CD to burn Windows Password Reset Disk.

- Burn the disk following the steps shown on the screen. Now eject the drive from the PC and insert it in the locked Sony VAIO Laptop.
- Boot your locked laptop with the password reset disk you created in the previous step.
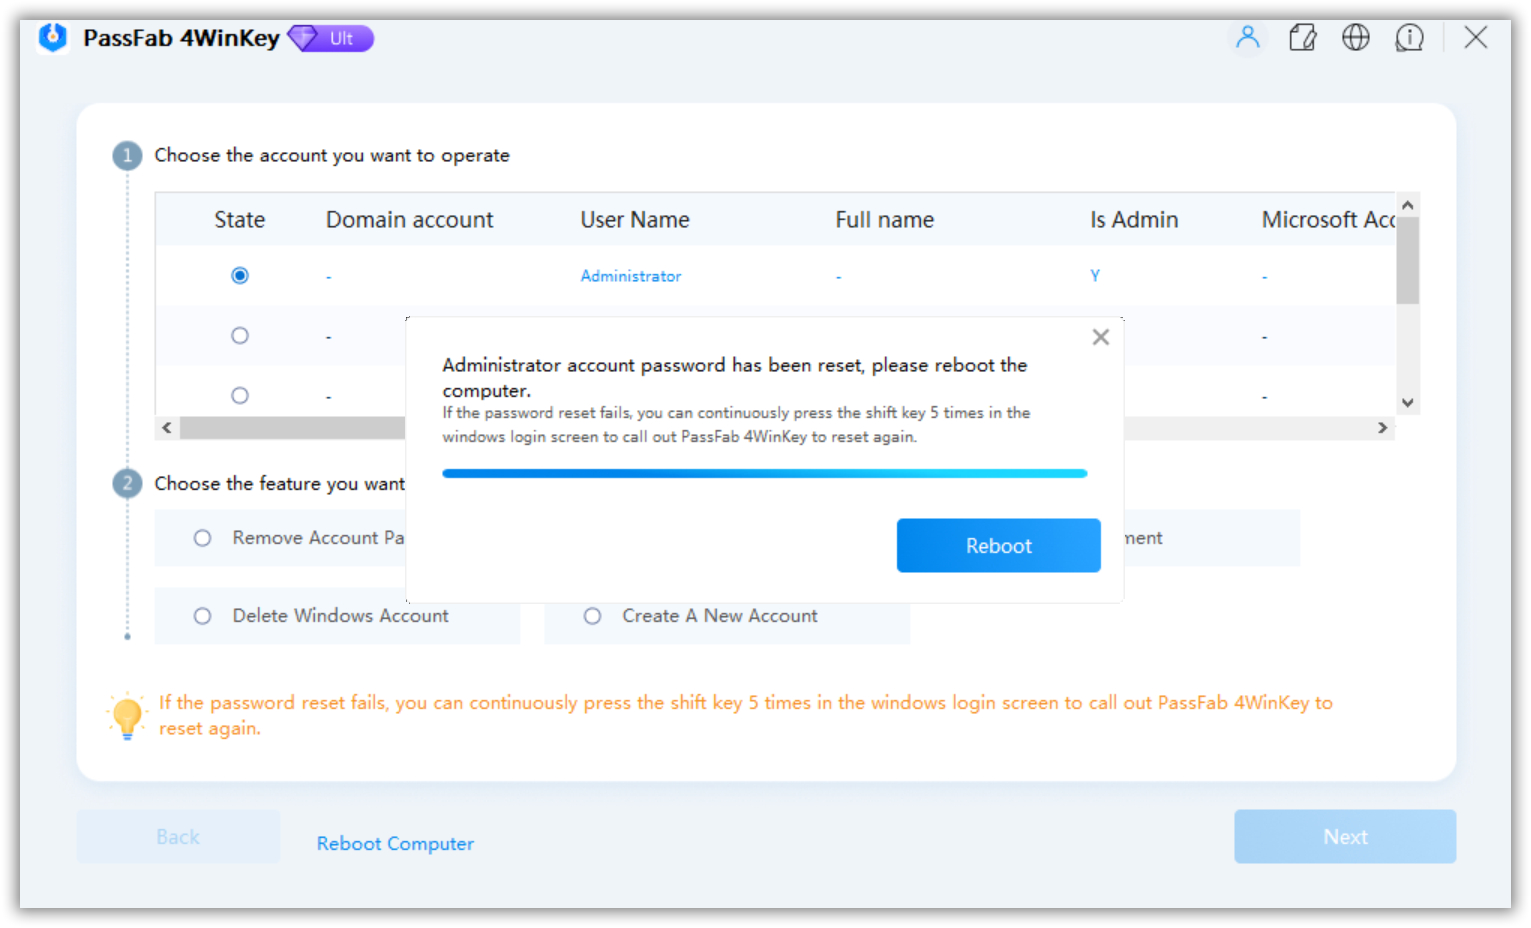
- When the password reset screen opens, choose the locked account and mark Change Account Password from the list of features.
Click on the Next button. You will be asked to enter the new password for that account. Enter the new password and click on the Reset button.

- Your Sony VAIO laptop will restart and the password will be reset.
You can now log in to your locked Sony VAIO laptop using the new password.
Method 2: Resetting Sony VAIO Laptop Password Using Microsoft Account (windows 8/10 only)
As a Windows 8 user, you should be familiar with Microsoft account features. As we know, local account is created and managed locally. Instead, a Microsoft account is the so-called Windows Live ID, which can be used to log in to all Microsoft products, including email, Windows Store, Outlook, and other partner websites.
Thus, you can reset the password of your Sony VAIO laptop online simply by clicking on the Reset Password link. You will be redirected to the Microsoft Accounts page.
- Visit the Microsoft login page via another system (mobile or working laptop).
Select the "I forgot my password" option. Click Next. Then type the Microsoft account and character

- Select the verification option you want, email or phone, and you will receive a verification code on your email or phone. Enter the code.
- Now enter the new password and confirm. Click Next. You can reset your password and log into your PC using the new password.
This method is easy to operate and straightforward. Certainly, if you had been familiar with the local account and hadn’t created a Microsoft account, this method cannot work for you. You can continue reading to find the method that suits you. Or you can try PassFab 4Winkey, whether you are using a local account or a Microsoft account,which is applicable.
Method 3: Resetting Sony VAIO Laptop Password using Safe Mode
You can reset the password of your Sony VAIO laptop by using the Safe Mode. This method is a bit more complicated, if you are familiar with computer technology, you can still give it a try. Unlike the previous method, you can use this method to perform Sony VAIO Windows 7 Recovery too.
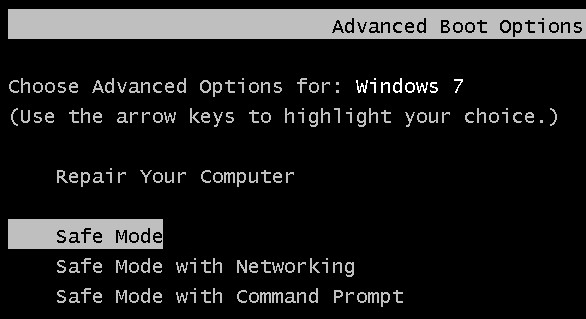
To reset the password using this method, restart your laptop and press the F8 key (win8: press shift+F8key). The Advanced Boot Menu Options will appear.

- Use the arrow key to navigate to Safe mode and press Enter to reset your password. After resetting the password, re-open the Advanced Boot Options Menu and choose Start Windows Normally.
You can now log into the system using the new password and format your Sony VAIO laptop.
Method 4: Resetting Sony VAIO Laptop Password using CMD
You can reset your Sony VAIO laptop account password using the CMD.
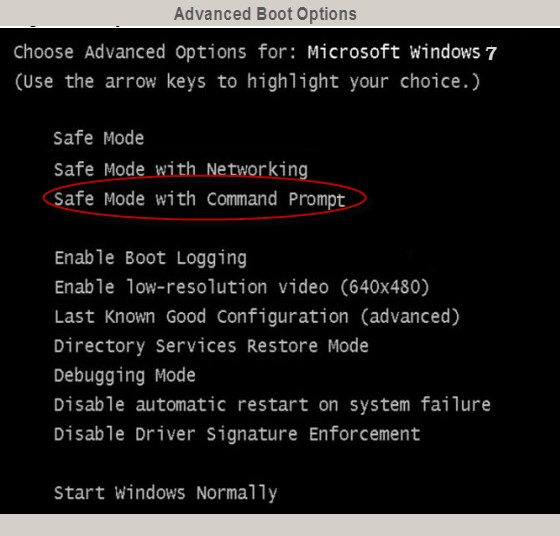
- To reset the password using this method, you will again have to open Advanced Boot Menu Options by pressing the F8 key (win8: press shift+F8key). while the laptop restarts.
Now, navigate to Safe Mode with the CMD option using the arrow keys. Press Enter.

- The command prompt window with administrative rights will pop up. Enter the username of the locked account and new password in the following command: C:\Windows\system32>net user username new_password
- After typing the above command, press Enter. Your account password will be reset automatically. Close the command prompt window and log into your Sony VAIO laptop using the new password.
If you are not a computer fan, it is not recommended that you use command prompt to unlock the password. Or you may end up severely damaging the system or data. option 1 is your best choice.
Conclusion
This article proposes different ways to format a Sony VAIO Laptop without a Disk by using Sony VAIO Recovery Center and VAIO Care through the Sony VAIO ASSIST button. Furthermore, this article provides different ways of resetting the forgotten Sony VAIO laptop password for someone who is not technical enough to format a laptop without logging into the system. It is recommended to do so by using the PassFab 4Winkey Password Reset Tool as it is the safest way of resetting and recovering a locked account.

