The Kmode exception not handled Windows 11 is a blue screen of death error that makes your system stuck in a restart loop. Most users encounter this error while upgrading to Windows 11 development and preview versions. This error is not specific to computers but also occurs in virtualization software like VMware or VirtualBox.
In this guide, you will learn the best ways to deal with the following errors:
- Kmode exception not handled Windows 11 boot loop
- Kmode exception not handled on startup
- Kmode exception not handled Windows 11 update
- Kmode exception not handled Windows 11 parallels desktop
- System thread kmode exception not handled Windows 11
Part 1. What Causes the System Thread Exception Not Handled Windows 11?
Part 2. How to Fix the KMODE EXCEPTION NOT HANDLED Windows 11?
- Solution 1: Smart Repair by PassFab FixUWinEasy and Quick
- Solution 2: Disable Fast Startup
- Solution 3: Check your RA
- Solution 4: Update the Problematic Driver
- Solution 5: Use Windows Memory Diagnostics Utility
- Solution 6: Turn off Early Launch Anti-Malware Protection (If applicable)
- Solution 7: Automatic Repair System Components with Command Prompt
- Solution 8: Clean Install Windows 11
FAQs
Part 1. What Causes the System Thread Exception Not Handled Windows 11?
When the error handler fails to catch an exception, the Kmode (Kernel Mode) generates Kmode exception not handled Windows 11 error. The Kmode program grants access to system memory and CPU instructions. The exception is an event triggered whenever a problem occurs during process execution.
This error generally occurs when a device driver overwrites the memory assigned to another element. However, it has some other reasons, such as,
- Outdated network driver
- Outdated BIOS
- Corrupted device drivers
- Faulty system memory
- Third-party antivirus software
- Incompatible hardware
Part 2. How to Fix the KMODE EXCEPTION NOT HANDLED Windows 11?
The following fixes will help you get rid of the error Kmode exception not handled Windows 11 boot loop:
Solution 1: Smart Repair by PassFab FixUWinEasy and Quick
PassFab FixUWin is an incredible tool that can fix most Windows errors by scanning it. You can resolve any blue screen and black screen, boot loop, restart loop, and other 200+ Windows errors with a few clicks. With its user-friendly interface, the tool gives you 100% security and eliminates issues without any privacy intrusion.
Here is how to fix kmode exception not handled Windows 11 boot loop by using this wonderful tool:
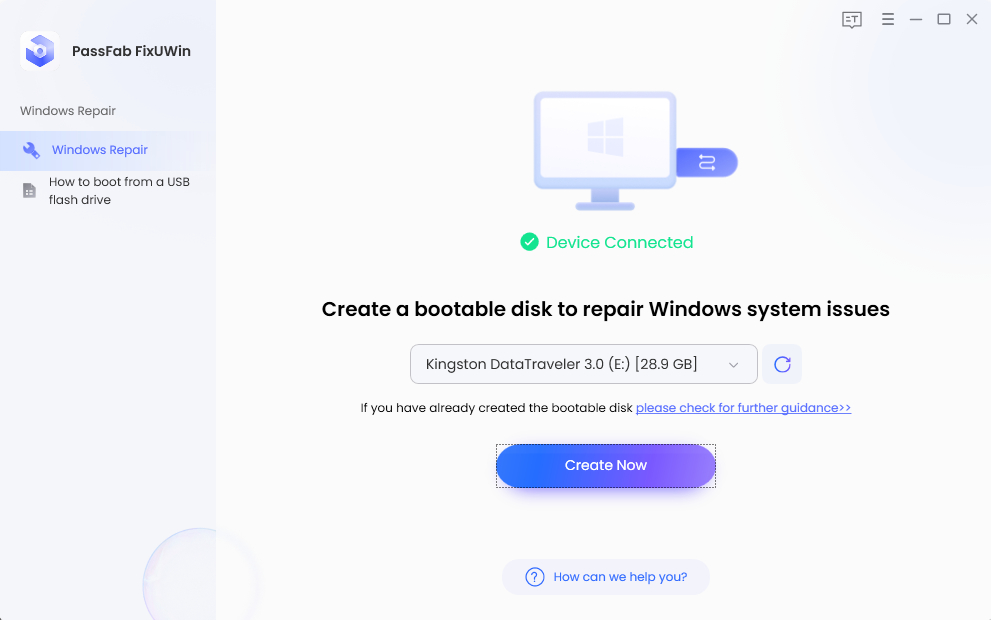
Step 1. Download and install PassFab FixUWin, insert a USB drive in the port, and select the Create boot disk Now button.
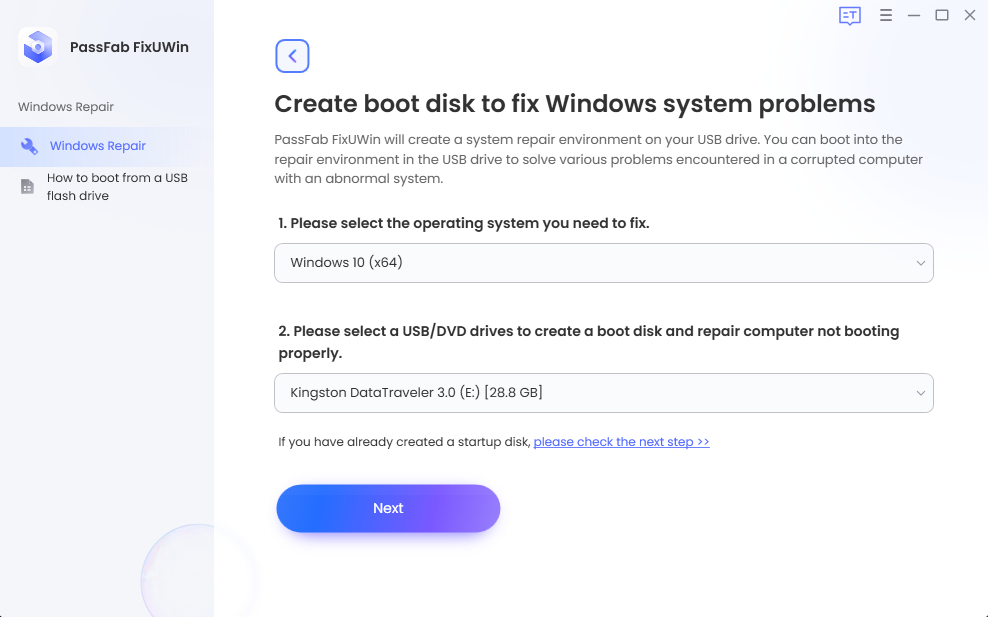
Step 2. Select the USB drive and click the Next button.
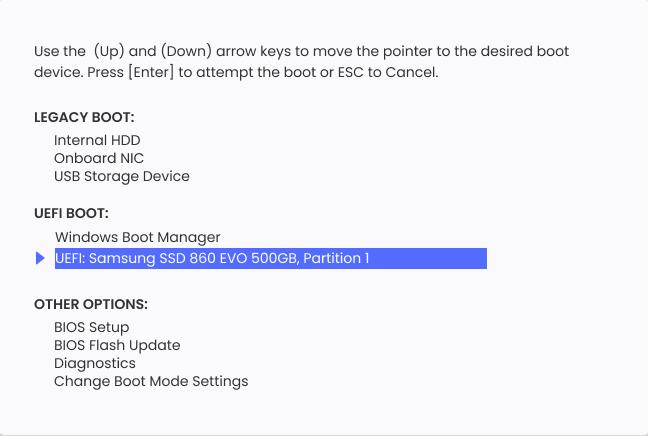
Step 3. Restart the PC and press the Boot key. Set the USB drive on boot priority, save changes, and exit.
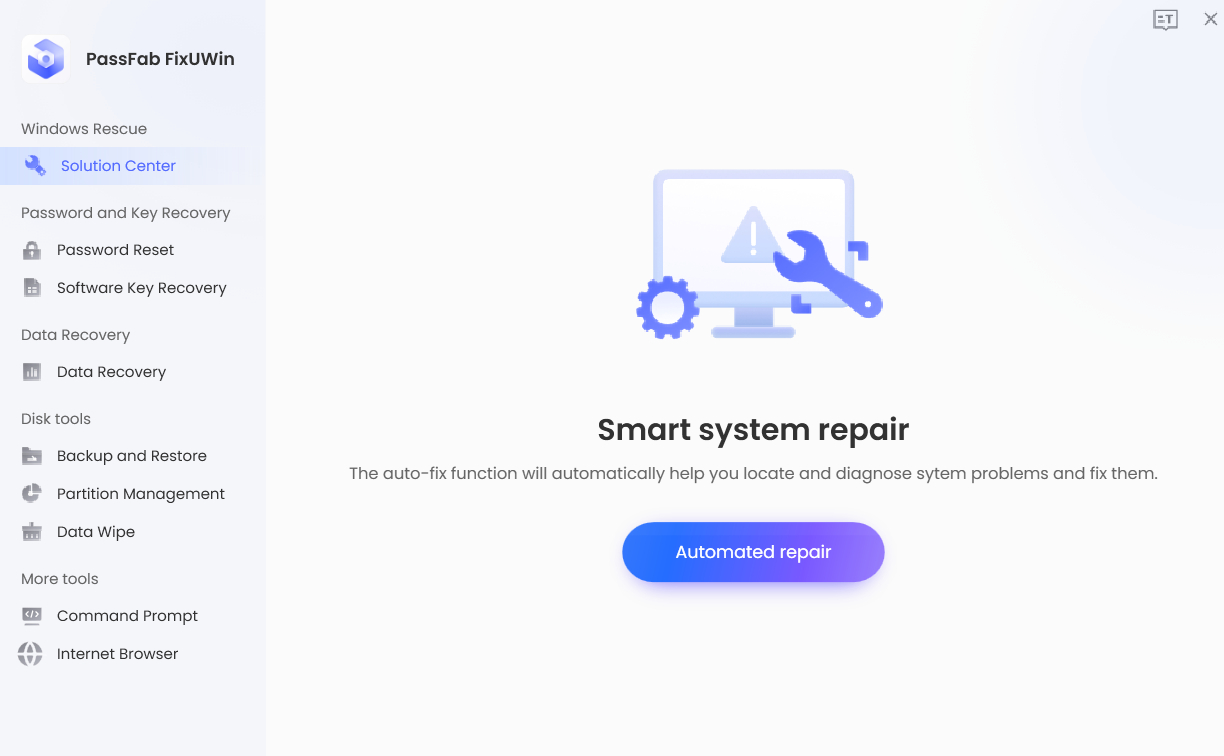
Step 4. Now, click Automated Repair.
Step 5. Choose the partition requiring repair and click Start Repair.
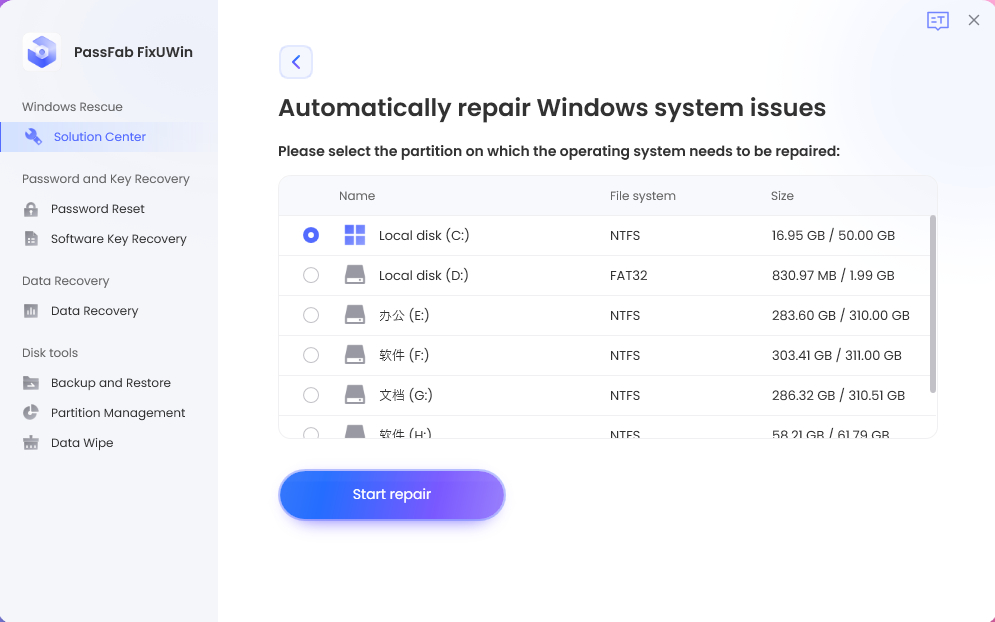
Wait patiently for the process to complete. The more data on the chosen partition, the more time it will take to repair.
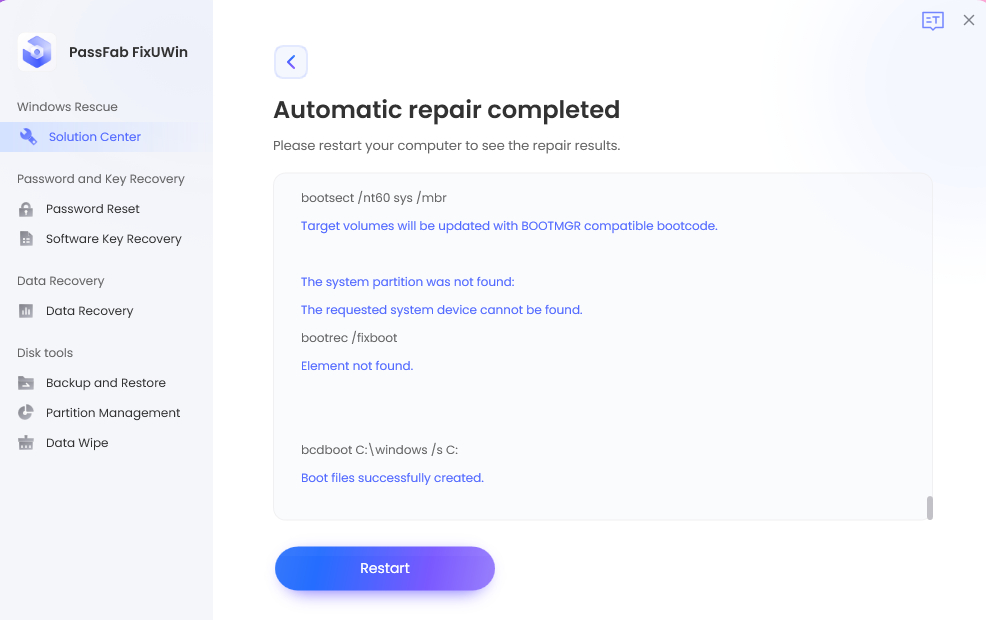
Step 6. To restart the PC, click Restart.
Solution 2: Disable Fast Startup
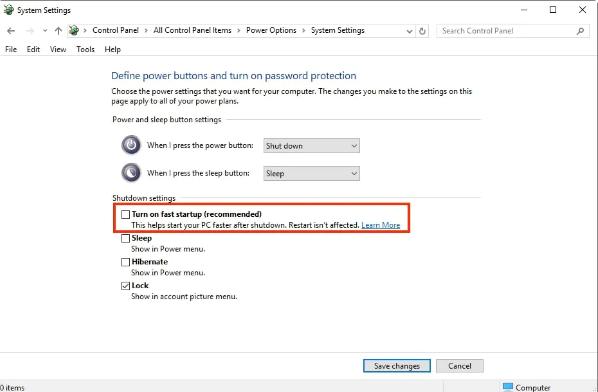
The Fast Startup feature lets the system turn on faster by preloading drivers. Sometimes, this feature creates issues like Kmode exception not handled on startup. You can try disabling it in an attempt to fix the addressed issue as follows:
Note: After deactivating Fast Startup, your system will take longer than usual to start up and shut down.
Step 1. Open Control Panel à System and Security à Power Options.
Step 2. Select the What the power button do option.
Step 3. Click Change settings currently unavailable.
Step 4. Finally, uncheck the Turn on fast startup (recommended) and then Save changes.
Solution 3: Check your RAM
A faulty RAM can be a culprit behind Kmode Exception not handled Windows 11 update, especially if you use a dual-channel kit. Some users resolved this error by simply removing the faulty stick. You can also try removing one stick. If the error persists, put it back in place and remove the other one and reboot your PC again.
However, if removing both RAMs did not fix the issue, you can move to the next solution.
Solution 4: Update the Problematic Driver
When you have an incompatible or outdated driver, the Kmode exception not handled Windows 11 error can be triggered. It is recommended to update all the drivers to prevent this problem.
Step 1. Enter the Windows Recovery Environment (WinRE) and boot Windows into Safe mode.
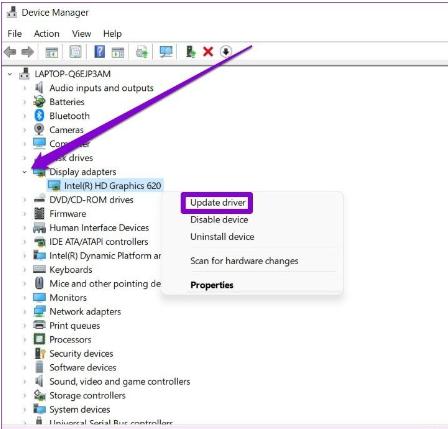
Step 2. Press Windows + X keys together and choose Device Manager from the menu.
Step 3. Look for the devices with an exclamation mark and right-click on it.
The exclamation mark indicates pending driver updates.
Step 4. Choose Update driver à Search automatically for the updated driver software.
Step 5. Once all the drivers have been updated, exit the Safe mode and restart your computer.
Solution 5: Use Windows Memory Diagnostics Utility
Occasionally, the Kmode exception not handled Windows 11 parallels desktop occurs due to memory issues in the system. Windows Memory Diagnostics is a tool used to test system memory. We recommend that you run this tool to check your RAM for faults.
Step 1. Boot Windows in Safe Mode, open the Run dialog, and type “mdsched.exe.” Hit OK.
Step 2. Select Restart Now and check for problems as recommended.
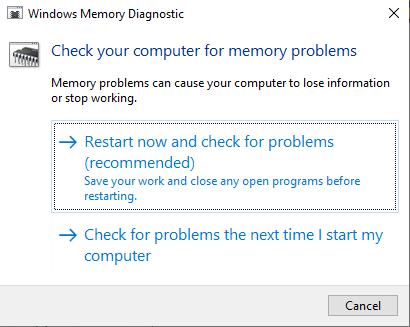
The Memory Diagnostics Tool will start scanning for errors. If any issues are found, you will have to replace the RAM.
Solution 6: Turn off Early Launch Anti-Malware Protection (If applicable)
Using third-party antivirus software will most likely conflict with system routines and generate system thread kmode exception not handled Windows 11. As Windows 11 is still improving, it does not fully support some third-party programs and utilities, creating unexpected issues. Therefore, you should try disabling early launch anti-malware protection by following the instructions below:
Step 1. Go to the Start menu and click Power Button.
Step 2. Choose the Restart option while pressing the Shift key.
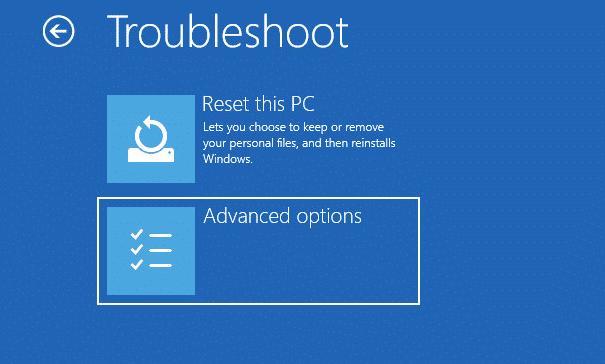
Step 4. Select Startup Settings and press restart button.
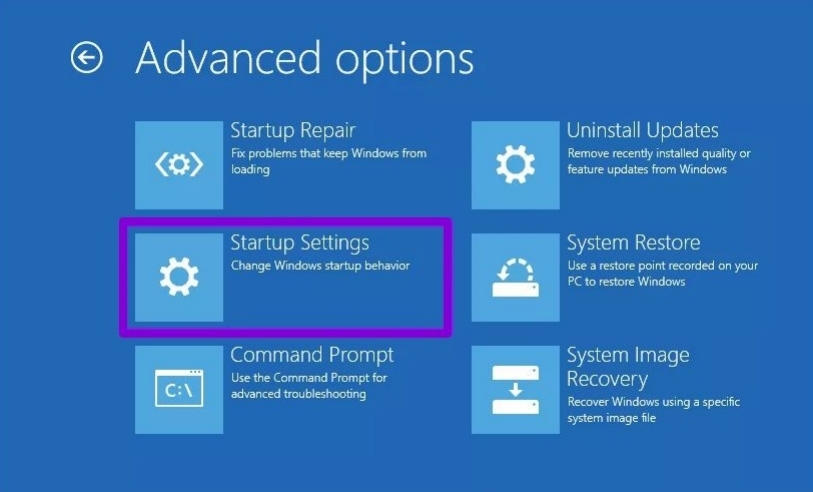
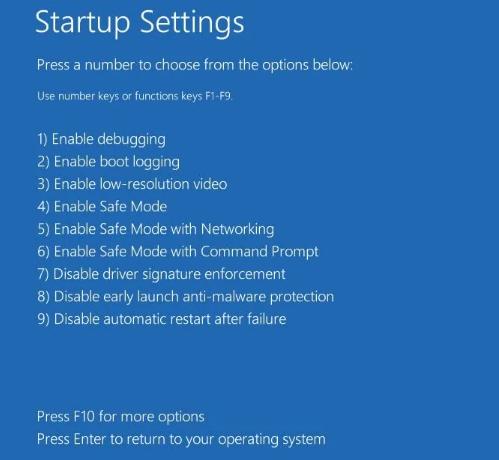
Step 5. When you see the Startup Settings menu, press the F8 key to disable early-launch anti-malware protection.
Solution 7: Automatic Repair System Components with Command Prompt
DISM (Deployment Image Servicing and Management) can automatically scan and repair system errors by rebuilding the Windows Image file. Running this tool can fix the Kmode exception unhandled Windows 11 error if a damaged Windows Image is causing it.
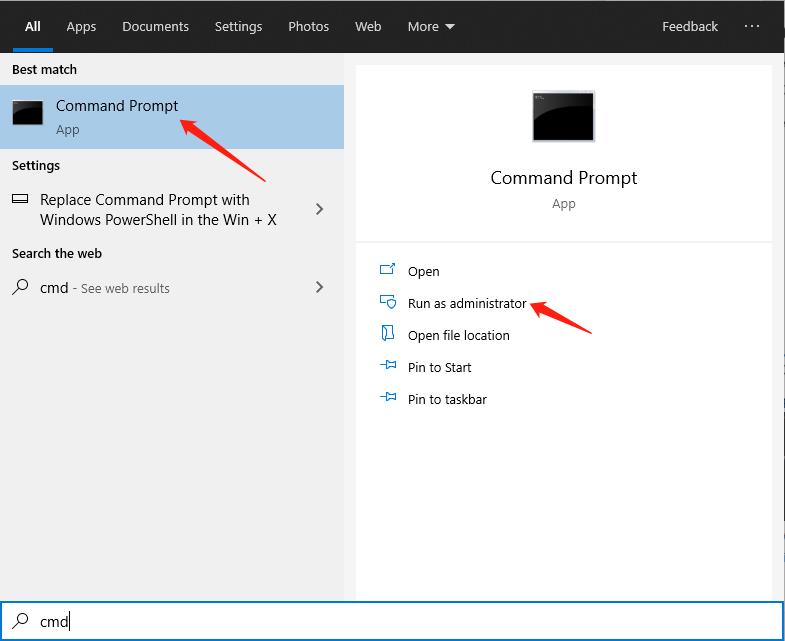
Step 1. Boot in Safe mode, search “cmd” in the Search bar, right-click the Command prompt, and Run as administrator.
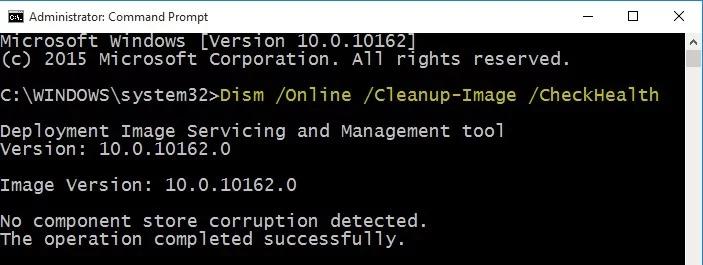
Step 2. Type “Dism /Online /Cleanup-Image /CheckHealth” command then hit Enter.
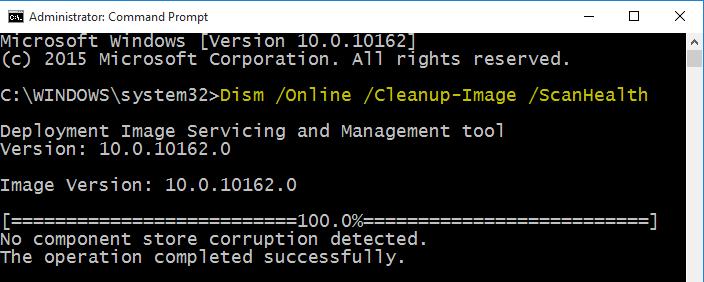
Step 3. Input command “Dism /Online /Cleanup-Image /ScanHealth” then hit Enter.
warning:
Avoid shutting down the system if the loading screen freezes for some time, as this process sometimes takes 5 to 20 minutes to finish.
Step 4. Type “Dism /Online /Cleanup-Image /RestoreHealth” and hit Enter to perform the repair operation here.
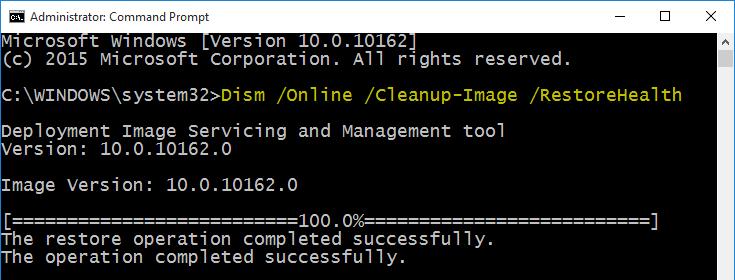
Wait until the process completes, as it takes some time, depending on the system specs and the image size.
Solution 8: Clean Install Windows 11
If none of the above solutions worked to fix the KMODE_EXCEPTION_NOT_HANDLED Windows 11 on startup, performing a clean installation of Windows 11 is your last resort. You can reinstall Windows 11 in many ways, but you may lose some data and applications during this process. Therefore, we recommend backing up any important files and data before proceeding.
Step 1. Insert a Windows 11 Installation Disk in the faulty system and restart it.
Step 2. Set the language and preferred input method, click Next.
Step 3. Click the Install Now, and Enter the product key(if any).
Step 4. Choose the Windows version you want to install and accept the license terms.
Step 5. Then choose the installation type, the disk you want to install the Windows 11 in, and hit the Next button.
Step 6. Continue by following the prompts and wait until Windows 11 starts.
Bingo! You have successfully resolved the Kmode exception error in Windows 11.
FAQs
Q1. How to fix the blue screen error in Windows 11 using Command Prompt?
You can resolve BSoD errors in Windows 11 using CMD by following the steps below:
Step 1. Open CMD as administrator.
Step 2. Type “SFC/scannow”, press Enter.
Step 3. Restart the system after the completion of the process.
Q2. How do I fix system service exceptions in Windows 11?
System Service Exceptions is a specific error that can occur in Windows operating systems. When a system service encounters an unexpected condition or exception that it cannot handle, it triggers a system service exception, resulting in a blue screen of death (BSOD) and a system shutdown to prevent further damage. Many solutions will surely help you in resolving system service exceptions in Windows 11, such as,
- Reinstall the Graphic Drivers
- Update Windows
- Run the DISM command
- Run the CHKDSK command
- Check RAM
- Turn off the Fast Startup feature
- Perform virus and malware scan
- Update the drivers
Conclusion
Kmode exception not handled Windows 11 is a common issue many face daily. In this article, we have addressed this error with the best possible methods to rescue you if you ever face kmode exception not handled on startup or after updating your PC. Besides all the solutions, Smart Repair by PassFab FixUWin is the most recommended because of its ease and security.
