Microsoft Defender Antivirus is an anti-malware program built into the Windows system to protect it from potential viruses, malware, and hackers. But sometimes, when the Defender prevents you from performing any action, or you have to change the settings conflicting with the antivirus, you may want to turn off the Microsoft Defender Antivirus temporarily or permanently.
In this article, you will learn how to turn off Windows Defender in Windows 10/11. Stay tuned and try out the given ways!
Part 1. How to Completely Disable Microsoft Defender Antivirus on Windows 10/11?
- 1. Disable Microsoft Defender with Windows Security
- 2.Disable Microsoft Defender with Group Policy Editor
- 3.Disable Microsoft Defender with Third-Party Application
- 4.Disable Microsoft Defender with Command Prompt
- 5.Enable or Disable Microsoft Defender Antivirus with REG file
Part 2: Extra tips - What to do if Your Computer Suffers a Malicious Virus Attack?
Part 1. How to Completely Disable Microsoft Defender Antivirus on Windows 10/11?
The Windows system does not allow you to uninstall Windows Defender. However, you can always permanently disable Windows Defender Windows 10/11 through the following workarounds:
1. Disable Microsoft Defender with Windows Security
Sometimes, you do not need to permanently turn off Windows Defender Windows 10/11, especially when you face antivirus conflicts with another application or installation. Instead, you can temporarily disable it through Windows Security as follows:
Step 1. First of all, go to the Start menu and search for Windows Security.
Step 2. Now, choose Virus & Threat Protection.
Step 3. Click the Manage Settings option.
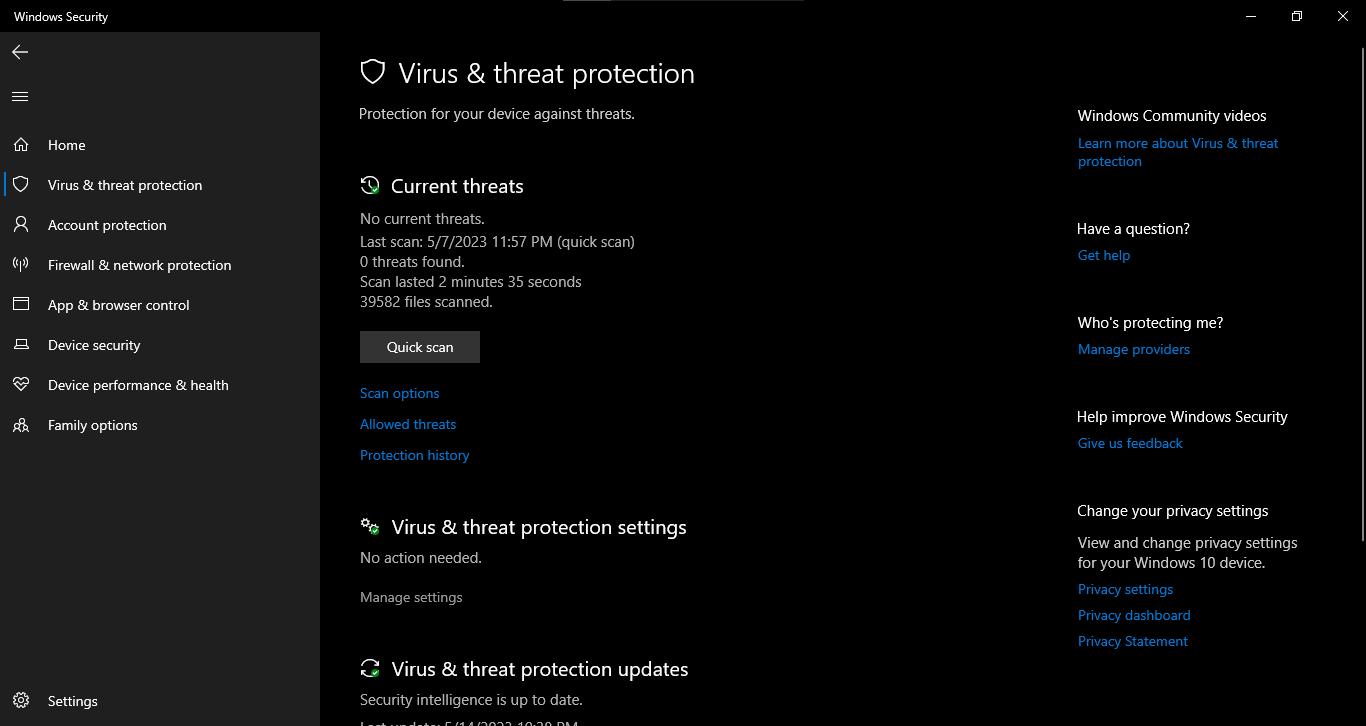
Step 4. Now, turn off the Real-Time protection toggle switch.
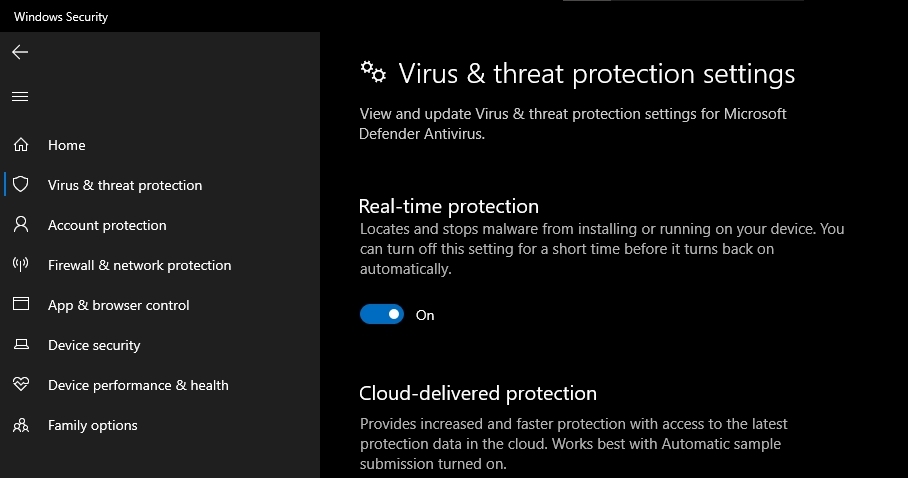
You have successfully turned the Microsoft Defender off temporarily.
2. Disable Microsoft Defender with Group Policy Editor
Group Policy Editor is an amazing tool that allows you to customize Windows Settings. It also lets you permanently disable Windows Defender Windows 10/11, but before applying the policy, you must disable the Tamper protection that prevents any changes in Windows security settings. Follow the steps below to turn off the Tamper protection:
Note: Follow these steps if you use Windows Home Edition. If you are a Windows Pro or Enterprise user, you can skip steps 1 and 2:
Step 1. Go to the Start menu, search Windows Settings, go to Virus and Threat Protection, and click the Manage Settings link.
Step 2. Toggle Tamper Protection switch to turn it off.
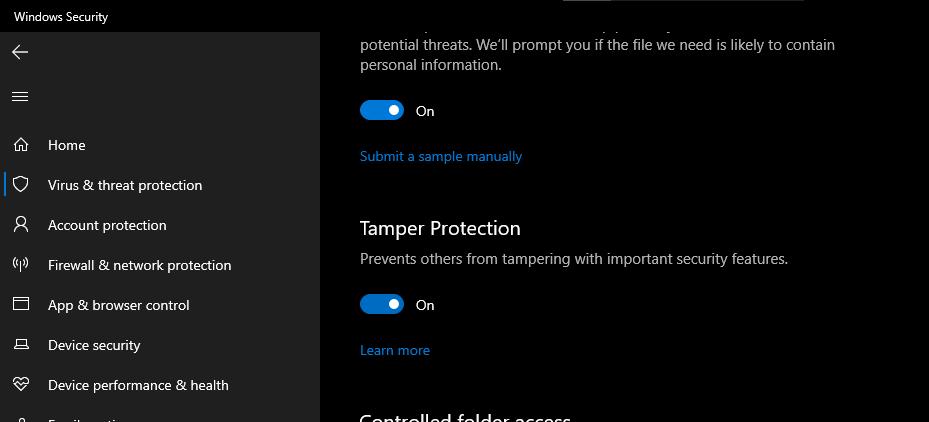
Now, follow the following steps to turn off Windows Defender permanently through Group Policy Editor:
Step 3. Press Windows + R keys to initiate the Run dialog and type “gpedit.msc” -> hit Enter.
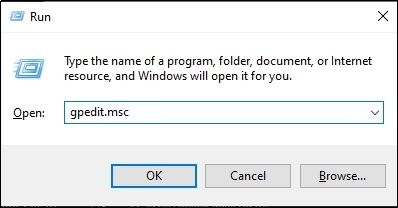
Step 4. Go to Computer Configuration when the Group Policy Editor launches.
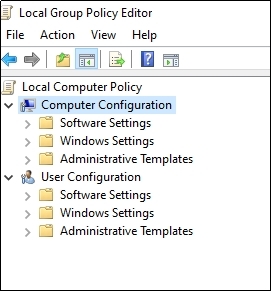
Step 5. Double-click on the Administrative Templates.
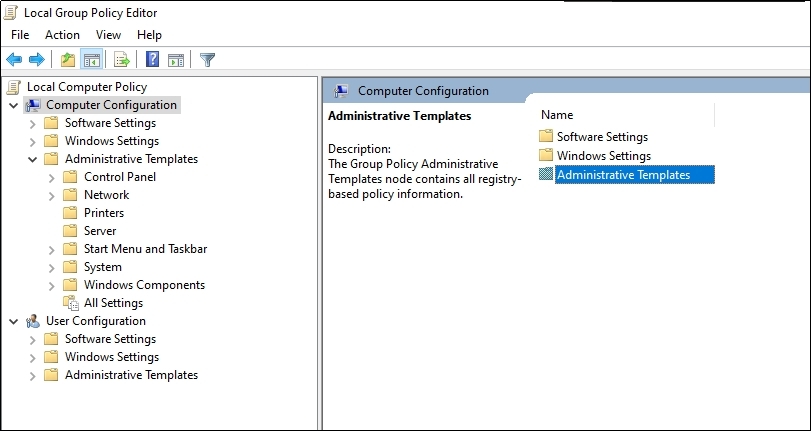
Step 6. Go to Windows Components.
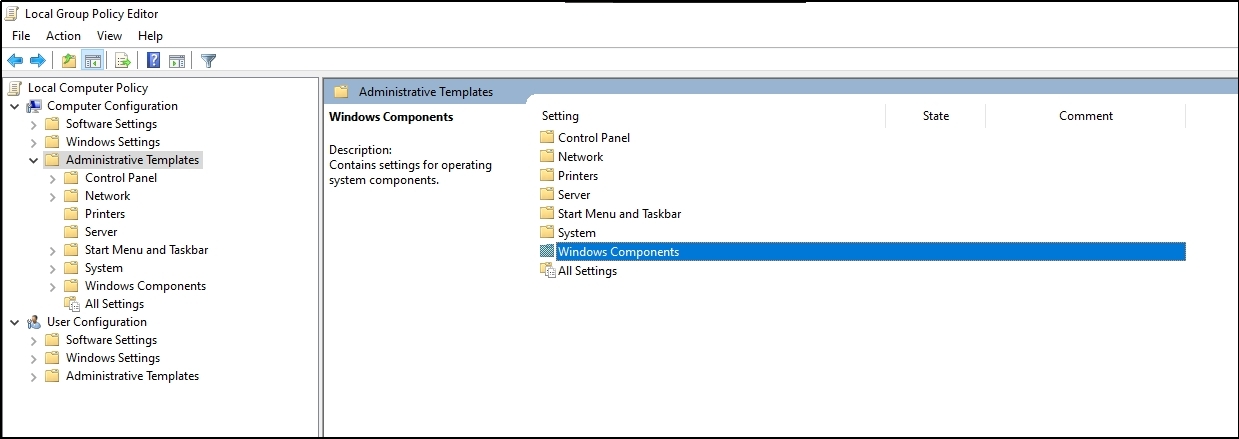
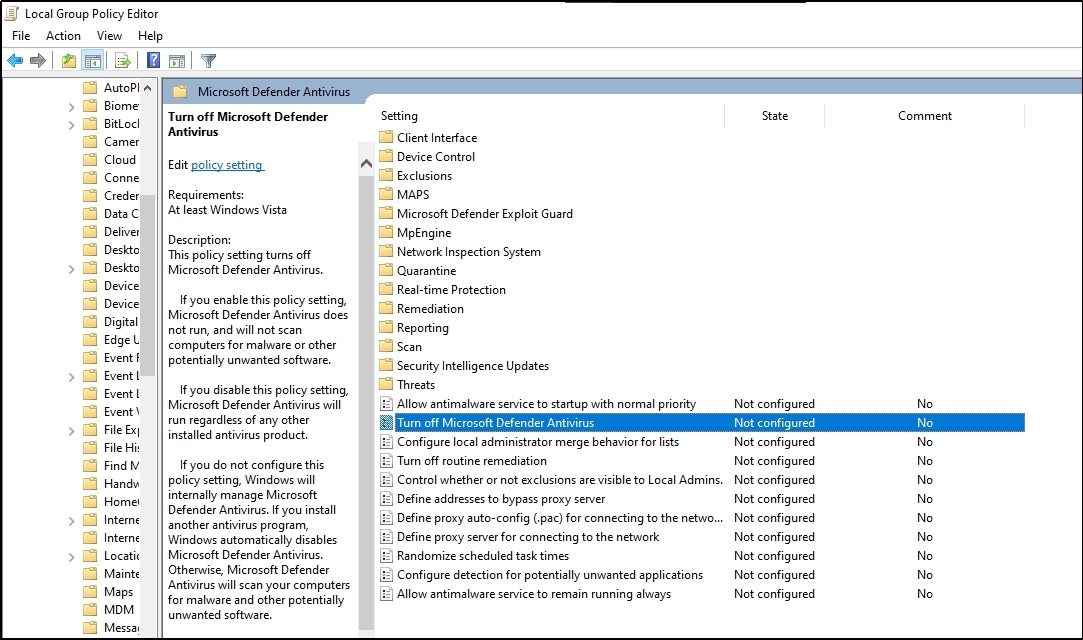
Step 7. Look for Microsoft Defender Antivirus and double-click on it.
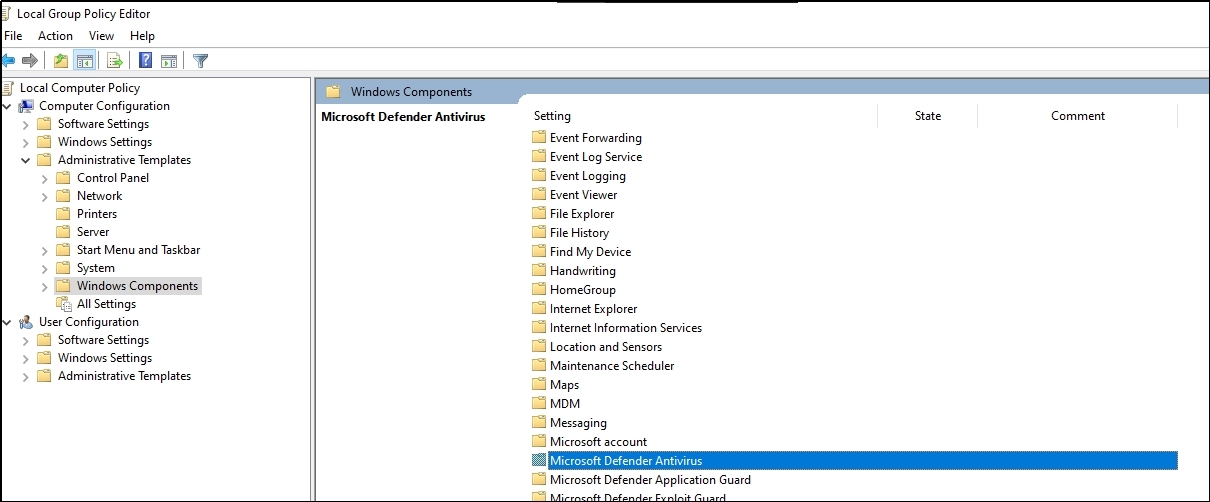
Step 8. Double click on turn-off Microsoft Defender Antivirus policy.
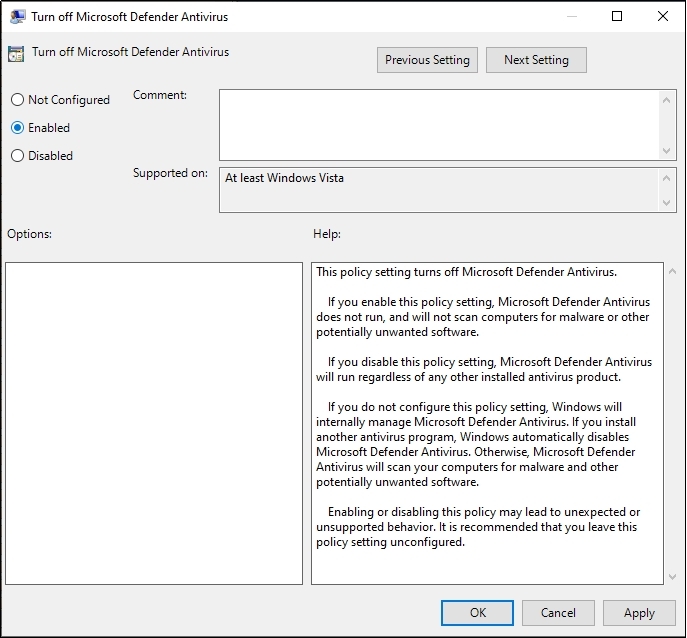
Step 9. Choose Enabled, click Apply, and then Ok to apply changes.
Step 9. Restart your computer.
When your computer restarts, the Microsoft Defender will be turned off permanently.
3. Disable Microsoft Defender with Third-Party Application
If you're seeking an alternative to Windows Defender, consider utilizing a third-party antivirus program. The installation of such a program will automatically disable Microsoft Defender, as Windows recognizes the presence of another antivirus solution. BitDefender is a solid choice, though the process is similar for most antivirus programs.
Step 1. Choose an Antivirus Program
Decide on a preferred antivirus software. For this example, we'll use BitDefender.
Step 2. Install Antivirus Program
Follow the installation process of your chosen antivirus program. This typically involves downloading the installer, executing it, selecting options (if any), and agreeing to license terms.
Post-installation, Windows Defender should automatically be disabled, replaced by your chosen antivirus solution.
4. Disable Microsoft Defender with Command Prompt
If you do not want to get into advanced settings or use any third-party software and wonder how do I turn off Microsoft Defender Antivirus, here is the best solution for you. You can also turn off Windows Defender permanently through the Command prompt. You only need to copy and paste the registry modification command as follows:
Step 1. Press Windows + R keys simultaneously to launch the Run dialog.
Step 2. Type “cmd” and press Ctrl + Shift + Enter to launch CMD with administrator privileges.
Step 3. Copy and paste the following command in CMD and hit Enter button:
- “reg add "HKEY_LOCAL_MACHINE\SOFTWARE\Policies\Microsoft\Microsoft Defender" /v DisableAntiSpyware /t REG_DWORD /d 1 /f”.
Step 4. When you see the “The Operation completed successfully” message on the screen, close the Command Prompt Window and restart your PC.

5. Enable or Disable Microsoft Defender Antivirus with REG file
You can enable or disable the Windows Defender Antivirus by changing the system Registry file. Here are the steps to follow in each situation:
Disabling Windows Defender Antivirus:
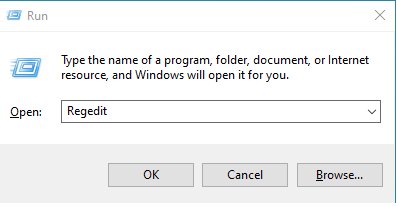
Step 1. Press Win + R, type “regedit” in the Run window, and press CTRL + Shift + Enter to open the registry editor in Admin mode.
Step 2. Copy and paste the following in the address bar:
- Computer\HKEY_LOCAL_MACHINE\SOFTWARE\Policies\Microsoft\Windows Defender
Step 3. Right-click on Windows Defender, go to New, and choose DWORD (32-bit) Value.
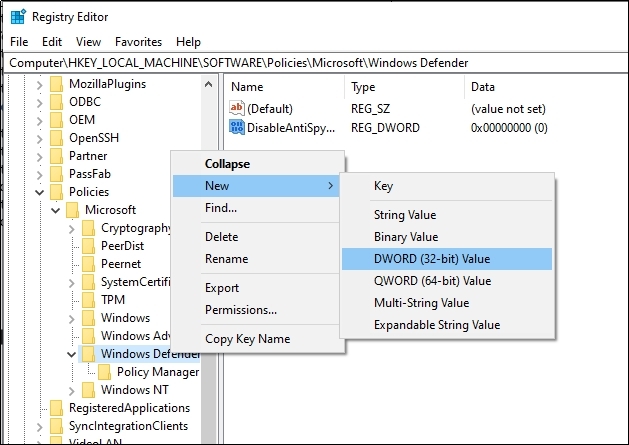
Step 4. Name the new DWORD as DisableAntiSpyware and double-click on it.
Step 5. Set the Value Data to 1 and click OK.
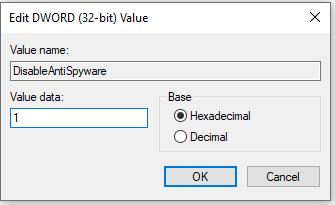
Now, restart the computer and go to the Virus & Threat protection. You will see that no antivirus is currently active on your system. However, you can repeat the steps above if you wish to re-enable the Microsoft Defender Antivirus.
Part 2: Extra tips - What to do if Your Computer Suffers a Malicious Virus Attack?
If you see a blue or black screen after turning the Windows Defender off, your computer has caught a virus that has damaged the system files required for the computer’s normal functioning. However, you do not need to worry about such a situation, as PassFab FixUWin has your back.
Passfab FixUWin is an all-in-one Windows repair tool that helps you fix any Windows problem within a few clicks without risking your security or privacy. This incredible tool can resolve 200+ Windows errors such as blue/black screen, PC crashing, restart loop, stuck on the loading screen, and much more. Besides, you can use it to manage your system resources efficiently. You can use this most recommended tool to resolve Windows errors as follows:
Step 1. Download & Install PassFab FixUWin
Download it from official PassFab website on a functioning PC.
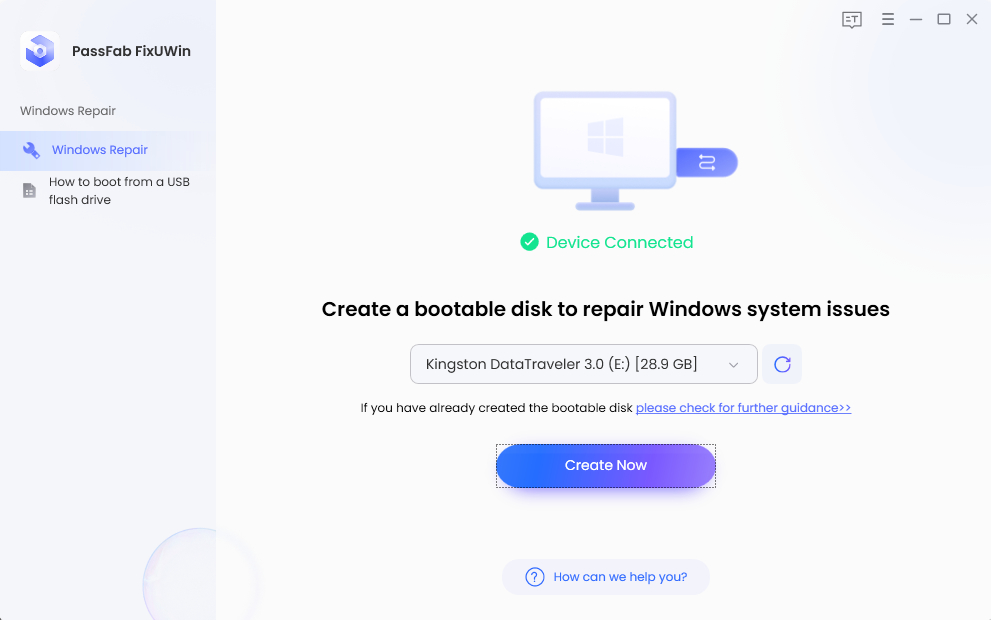
Step 2. Preparing the Bootable USB Drive
With PassFab FixUWin launched, connect a USB drive to your PC. The program will recognize it automatically. Select 'Create boot disk now' in the software, choose your USB drive, and click 'Next'. The software will proceed to create a bootable USB.
Step 3. Moving Bootable USB to Problematic PC
After the bootable USB drive has been successfully created, safely eject it from the working PC. Move to the problematic PC and plug the bootable USB drive into an available USB port.
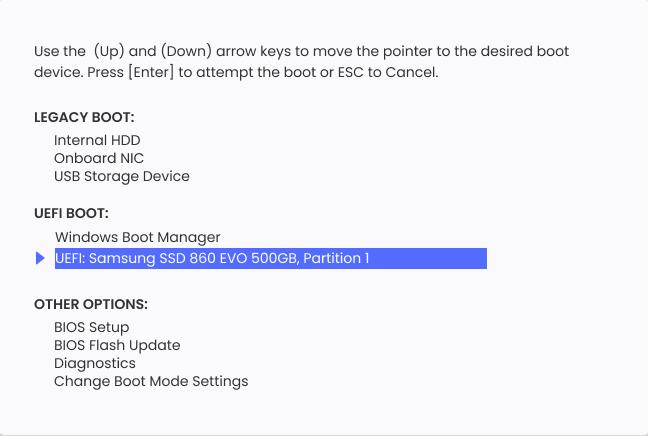
Step 4. Booting from the USB Drive
Turn on the troubled PC. When the manufacturer's logo shows, repeatedly press the boot key (often F12, F10, F9, or F8) to open the boot menu. Set the USB drive as the primary boot device, save changes, and exit. The PC will then boot from the USB.
Step 5. Using PassFab FixUWin for Automated Repair
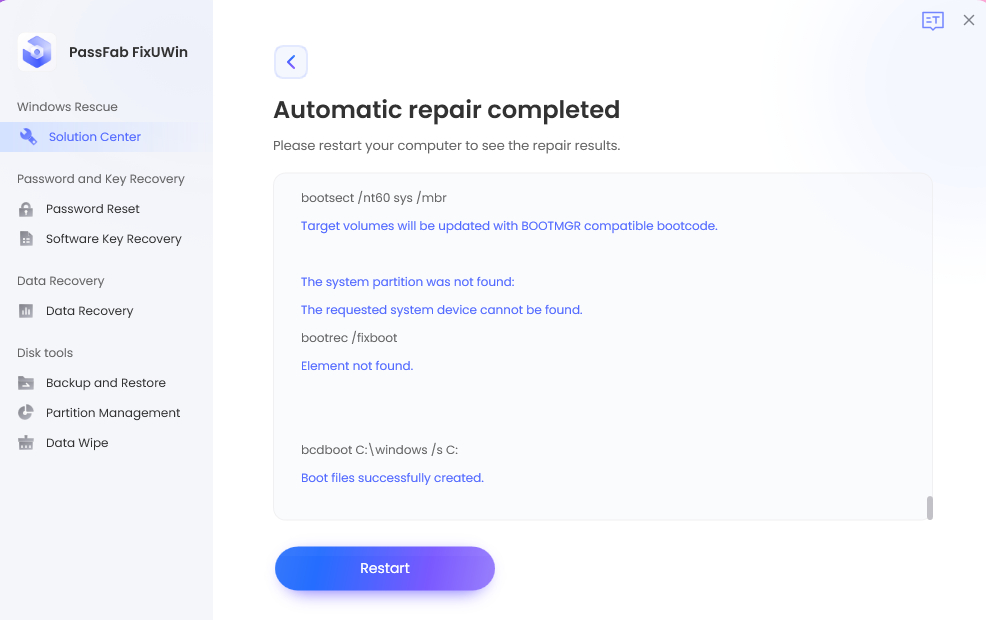
In PassFab FixUWin's interface, click 'Automated Repair'. Select the partition needing repair and start the process.

Step 6. Restarting the System
After the repair, click 'Restart'. The system should now function properly.
Final verdict
The Windows Defender Antivirus sometimes causes problems by conflicting with other programs. Although you cannot uninstall it entirely from the system, this article elaborates on how to turn off Windows Defender in Windows 10. The different ways discussed in the article include disabling Microsoft Defender using Windows Security, Group Policy editor, with a third-party application, command prompt, and with the help of REG file.
Besides, it also covers recovering your faulty PC after a virus attack using the best Windows repair tool, i.e., PasFab FixUWin.
